
Follow me on LinkedIn - AI, GA4, BigQuery

Note: Before you move forward, make sure that you have connected your GA4 property with a BigQuery project. If you haven’t then check out this article first: GA4 BigQuery – Connect Google Analytics 4 with BigQuery

Introduction to custom GA4 schema

When you send data from a GA4 property to BigQuery, you use the default schema (i.e. structure) provided by Google. 

As a result, Google automatically created a set of tables (‘events_‘ and ‘events_intraday_‘) in the pre-built dataset (“analytics_<property_id>“).

You do not get the option of creating the data tables you want or setting the fields you want to see in the data table(s):
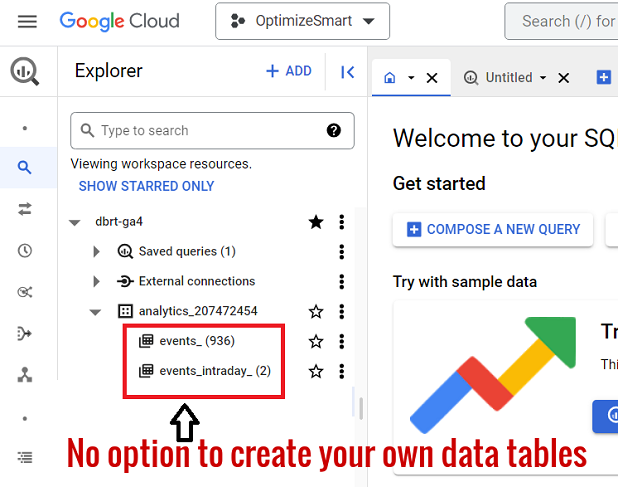
no option to create your own data tables

When you use the default schema you have no control over the fields (columns) that appear in your data tables and no control over the number and type of data tables you see in your dataset.
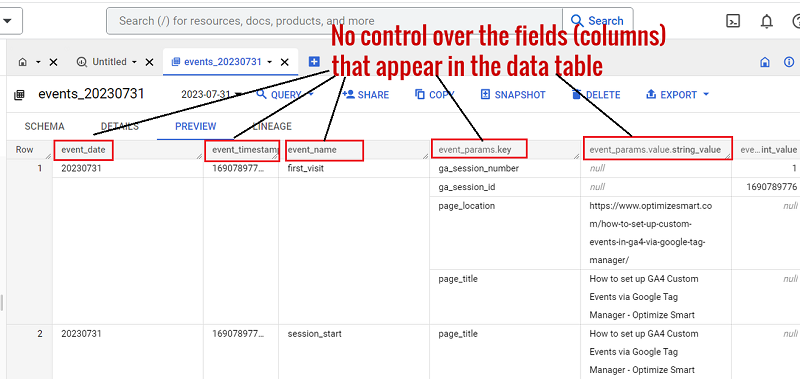
no control over the fields

If you want to see your data tables with only the fields you want, then you need to first create your own schema (also called Custom Schema).

The custom schema that you create depends on the data source being used.

For example, if you are using GA4 as a data source, then you define a schema by selecting the dimensions and metrics you want to see in your data table. 

Then you add one or more queries to it.

The GA4 data that you send to BigQuery via custom schema is called the custom GA4 data.

How to send custom GA4 data to BigQuery

Following is the 10,000 foot view of sending custom GA4 data to BigQuery:

#1 Create a new BigQuery project where you are going to store GA4 data in BigQuery. If you already have a BigQuery project, use that one to create a new dataset for storing Custom GA4 data.

#2 Create a new dataset in your existing project for storing custom GA4 data. You can also use an existing dataset, but I prefer creating a new dataset to make data management easier.

#3 Find and use a third-party solution (connector) for sending custom GA4 data to BigQuery. I am going to use Supermetrics for BigQuery connector. I have tested many other paid connectors (like dataddo, fivetran, stitch etc.). Supermetrics is the most reliable and cost-effective so far.

#4 Create a new Google Cloud service account to use BigQuery with Supermetrics. You only need to complete this task once for all subsequent data transfers via supermetrics.

#5 Create a new JSON key for your new service account. You only need to complete this task once for all subsequent data transfers via supermetrics.

Note: You would need only one service account with one key creating 1 JSON for a single BigQuery project. It’s only if you want to write to a different BQ project that you would need a different service account, key and JSON.

#6 Start the free trial or sign up straightaway for the Supermetrics for BigQuery connector. You only need to complete this task once for all subsequent data transfers via supermetrics.

#7 Connect Supermetrics to Google BigQuery.

#8 Connect Supermetrics to Google Analytics 4.

#9 Create a wireframe of your data table.

Figure out the overall layout and format (wireframe) of how your GA4 data table should look in BigQuery.

#10 Create a custom schema.

Based on your wireframe, create a custom schema via a third-party solution (connector). 

#11 Create a new destination for your data transfer.

Before you can create data transfer in Supermetrics, you will need to create a destination for your GA4 data.

#12 Create a new data transfer for Google Analytics 4.

#13 Check for the imported GA4 data in BigQuery.

#14 Query the GA4 data in the desired format.

Create a new dataset for storing Google Analytics 4 data.

Follow the steps below to create a new dataset for storing custom GA4 data in your existing project:

Step-1: Navigate to your BigQuery account: https://console.cloud.google.com/bigquery 

Step-2: Make sure that you are in the correct project where you want to store the GA4 data:

Make sure that you are in the correct project 3

Step-3: Click on the three dots menu next to the project ID where you want to store the GA4 data:

Click on the three dots menu next to the project ID

Step-4: Click on ‘Create Dataset’:

Create Dataset bigquery 1

Step-5: Name your data set (e.g. ‘custom_ga4’) and then click on the ‘Create Dataset’ button:

custom ga4

You should now see the new dataset created under your project ID:

the new dataset created

Note: The ‘custom_ga4’ dataset does not contain any data table or any data. For that, you would first need to create a data transfer.

Find and use a third-party solution (connector)

Find and use a third-party solution (connector) for sending custom GA4 data to BigQuery. I am going to use Supermetrics for BigQuery connector.

They provide a free 14 days trial of their solution. No credit card is required.

Create a new Google Cloud Service account.

You need to create a new Google Cloud service account to use GA4 with BigQuery via supermetrics.

Note: You only need to complete this task once for all subsequent data transfers via supermetrics.

Follow the steps below to create a new Google Cloud service account to use GA4 with BigQuery via Supermetrics:

Step-1: Click on the burger menu located at the top left of your Google Cloud Console account:

the burger menu bigquery

Step-2: Navigate to IAM & Admin > Service Accounts:

Service Accounts google cloud

Step-3: Click on the link ‘+CREATE SERVICE ACCOUNT’:

CREATE SERVICE ACCOUNT 2

Step-4: Type ‘supermetrics’ as the service account name and then click on the ‘CREATE AND CONTINUE’ button:

Type ‘supermetrics as the service account name 1

Step-5: Select ‘BigQuery Admin’ from the ‘Role’ drop-down menu (type ‘BigQuery Admin’ to find it) and then click on the ‘Continue’ button:

Select ‘BigQuery Admin from the ‘Role drop down menu 1

Step-6: Click on the ‘DONE’ button:

done 1

Create a new JSON key for the service account.

Note: You only need to complete this task once for all subsequent data transfers via supermetrics.

Follow the steps below to create a new JSON key for the service account:

Step-1: Click on the email address for the service account that you just created:

Click on the email address for the service account that you just created

Step-2: Click on the ‘KEYS’ tab:

Click on the ‘KEYS tab 1

Step-3: Click on the ‘ADD KEY’ drop-down menu:

Click on the ‘ADD KEY drop down menu 1

Step-4: Click on ‘Create new key’:

Click on ‘Create new key 1

Step-5: Click on the ‘CREATE’ button:

Click on the ‘CREATE button

A JSON key file will be downloaded to your computer.

Step-6: Click on the ‘CLOSE’ button:

Click on the ‘CLOSE button 1

Note: You would need only one service account with one key creating 1 JSON for a single BigQuery project. It’s only if you want to write to a different BQ project that you would need a different service account, key and JSON.

Start the free trial or signup.

Start the free trial or sign up straightaway for the Supermetrics for BigQuery connector.

The license for the ‘supermetrics for BigQuery’ connector is sold via the account manager.

You would need to book a call to discuss BigQuery pricing with them, as there is no one size fit all pricing. The pricing depends upon the number of data sources you use.

Follow the steps below to start the free trial:

Step-1: Navigate to the ‘Supermetrics for BigQuery‘ page.

Step-2: Click on the ‘Start free trial’ button:

Click on the ‘Start free trial button

Step-3: Fill out the form and then click on the ‘Send’ button:

Fill out the form 1

You should now be automatically redirected to https://hub.supermetrics.com/

Step-4: Click on the ‘Sign in with Google’ button:

Click on the ‘Sign in with Google button

Once you have signed in, you should see a screen like the one below:

dwh supermetrics

Connect Supermetrics to Google BigQuery

Note: If you have already connected supermetrics to BigQuery, then move to the next step.

Follow the steps below to connect Supermetrics to Google BigQuery:

Step-1: Click on ‘Data Sources’ under ‘CONNECT’ from the left navigation menu:

Click on ‘Data Sources under ‘CONNECT from the left navigation menu

Step-2: Scroll down and then click on the ‘+ Connect’ button next to ‘Google BigQuery’:

click on the ‘ Connect button next to ‘Google BigQuery

Step-3: Click on the ‘Sign in with Google’ button:

connect to google bigquery 3

Step-4: Once you have signed it, click on the ‘Allow’ button:

allow supermetrics to view your data in bigquery

You should now see a screen like the one below, which shows that you have successfully connected supermetrics with BigQuery:

ou have successfully connected supermetrics with BigQuery

Connect Supermetrics to Google Analytics 4

Follow the steps below to connect Supermetrics to your GA4 property:

Step-1: Click on ‘Data Sources’ from the left navigation menu:

Data Sources supermetrics hub

Step-2: Scroll down and click on ‘+Connect’ button next to ‘Google Analytics 4’:

click on ‘Connect button next to ‘Google Analytics 4

Step-3: Click on the ‘Sign in with Google’ button:

connect to ga4

Step-4: Once you have signed in then, click on the ‘Allow’ button:

allow supermetrics to view your google analytics data

You should now see a screen like the one below, which shows that supermetrics is connected to your GA4 property:

supermetrics is connected to your GA4 property

Create a wireframe of your data table.

If you want to use a custom schema to send custom GA4 data to BigQuery, you will first need to create a wireframe of your data table.

Figure out the overall layout and format (wireframe) of how your data table should look in BigQuery.

Note: If you are planning to use the default schema, then skip this step.

Let’s extract GA4 data in the following format in BigQuery:

Lets extract GA4 data in the following format in BigQuery

From the screenshot above, we can determine the following things about how our data table should look in BigQuery:

  1. Our data table should have one primary dimension called ‘Country’.
  2. Our data table should have the following four metrics: ‘Total Users’, ‘New Users’, ‘Sessions’ and ‘Engaged Sessions’
  3. The data table needs to have 10 rows.
  4. The data in the data table should be sorted by ‘sessions’ in descending order.
  5. The data in the data table should be from the last 30 days (not shown in the screenshot above).

Create customs schema

Based on your wireframe, create a custom schema via a third-party solution (connector). 

Follow the steps below to create a custom schema for GA4 data table via supermetrics:

Step-1: Click on ‘Table manager’ from the left navigation menu:

Table manager supermetrics 1

Step-2: Click on ‘Change data source’ button:

Change data source

Step-3: Click on  ‘Google Analytics 4’ under the ‘Data Sources in use’ section:

Click on ‘Google Analytics 4 under the ‘Data Sources in use section

You should now see the list of all the table groups:

You should now see the list of all the table groups

Each table group contains one or more data tables. 

For example, the table group named ‘STANDARD_ARCHIVED20221201’ contains 7 data tables.

Similarly, the table group named ‘STANDARD’ contains 7 data tables.

Step-4: Click on the drop-down menu to see all the data tables listed under the table group ‘STANDARD’:

see all the data tables listed under the table group ‘STANDARD

All these data tables are based on pre-built schemas provided by Supermetrics. 

Each data table corresponds to one schema. You can use this schema while creating your data transfer or you can create your own custom schema. We will create our own custom schema.

Step-5: Click on the ‘+ New table group’ button to create a new table group:

Click on the ‘ New table group button

Step-6: Name the new table group ‘GA4 Custom Schema’ and then click on the ‘Create table group’ button:

Name the new table group ‘GA4 Custom Schema

Step-7: Click on the ‘Add table’ button:

Click on the ‘Add table button

Step-8: Name the new data table ‘Top Countries by Sessions’:

Name the new data table ‘Top Countries by Sessions

Step-9: Click on the drop-down menu next to ‘Select metrics’ and then add the following metrics one by one: ‘Total Users’, ‘New Users’, ‘Sessions’ and ‘Engaged Sessions’:

add the following metrics one by one

Step-10: Click on the drop-down menu next to ‘Split by’ and then select the dimensions ‘Country‘ and ‘Date‘:

Click on the drop down menu next to ‘Split by

Step-11: Set the ‘# of rows to fetch:’ to 10:

number of rows to fetch

Step-12: Select ‘Sessions’ from the ‘Sort rows’ drop-down menu:

Select ‘Sessions from the ‘Sort rows drop down menu

Step-13: Select ‘Descending’ from the ‘Sort direction’ drop-down menu:

Select ‘Descending from the ‘Sort direction drop down menu

Step-14: Scroll down, click on the drop-down menu next to ‘Select properties’ and then select your GA4 property:

Select properties

Step-15: Click on the drop-down menu next to ‘Select dates’ and then select ‘Last X days’:

Select dates 1

Step-16: Type 30 days in the field below:

Type 30 days in the field below

Step-17: Click on the ‘Preview data’ button at the right-hand side of your screen to make sure that it matches the wireframe you created earlier. Then click on the ‘Save table’ button:

Click on the ‘Preview data button

This data table corresponds to a custom schema. When creating a new data transfer, we will use this custom schema.

Create a new destination for your data transfer.

Before you can create a data transfer in Supermetrics, you will first need to create a new destination for your data transfer.

Follow the steps below to create a new destination for your data transfer.

Step-1: Click on ‘Connect to DWH’ from the left navigation menu:

Connect to DWH 2

Step-2: Click on the ‘Create new’ button to create a new destination:

create a new destination 1

Step-3: Select ‘BigQuery’ from the drop-down menu and then click on the ‘Next’ button:

Select ‘BigQuery from the drop down menu

Step-4: Enter ‘Google Analytics 4’ in the ‘Display Name’ field:

Enter ‘Google Analytics 4 in the ‘Display Name field

Step-5: Enter the name of the previously created dataset you want Supermetrics to write to in the ‘Dataset name’ field. In our case, it would be ‘custom_ga4’:

Enter the name of the previously created dataset 1

Step-6: Copy-paste the entire content of the Service account JSON file you downloaded from BigQuery in the ‘Auth key’ field:

Copy paste the entire content of the Service account JSON file 2
auth key 2

Step-7: Click on the ‘Test’ button:

test destination

You should now see the message ‘Connection test has succeeded’: 

You should now see the message ‘Connection test has succeeded

Step-8: Click on the ‘Save’ button:

save destination 1

Create a new data transfer for Google Analytics 4.

We create data transfer in order to automatically send custom GA4 data to our BigQuery project on a regular basis.

Follow the steps below to create a new data transfer for GA4 in Supermetrics:

Step-1: Click on ‘Transfers’ from the left navigation menu:

Click on ‘Transfers from the left navigation menu

Step-2: Click on the ‘Create new’ button:

create new data transfer

Step-3: Select ‘Google Analytics 4’ from the data source drop-down menu and then click on the ‘Ok’ button:

Select ‘Google Analytics 4 from the data source drop down menu

Step-4: Click on the ‘pencil’ button and then name your new data transfer ‘GA4 to BigQuery’:

name your new data transfer ‘GA4 to BigQuery

Step-5: Make sure that your destination is set to ‘Google Analytics 4’:

Make sure that your destination is set to ‘Google Analytics 4

Step–6: Set your refresh schedule:

Set your refresh schedule 2

Here,

Frequency => How often the data transfer will be repeated. You can set the frequency to daily, weekly or monthly.

Time => When the data transfer will run. 

Refresh windows => How many days of historical data (backwards from the latest run date) are extracted from the data source and replaced in the destination. A maximum of 30 days is allowed, but this can be more restricted by license type and/or data source.

Step-7: Select ‘GA4 Custom Schema’ from the drop-down menu:

Select ‘GA4 Custom Schema from the drop down menu

Step-8: Select your GA4 property and then click on the ‘Create Transfer’ button:

Select your GA4 property and then click on the ‘Create Transfer button

At this point, you can backfill more GA4 data into your BigQuery project by clicking on the ‘Configure backfill’ button. Alternatively, you can click on the ‘Done’ button:

‘Configure backfill button

If you click on the ‘Configure backfill’ button, you will need to set the start and end date for when you would like the data to be populated and then click on the ‘ok’ button:

set the start and end date for when you would like the data to be populated 2

For this exercise, I won’t backfill any more data.

You should now see a screen like the one below:

transfer status

The yellow dot under the ‘Status’ column means the data transfer has not started yet.

Once your data transfer is complete, you should see a dark green circle under the ‘Status’ column:

your data transfer is complete 2

Check for the imported GA4 data in BigQuery.

Follow the steps below to check for the imported GA4 data in your BigQuery project:

Step-1: Navigate to https://console.cloud.google.com/bigquery 

Step-2: Make sure you are in the correct project:

google cloud project

Step-3: Navigate to the data table under ‘custom_ga4’ dataset you created earlier. This data table was automatically created by Supermetrics:

Navigate to the data table under ‘custom ga4 dataset

Step-4: Click on the ‘Preview’ tab:

preview custom ga4 data table

You can see the data in the data table matches the custom schema we created earlier. 

However, it is not displayed how we would like it to be. For that, we would need to query the data in our desired format.

That’s how you can send custom GA4 data to BigQuery.

Handling empty fields in GA4 BigQuery.

empty fields

Empty strings in GA4 BigQuery results indicate unpopulated fields due to data collection issues, consent restrictions, or improper handling of nested fields.

Unlike NULL, empty strings are valid values, impacting aggregation functions like COUNT or GROUP BY. Convert empty strings to NULL to ensure accurate data aggregation and query results.

For more details, check out this article: How to handle empty fields in GA4 BigQuery.

  1. Google Analytics 4 Page Title, Page Path & Views in BigQuery
  2. Google Analytics 4 Unique Pageviews in BigQuery.
  3. Google Analytics 4 Traffic Attribution in BigQuery.
  4. Finding Real Google Analytics 4 Conversion Paths in BigQuery.
  5. Tracking Google Analytics 4 UTM Parameters in BigQuery.
  6. Tracking Google Analytics 4 AI Traffic in BigQuery.
  7. Tracking peak time for Website Traffic in GA4 BigQuery.
  8. How to Correctly Work With Google Analytics Data Types in BigQuery.
  9. Three SQL Query Logic You Must Use For GA4 in BigQuery.
  10. Four Rules for Google Analytics Data Aggregation in BigQuery.
  11. Top 10 Optimization Strategies for GA4 SQL in BigQuery.
  12. How To Correctly Track GA4 Sessions in BigQuery.
  13. Tracking Google Analytics 4 Engaged Sessions in BigQuery.
  14. Tracking Google Analytics 4 Total Users in BigQuery.
  15. Tracking Google Analytics 4 New Users in BigQuery.
  16. Tracking Google Analytics 4 Returning Users in BigQuery.
  17. What is BigQuery Data Transfer Service & how it works.
  18. How to send Custom GA4 Data to BigQuery.
  19. Connect and transfer data from Google Sheets to BigQuery.
  20. Query GA4 data in BigQuery without understanding SQL.