

Websites where the majority of conversions happen offline, often rely on leads generation for driving sales.
The most common type of leads is form leads. These are the leads generated through a form, which is embedded on a website.
Form leads can be classified into:
#1 Qualified leads – leads that meet your customers’ qualification criteria.
#2 Converted leads – qualified leads that converted into actual sales.
There are two methods to track web form leads as conversions in GA4:
#1 Traditional method.
#2 Via CRM (client relationship management).

The traditional method for tracking Web Form Leads as conversions in GA4.
In the traditional method, a user fills out the lead generation form on your website and then submits it.
You then track the confirmation page URL (the URL of the page which is shown to a user on successful form submission) as the destination goal in GA4.
This is one of the most common and widely used methods in GA.
But with this method, you will not be able to track qualified and converted leads, as well as the sales associated with each form lead.
Tracking Web Form Leads in GA4 via CRM.
Here is how this system works:
#1 A user fills out the lead generation form on your website and submits it, triggering the recommended generate_lead event in GA4 instead of a generic form_submit event.
#2 As soon as the user hits the submit button, all of the lead information goes straight into your CRM software (like Salesforce) via web‑to‑lead or a similar integration, while GA4 records the generate_lead event tied to that user.
#3 You or your staff qualify and categorise the lead inside the CRM (for example: new lead → qualified lead → converted lead), and your CRM (or middleware) sends the corresponding GA4 events such as qualify_lead, working_lead, close_convert_lead, or close_unconvert_lead when the lead status changes.
#4 Your CRM stores all the lead data along with the corresponding client ID and/or user ID, which it uses when calling the GA4 Measurement Protocol so each backend lead event (qualify, convert, disqualify) is linked back to the original generate_lead event and user journey.
#5 On a regular basis (or in near‑real time), your CRM or integration pushes these lead‑stage events into GA4 via Measurement Protocol, so GA4’s Lead acquisition report can show user‑scoped metrics like New Leads, Qualified Leads, and Converted Leads by source/medium, campaign, and other dimensions.
#6 In GA4 Admin, you mark the key backend events (for example, qualify_lead and close_convert_lead) as conversions, so optimisation and reporting focus on qualified and converted leads rather than just raw form submissions.
This is the best way to track web form leads in GA4.
Follow the steps below to track qualified and converted (won) leads in GA4 using your CRM:
- Decide which identifiers and lead‑stage data you will send from your website and CRM to GA4 and your CRM.
- Capture the identifiers and additional marketing data you need at the time of lead generation.
- Create one or more custom fields in your CRM to store GA4 identifiers and marketing metadata.
- Send identifiers and marketing data to your CRM when the form is submitted, and trigger the generate_lead event in GA4.
- Qualify and categorize leads in the CRM and trigger backend GA4 lead events like qualify_lead and close_convert_lead via Measurement Protocol.
- (Optional) Download or export CRM data for QA and backup on a regular cadence.
- Use GA4’s Lead Acquisition report (powered by these events) instead of one‑off CSV imports as your primary way to analyse new, qualified, and converted leads.
Step‑1: Decide what to send to your CRM and GA4.
It is still essential that you store at least one web identifier (client ID and/or user ID) in your CRM so you can connect website sessions and GA4 events to specific leads.
In addition to client ID/user ID and basic lead details (name, email, phone), decide which extra marketing fields you want to capture and store, such as:
- Campaign source, medium, campaign, content, term (UTM parameters).
- Landing page, referring URL, form ID, lead source (internal naming).
These fields will later help you understand which channels and campaigns generate qualified and converted leads in the Lead Acquisition report.
Step‑2: Capture identifiers and additional data on the website.
- Read the GA4 client ID from the _ga cookie or via the gtag/gtm API and store it in a JavaScript variable ready to be passed into hidden fields or directly to your backend.
- If your users log in or you otherwise assign them an internal ID, capture this user ID and use it consistently both in GA4 and your CRM.
- Use a script or tag manager to capture key UTM parameters, referrer, landing page, and form ID when the user first visits or when the lead form is loaded.
This data will be passed both into your CRM and, via Measurement Protocol, along with your lead events (for example, as parameters like lead_source, form_id, or campaign where appropriate).
Step‑3: Create custom fields in your CRM.
Create one or more custom fields in your CRM to store:
- GA4 client ID (and/or user ID).
- Lead source / UTM source, medium, campaign.
- Landing page or original referrer (optional but useful).
Check your CRM’s documentation for creating custom fields or contact their support team if you are unsure where to store these values.
These fields allow your CRM to later send accurate GA4 events (qualify_lead, close_convert_lead, etc.) that can be linked back to the original website session and generate_lead event.
Step‑4: Send identifiers and marketing data to CRM on form submission.
Additional data such as client ID, user ID, and campaign parameters are not things you ask users to type into the form, so you need to send them via hidden fields or server‑side logic.
Typical implementation options:
- Hidden fields:
- Add hidden inputs to your lead forms (e.g., ga_client_id, ga_user_id, utm_source, utm_medium, utm_campaign).
- Use JavaScript to populate these fields when the form is rendered or just before submission.
- Server‑side capture (preferred for robustness):
- Send identifiers and UTM parameters with the form payload to your backend.
- Your backend then writes these into the CRM via its API.
Example (simplified) hidden field for client ID:
<form action="" name="leadForm">
  Name: <input type="text" name="name">
  <input type="hidden" id="ga_client_id" name="ga_client_id" value="">
  <input type="submit" value="Submit" name="btnSubmit">
</form>
<script>
  // Example: populate GA4 client ID from cookie or dataLayer
  document.getElementById('ga_client_id').value = window.myGa4ClientId || '';
</script>
At the same time, your website should send the GA4 generate_lead event when the form is successfully submitted so that the Lead Acquisition report can count the new lead.
Step‑5: Qualify and categorize lead data in the CRM.
As your sales or success team works the leads in the CRM, you move them through your internal stages (e.g., New → Working → Qualified → Won → Lost).
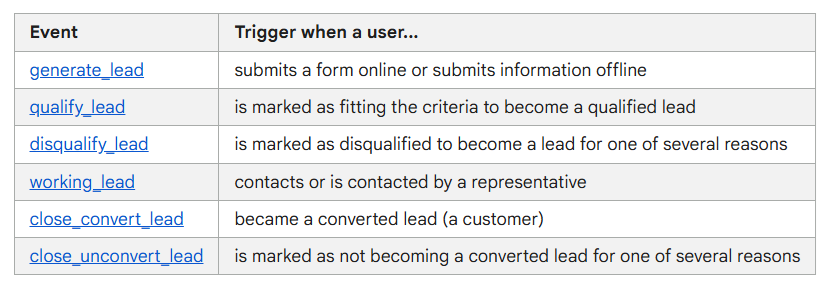
For GA4, map these CRM stages to the new recommended lead events:
- generate_lead: When the form is submitted (already fired on the website).
- working_lead: When a rep contacts or is actively engaging the lead.
- qualify_lead: When the lead is marked as fitting your qualification criteria (MQL/SQL).
- disqualify_lead: When the lead is ruled out (send disqualified_lead_reason where possible).
- close_convert_lead: When the lead becomes a paying customer (include value and currency).
- close_unconvert_lead: When the lead is closed as lost (can include unconvert_lead_reason).
Your CRM (or middleware like n8n/Make) should trigger these events via GA4 Measurement Protocol whenever the lead’s status changes, using the stored client ID/user ID to link back to the original session.
Step‑6: Export CRM data periodically (optional but useful).
Although Measurement Protocol can keep GA4 in sync in near real time, many teams still export CRM data on a weekly or monthly basis to:
- Audit lead stages, values, and identifiers.
- Backfill or correct events using GA4 offline event import if needed.
Use your CRM’s export tools or API to obtain data keyed by client ID/user ID and lead ID for QA and reconciliation.
Step‑7: Send CRM data into GA4 and use the Lead Acquisition report.
In the UA era, the primary method was CSV data import into Google Analytics; in GA4, the core options are:
- Measurement Protocol (recommended for leads):
- Send lead‑stage events (qualify_lead, working_lead, close_convert_lead, close_unconvert_lead) from the CRM to GA4 as they happen.
- Include identifiers (client ID/user ID) and key parameters (value, currency, reasons, lead_source, etc.).
- Event Data Import (CSV):
- Use for batch backfills or corrections, uploading offline lead events keyed by identifiers and timestamps.
Once these events are flowing, GA4’s Lead acquisition and related lead‑generation reports automatically surface:
- New Leads (from generate_lead)
- Qualified Leads (from qualify_lead)
- Converted Leads (from close_convert_lead)
all broken down by source/medium, campaign, landing page, and other acquisition dimensions.
Mark your key lead‑stage events (for example, qualify_lead and close_convert_lead) as key events (conversions) in GA4 Admin so optimisation and reporting focus on lead quality and revenue, not just raw form submissions.
The ‘Lead Acquisition’ Report in GA4.
In GA4, you can track the New, Qualified and Converted Leads via the ‘Lead Acquisition’ Report.
You can access the ‘Lead Acquisition’ Report in GA4 by Reports > Acquisition > Lead Acquisition in your GA4 property:

How to populate the ‘Lead Acquisition’ Report in GA4 with actual data?
The Lead acquisition report provides access to three new lead metrics: New Leads, Qualified Leads and Converted Leads.

You will have to fire a new set of lead generation events (check the screenshot below) to populate this report.
Other than the ‘generate_lead’ event (which typically happens on your website and can be tracked with your regular GA4 setup or Google Tag Manager), the other events (qualify_lead, disqualify_lead, working_lead, close_convert_lead, close_unconvert_lead) usually need to be triggered from your CRM or back-end systems, because those lead stages happen after the website form submission.
Send these events to GA4 using the Measurement Protocol.
Your CRM (or integration/middleware) should call the Measurement Protocol endpoint when a lead’s status changes.
The ‘form_submit’ event by itself will not populate the Lead Acquisition report in GA4.
You should retire the ‘form_submit’ event once you have fully implemented the new lead generation events unless you have other forms on your website (newsletter, event signup, downloads) that are not related to the lead funnel.
You use ‘form_submit’ for only generic form tracking.
Recommended best practices:
- Migrate all “lead” forms to fire the new ‘generate_lead’ event.
- Update any audiences, conversions, or tags in GA4 that referenced ‘form_submit’ for leads, so they now use ‘generate_lead’.
- If you have forms not related to leads, you can keep a separate ‘form_submit’ for those, or use a more descriptive event name (e.g., newsletter_signup, event_registration, etc.).
Here’s what you can do through a lead acquisition report.
#1 Track Lead Sources – Identify which marketing channels (e.g., Direct, Organic Search, Social, Referral) are driving the most leads.
#2 Measure Lead Quality – Analyze the number of new, qualified, and converted leads from each channel.
#3 Monitor Conversion Rates – Evaluate how well leads from each source are progressing through the funnel (from new to qualified to converted).
#4 Compare Channel Performance – Easily compare the effectiveness of different channels in generating leads.
#5 Identify Growth Opportunities – Spot channels with high potential for growth or channels that may need optimization.
#6 Allocate Marketing Budget – Make data-driven decisions about where to allocate marketing resources for the best ROI.
#7 Detect Trends Over Time – Observe how lead acquisition trends change over different time periods.
#8 Set Goals and Benchmarks – Establish performance benchmarks and set realistic goals for future lead generation.
The ‘Lead disqualification and loss report’ in GA4.
This report shows the reasons why potential customers did not progress through the stages of becoming qualified and converted leads for your business.
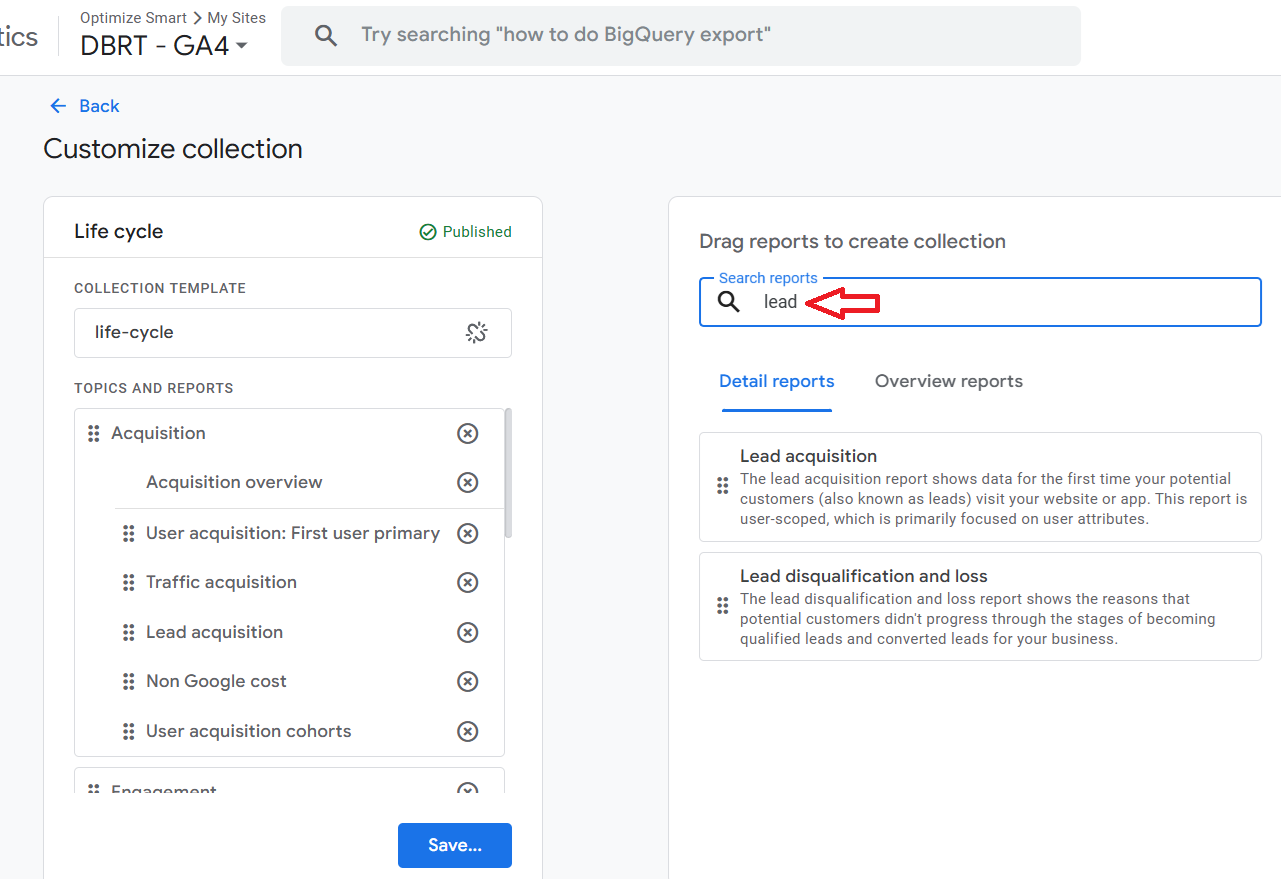
To access this report, follow the steps below:
#1 In your GA4 property, navigate to Reports > Library.
#2 Click on the three dots menu > Edit next to ‘Life cycle’ collection:

#3 Search for ‘lead’. You should now be able to see the entry for ‘Lead disqualification and loss’:
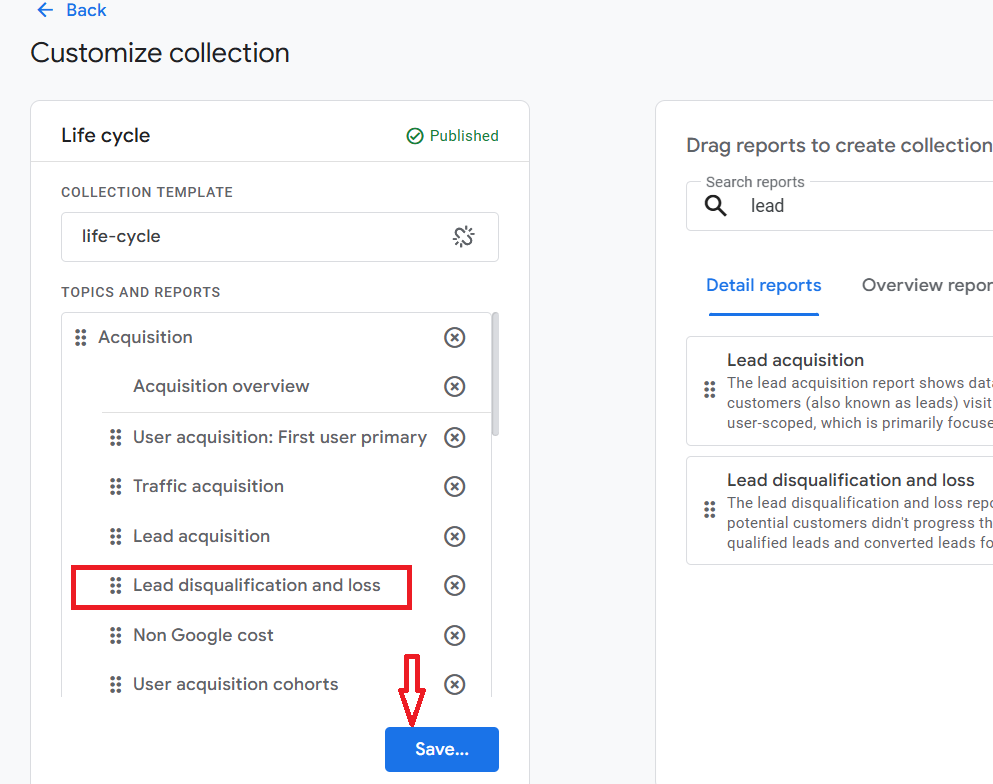
#4 Drag and drop the ‘Lead disqualification and loss’ report under ‘Acquisition’ > ‘Lead Acquisition’ and then click on the ‘Save’ button (Save changes to current collection):
You should now be able to see the ‘Lead disqualification and loss’ report under ‘Acquisition’:
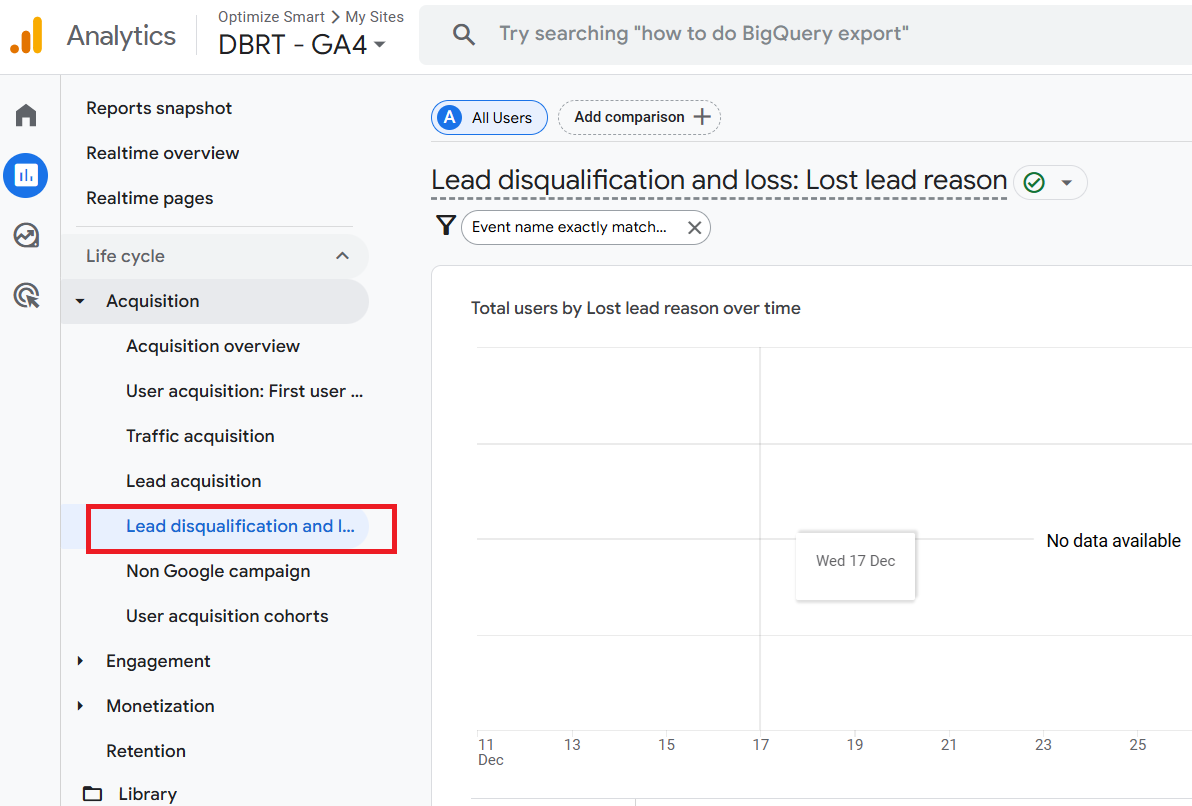
How to populate the ‘Lead disqualification and loss report’ in GA4 with actual data?
This report uses the following filter:
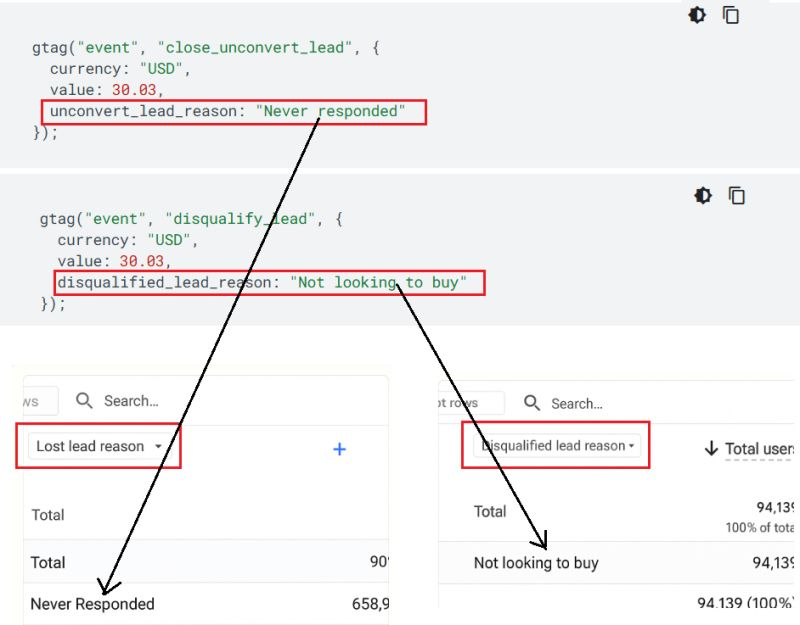
Event name exactly matches 'disqualify_lead' OR 'close_unconvert_lead'. So, if you are not sending these events to GA4, this report will remain empty.
In addition to sending these events, you also need to send the following event parameters:
'unconvert_lead_reason: "<add your reason here>" with the event 'close_unconvert_lead'
disqualified_lead_reason: "<add your reason here>" with the event 'disqualify_lead'.
Here,
'close_unconvert_lead' => This event measures when a user is marked as not becoming a converted lead.
'unconvert_lead_reason' => This event parameter is used to display the reason a lead was unconverted.
'disqualify_lead' => This event measures when a user is marked as disqualified to become a lead.
'disqualified_lead_reason' => This event parameter is used to display the reason a lead was marked as disqualified.
Therefore, you need to specify the reasons for lost leads manually. GA4 will not automatically give this insight to you.
Other Articles on GA4.
- Tracking New, Qualified and Converted Leads in GA4.
- Free GA4 training and tutorial with Certification.
- Understanding GA4 Ecommerce Reports (Monetization Reports).
- GA4 Ecommerce Tracking via GTM: Step-by-Step Setup Guide.
- How to see UTM parameters in GA4 (Google Analytics 4).
- GA4 UTM parameters not working? Here is how to fix it.
- How To Use UTM parameters in GA4 (Campaign Tracking).
- How to track AI traffic in GA4.
- Understanding Google Analytics 4 cookies – _ga cookie.
- GA4 (Google Analytics 4) Measurement Protocol Tutorial.
- GA4 Unassigned Traffic: Causes and How to Fix it Fast.
- GA4 Regex (Regular Expressions) Tutorial.
- GA4 Direct Traffic Spike: Common Causes and How to Fix Them.
- gtag.js – Google Tag in Google Analytics 4 and beyond.
- GA4 Scopes – User, Session, Event & Item scopes.
- GA4 Conversion Tracking (Key Events) Tutorial.
- GA4 (not set) - Guide to fixing (not set) issue.
- GA4 Certification Exam: Questions, Answers for Skillshop (GAIQ).
- GA4 User Properties (User Scoped Custom Dimensions) – Tutorial.