

Understanding GA4 user properties is a game changer for anyone looking to understand their audience really well.
GA4 user properties let you define custom attributes, such as user preferences, subscription tiers, or engagement levels, to gain deeper insights into user behaviour.
Imagine segmenting audiences not just by clicks but by who they are and what drives them. This capability can transform your analytics from surface-level data into powerful, personalized insights.
Learn to create and use the GA4 user properties through this step by step guide.
What are GA4 User properties?
GA4 User properties are attributes used to describe segments of your user base. They help you segment and analyse user data.
These user attributes include language preference, geographic location, age, gender, membership level, etc.

By default, Google Analytics 4 automatically logs a few user properties like the ones below:
What’s the difference between user attributes, user properties and user-scoped custom dimensions?
User attributes are the attributes of your website users.
We typically capture those user attributes that GA4 does not automatically track with the help of hard-coded data layers on the website.
We then pull the data from data layers via the GTM data layer variables.
Once you have mapped the data layer variables to their corresponding user attributes in GTM, the user attributes become user properties.
We send the user attribute data to GA4 via user properties.
You can create a user-scoped custom dimension by registering an event parameter with the ‘user’ scope in the GA4 user interface.
This parameter can be an automatically tracked parameter or a custom parameter.
Here, the custom parameter is the user property.
In other words, the user properties that you register in your GA4 property via the user scope custom dimensions are user-scoped custom dimensions.
 - Tutorial 1")
User-scope means the value of the custom dimension is calculated and sent once for each user.
When to create a User Property?
Google recommends creating a user property when you want to identify static or slowly changing attributes of your website/app users, such as changes in subscription plan, membership level, or game difficulty.
If a built-in user-scoped dimension does not capture any specific users’ details relevant to your business or tracking goals, create its corresponding user property and then register it as a user-scoped custom dimension in GA4.
Following is an example to illustrate my point:
You run a publishing website and want to track a user’s “subscription status” (free, paid) across their interactions.
A built-in user-scoped dimension might not capture this specific detail.
You can create a “Subscription Status” custom user-scoped dimension to capture this specific detail.
By creating and populating the “Subscription Status” custom user-scoped dimension, you can now:
- Segment users based on their subscription status (free users vs. paid users).
- Analyze how subscription status affects user engagement with your platform content.
- Identify trends in user subscription behavior (e.g., free users upgrading to paid).
How to create a user property in GA4?
Follow the steps below to create a user property in GA4:
#1 Decide the user attributes you want to track.
#2 Check whether the user attributes you want to track are already being tracked in your GA4 property. Confirming this avoids redundant work.
#3 If the user attributes you want to track are not already being tracked in your GA4 property, then ask your developer to push the required user attributes you want to track into a data layer hardcoded on your website.
#4 Pull the user attributes from the data layer via one or more data layer variables in GTM.
#5 Create an event settings variable in GTM and map each data layer variable to its corresponding user attribute. Once you have mapped the data layer variables to their corresponding user attributes in GTM, the user attributes become user properties.
#6 Add the event settings variable to your GA4 configuration tag (aka Google Tag) and all the GA4 event tags.
#7 If you need different user properties on specific events, edit the GA4 event tags as needed and create separate Event Settings variables with the required properties, or directly add user properties to individual GA4 event tags.
#8 Preview the GTM container to ensure that the data layer variables, Google Tag and GA4 event tags contain the desired user properties.
#9 Navigate to the debug view report in your GA4 property to confirm that the user property is being logged/recorded.
#10 If everything looks good, publish your GTM container.
#11 After 24 hrs have elapsed, navigate to your GA4 property and register the logged user property as a new user-scoped custom dimension. This action is required so that you can use the logged user property in GA4 reports.
#12 Use the user-scoped custom dimension in the exploration report or user explorer report. You can also use the user-scoped custom dimension to create or edit audiences or comparisons.
Example of creating a user property in GA4.
Let’s say you want to track a user property called “Subscription Status” to identify whether users are “Free” or “Paid” subscribers.
#1 Decide the user attributes you want to track.
We decided to track “Subscription Status” as our user attribute. This attribute will indicate if a user has a “Free” or “Paid” subscription.
#2 Check whether the user attributes you want to track are already being tracked in your GA4 property.
Navigate to your GA4 property and check if “Subscription Status” is already available as a user property. If it isn’t, continue to the next step.
#3 If the user attributes are not tracked, ask your developer to push the required user attributes into a data layer hardcoded on your website.
Ask your developer to add “subscription_status” to the data layer on the website, setting its value to “Free” or “Paid” based on the user’s current subscription level.
Here’s an example of what the developer might add:
window.dataLayer = window.dataLayer || [];

window.dataLayer.push({

  'event': 'subscriptionStatusUpdate',

  'subscription_status': 'Paid'

});
Including an event name (‘subscriptionStatusUpdate’) ensures that GTM can easily listen for this specific event if needed.
#4 Pull the user attributes from the data layer via one or more data layer variables in GTM.
In GTM, create a Data Layer Variable:
- Navigate to Variables > New > Variable Configuration.
- Select Data Layer Variable.
- Name it “DLV – Subscription Status” and set the Data Layer Variable Name to “subscription_status“.
 - Tutorial 2")
#5 Create an Event Settings Variable in GTM and map each data layer variable to its corresponding user attribute.
- Navigate to Variables > New > Variable Configuration > Google Tag: Event Settings.
- In the ‘Google Analytics User Properties’ section, add a user property with the name “subscription_status“.
- Map it to the ‘DLV – Subscription Status’ variable created in step 4.
- Save this as an Event Settings Variable (e.g., “ESV – User Properties“).
 - Tutorial 3")
#6 Add the Event Settings Variable to your Google Tag and all GA4 event tags.
- Navigate to your Google Tag in GTM and select the newly created Event Settings Variable in the Event Settings section.
- Also, add the Event Settings Variable to any specific GA4 event tags you have so that the “subscription_status” property is included with all events.
 - Tutorial 4")
 - Tutorial 5")
#7 Only if you need different user properties on specific events, edit the GA4 event tags as needed and directly add the user properties.
#8 Preview the GTM container to ensure that the data layer variables, Google Tag, and GA4 event tags contain the desired user properties.
- Use Preview Mode in GTM to verify the setup.
- Open the Debug Console in the browser.
- Check that the data layer correctly populates “subscription_status”.
- Check the value of the ‘Event settings’ variable in the Google tag on the initialization event.
- Check the value of the ‘Event settings’ variable in one or more GA4 event tags.
Check that the data layer correctly populates “subscription_status”.
 - Tutorial 6")
Check the value of the ‘Event settings variable in the Google tag on the initialization event.
 - Tutorial 7")
Check the value of the ‘Event settings’ variable in one or more GA4 event tags.
 - Tutorial 8")
#9 Navigate to the DebugView report in your GA4 property to confirm that the user property is being logged/recorded.
- In GA4, navigate to ‘Data Display’ > ‘DebugView’.
- Confirm that the “Subscription Status” user property is appearing with each relevant event.
 - Tutorial 9")
 - Tutorial 10")
#10 If everything looks good, publish your GTM container.
#11 After 24 hrs, register the logged user property as a new user-scoped custom dimension in your GA4 property.
- Navigate to Data Display > Custom Definitions > Create Custom Dimension.
- Set the dimension name to “Subscription Status,” Scope to “User,” and select User Property as “subscription_status“.
- Save it. This custom dimension should be available in GA4 reports within 24 hours.
 - Tutorial 11")
#12 Use the user-scoped custom dimension in GA4 reports.
You can now use the ‘user-scoped’ custom dimension in Explorations and User Explorer reports or use it to create or edit audiences and comparisons based on subscription status.
Caveat: Logged event parameters should supply the value of a user scope custom dimension.
Before you create a user-scoped custom dimension, you would need a logged event parameter in your GA4 property, and this parameter must have user scope.
In other words, you cannot create a user-scoped custom dimension by registering a parameter with event scope.
For example, the ‘page_title’ parameter has an event scope, so you cannot register this parameter as a user-scoped custom dimension.
You can only register parameters as user-scoped custom dimensions if they have user scope.
You can also create a user-scoped custom dimension before logging the event parameter, but that is not the best practice for creating user-scoped custom dimensions.
When you create a custom dimension without an existing logged event parameter, the dimension won’t have anything to populate it with. This can lead to a high number of “(not set)” values in your reports, making it difficult to understand user behaviour or trends.
Where can I find data for user-scoped custom dimensions in GA4?
You can find data for user-scoped custom dimensions in GA4 in the following places:
#1 Exploration reports – When you create a new exploration report or edit an existing report, you can add the user-scoped custom dimension to your report:
 - Tutorial 12")
#2 User Explore report – User scoped dimensions are available in this report by default. You can find them under ‘user properties’:
- Navigate to the user explore report in your GA4 property.
- Click on an ‘Effective User ID’ listed on the reporting canvas.
- A new tab will automatically open. Click on a listed event to see the user property.
 - Tutorial 13")
 - Tutorial 14")
 - Tutorial 15")
#3 You can add a user-scoped custom dimension as a secondary dimension to any standard GA4 report containing a data table:
 - Tutorial 16")
#4 You can use user-scoped custom dimensions to create comparisons:
 - Tutorial 17")
#5 You can use user-scoped custom dimensions to create custom audiences:
 - Tutorial 18")
Note: Unlike event-scoped custom dimensions, user-scoped dimensions won’t appear as individual data cards within event reports. This is because they are not directly tied to a single event but rather the user itself.
The true value of user-scoped custom dimensions lies in segmenting and analysing user behaviour over time.
How to delete a user scoped custom dimension in GA4?
GA4 does not allow you to delete a user scoped custom dimension. But you can archive it.
Since GA4 provides only 25 custom user scoped dimensions, if you exceed the limit or do not want to continue with an existing user scoped dimenion, you can archive any of the current dimensions that are no longer needed or less important.
Follow the steps below to archive a user scoped custom dimension:
Step-1: Navigate to the admin section of your GA4 property and then click on ‘Custom Definitions’ under ‘Data Display’:
 - Tutorial 19")
Step-2: Click on the three dots menu next to the user-scoped custom dimension you want to archive:
 - Tutorial 20")
Step-3: Click on the ‘Archive‘ option:
 - Tutorial 21")
Step-4: Click on the ‘Archive’ button:
 - Tutorial 22")
Important points about archiving a user scoped custom dimension.
- Archiving stops new data from being collected for that user scoped dimension.
- It affects any audiences, explorations, comparisons, or custom reports using the archived dimension.
- Historical data is preserved, but no new data is generated.
- Archiving a user scoped custom dimension is permanent. It cannot be undone.
- The archived user property will no longer be usable throughout GA4 without first re-registering.
Sending Client ID as a User Property to GA4.
Follow the steps below:
Step-1: Login to your Google Tag Manager account and then click on the ‘Templates‘ link:
 1")
Step-2: Click on the ‘Search Gallery‘ button under the ‘Tag Templates’ section:
 2")
Step-3: Click on the magnifying glass to display a search box:
 3")
 4")
Step-4: Type ‘GTAG GET API‘ in the search box and then click on the first search result:
 5")
Step-5: Click on the ‘Add to workspace‘ button:
 6")
Step-6: Click on the ‘Add‘ button:
 7")
You should now see the new tag template listed under the ‘Tag Templates‘ section:
 8")
Now, we are going to create a new tag based on this tag template.
Step-7: Click on the ‘Tags‘ link and then click on the ‘New‘ button to create a new tag:
 9")
Step-8: Name the new tag ‘Gtag get api‘:
 10")
Step-9: Click on the ‘choose a tag type’ button:
 11")
Step-10: Scroll down and then click on the custom template ‘GTAG GET API‘:
 12")
Step-11: Enter the measurement ID of your GA4 property and then click on the ‘Save‘ button:
 13")
Step-12: Click on the ‘Save Tag‘ button, as your tag will not have any firing trigger:
 14")
Now, we need to edit the GA4 configuration tag (the Google tag we used to install and enable the GA4 tracking) and add the tag ‘Gtag get API‘ in a tag sequence.
Step-13: Find and edit your Google tag and then click on the ‘Advanced Settings‘ link:
 15")
Step-14: Click on ‘Tag Sequencing‘:
 16")
 17")
Step-15: Click on the checkbox ‘Fire a tag after Google Tag – All Pages fires‘:
 18")
Step-16: Click on the ‘Select tag‘ drop-down menu:
 19")
Step-17: Click on the ‘Gtag get api‘ tag:
 20")
Step-18: Click on the ‘Save‘ button to save your tag:
 21")
Step-19: Click on the ‘Triggers‘ link and then click on the ‘New‘ button to create a new trigger.
 22")
Step-20: Name the new trigger ‘gtagApiGet‘ and then choose the trigger type to ‘Custom Event‘:
 23")
Step-21: Type ‘gtagApiGet‘ in the ‘Event Name’ text box and then click on the ‘Save‘ button:
 24")
Step-22: Click on the ‘Variables‘ link and then click on the ‘New‘ button under the ‘User-Defined Variables‘ section:
 25")
Step-23: Name the new variable ‘Return Client ID‘ and then set the variable type to ‘Data Layer Variable‘:
 26")
Step-24: Type ‘gtagApiResult.client_id‘ in the ‘Data Layer Variable Name’ text box and then click on the ‘Save‘ button:
 27")
Step-25: Click on the ‘Tags‘ link and then click on the ‘New‘ button to create a new tag:
 28")
Step-26: Name the new tag ‘Send client id to GA4 test property‘ (or whatever best works for you) and then select ‘Google Analytics: GA4 Event‘ as the tag type:
 29")
Step-27: Enter your measurement ID:
 30")
Step-28: Type ‘get_user_data‘ in the ‘Event Name‘ text box:
 31")
Step-29: Click on the ‘User Properties‘ drop-down menu:
 32")
Step-30: Click on the ‘Add Row‘ button:
 33")
Step-31: Type ‘client_id_custom‘ in the ‘Property Name‘ text box and ‘{{Return Client ID}}.‘ in the ‘Value‘ text box:
 34")
Note: Make sure that you add the dot . after the {{Return Client ID}} variable to force GA4 to treat the value of this variable as a string and not a number.
Step-32: Click on the ‘Choose a trigger’ button:
 35")
Step-33: Click on ‘gtagApiGet‘ trigger:
 36")
Step-34: Click on the ‘Save‘ button to save your new tag:
 37")
Step-35: Click on the ‘Preview‘ button to preview your GTM container:
 38")
You should now be automatically redirected to a new tab in your web browser.
Step-36: Enter your website address and then click on the ‘Connect‘ button:
 39")
You should now be automatically redirected to a new tab in your web browser which shows your website content.
Step-37: Navigate back to your Tag Assistant window and then click on the ‘Continue‘ button:
 40")
You should now be able to see the ‘gtagApiGet’ event listed in the event list and the tags ‘Send client id to GA4 test property‘ & ‘Gtag get api‘ listed under the ‘Tags fired’ section:
 41")
Step-38: Navigate to the ‘DebugView‘ report of your GA4 property:
 42")
Step-39: Find and click on the user property named ‘client_id_custom= ……‘:
 43")
Step-40: Find and click on the user property named ‘client_id_custom‘:
 44")
You should now be able to see the captured client ID:
 45")
Step-41: Navigate back to Google tag assistant window and then close it by clicking on the cross button at the top left-hand side:
 46")
Step-42: Click on the ‘Stop debugging’ button:
 47")
Step-43: Navigate back to your GTM account and then click on the ‘Submit‘ button to publish your container:
 48")
Step-44: Enter your container version name and then click on the ‘Publish‘ button:
 49")
That’s how you can create and pass a user scope custom parameter along with an event.
Extracting User Properties data from GA4 BigQuery Data Table.
In the GA4 BigQuery Export table, you can retrieve the name of a user property from the ‘user_properties.key’ field.
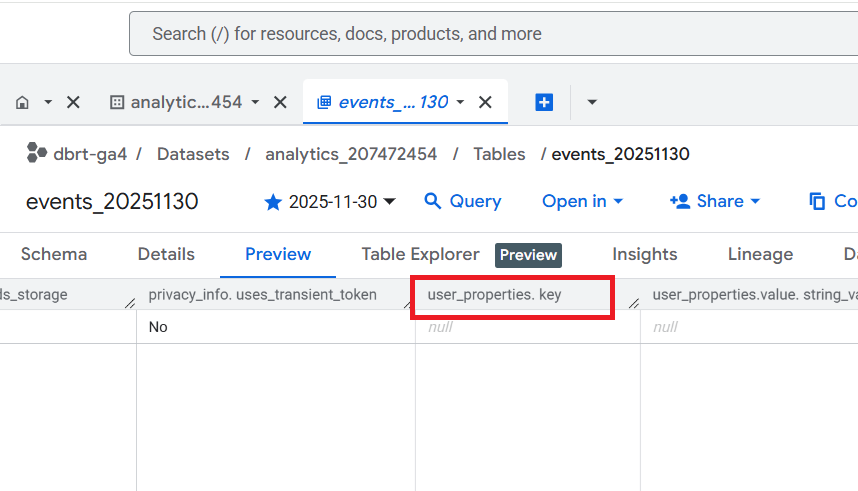
In the GA4 BigQuery Export table, you can retrieve the value of a user property from one of the following fields:
- user_properties.value.string_value
- user_properties.value.int_value
- user_properties.value.float_value
- user_properties.value.double_value
- user_properties.value.set_timestamp_micros
For more details, check out this article: Extracting GA4 User Properties in BigQuery.
Other Articles on GA4.
- Tracking New, Qualified and Converted Leads in GA4.
- Free GA4 training and tutorial with Certification.
- Understanding GA4 Ecommerce Reports (Monetization Reports).
- GA4 Ecommerce Tracking via GTM: Step-by-Step Setup Guide.
- How to see UTM parameters in GA4 (Google Analytics 4).
- GA4 UTM parameters not working? Here is how to fix it.
- How To Use UTM parameters in GA4 (Campaign Tracking).
- How to track AI traffic in GA4.
- Understanding Google Analytics 4 cookies – _ga cookie.
- GA4 (Google Analytics 4) Measurement Protocol Tutorial.
- GA4 Unassigned Traffic: Causes and How to Fix it Fast.
- GA4 Regex (Regular Expressions) Tutorial.
- GA4 Direct Traffic Spike: Common Causes and How to Fix Them.
- gtag.js – Google Tag in Google Analytics 4 and beyond.
- GA4 Scopes – User, Session, Event & Item scopes.
- GA4 Conversion Tracking (Key Events) Tutorial.
- GA4 (not set) - Guide to fixing (not set) issue.
- GA4 Certification Exam: Questions, Answers for Skillshop (GAIQ).
- GA4 User Properties (User Scoped Custom Dimensions) – Tutorial.
- Tracking Organic Traffic in GA4 - Complete Guide.
- Tracking Events in GA4 (Google Analytics 4).
- GTM Server Side Tagging - Setup Guide.
- Using Subfolder for GTM Server Side Tagging (Same Origin Tracking).
- Understanding Event Parameters in Google Analytics 4 (GA4).
- How to Uninstall GTM Server Side Tagging.
- How to remove (other) in GA4 reports and avoid Cardinality.