

Use a sub-folder instead of a subdomain for GTM server-side (SS) tagging.
Most developers use subdomains for SS tagging, and not just any subdomain, but ones that clearly indicate tracking attempts (easier detection by ad blockers), such as collection.mywebsite.com, tagging.mywebsite.com, or sgtm.mywebsite.com.
Many ad‑blockers and privacy tools block tracking on subdomains when patterns or blocklists match them.
For example, uBlock Origin explicitly blocks “first‑party tracking scripts” loaded from subdomains such as tracking.example.com when they resolve via CNAME to known tracking infrastructure.
Privacy browsers such as Brave perform CNAME uncloaking, resolve subdomains like ss.yoursite.com or tracking.example.com, and block them if they point to tracking services.
So,
Subdomains used for tracking can and do get blocked by ad blockers and privacy tools; using a subdomain (e.g., sgtm.mywebsite.com) instead of a subfolder (e.g., www.mywebsite.com/fun) is not pointless, but it is also not a magic shield.
Using a subfolder instead of a subdomain for server-side tagging offers major privacy and Safari ITP benefits, along with other practical advantages.


You can bypass Safari’s ITP 7 days Cookie cap.
Safari’s ITP does not apply IP heuristics when everything happens on the same origin (same scheme + domain + port).
A subfolder lives on the same origin as your main website.
So no IP mismatch check and no CNAME cloaking suspicion.
Cookies set via Set-Cookie header from www.mywebsite.com/fun will be trusted first-party cookies with no 7-day cap in Safari.
Your GTM Server Side tagging setup is truly first-party.
Subfolders share everything: domain, SSL cert, IP, DNS, and origin. This simplifies CORS, SameSite, and cookie behaviour.
Browsers treat such a setup as 100% first-party.
Your SS tracking is less likely to get blocked by ITP, ETP (Firefox), Brave, and ad blockers.
Simpler consent management.
Consent banners (e.g., for GDPR) can apply directly to all endpoints under the same origin.
It becomes easier to manage user privacy preferences consistently across tags, pages, and endpoints.
Improved attribution accuracy.
Because the endpoint lives on the same origin, referrer headers are preserved, cookies persist longer, and less attribution loss occurs.
However, be aware of the challenges of setting up subfolders for SS tagging.
Challenges of using Sub-folder setup for GTM Server Side Tagging.
It is generally more difficult to set up a subfolder for SS tagging than a subdomain.
A subdomain can be configured with only DNS changes, making mapping easier.
Setting up a subfolder for SS tagging requires the website to run through the same service that handles the routing.
This often involves more complex configuration of web servers or reverse proxies (e.g., NGINX, Apache) to correctly route traffic to the server-side container.
1) When using a CDN (like Cloudflare), ensure it doesn’t cache /fun requests meant for tagging.
2) You can’t configure DNS for a subfolder, as DNS is domain-specific. This adds another layer of complexity to the subfolder setup.
3) You need to set up a reverse proxy or load balancer (e.g., NGINX, Apache, Cloudflare Workers) to forward traffic from /fun to your SS container.
What about the risk of getting your whole domain put on block list in ad-blockers / browsers?
It's no longer just a subdomain that could be blocked; it's now a full domain.
Valid but hypothetical concern, as Safari's ITP or other privacy-focused browsers do not apply IP heuristics when everything happens on the same origin.
In fact, you are more likely to encounter issues like IP-based expiration limits or tracking suspicion when using a subdomain, not a subfolder.
The risk of the whole domain being blocklisted due to tracking endpoints living in subfolders is still theoretical, at least for me, as in practice.
I haven't seen a real-world case where an entire domain was blocklisted because of using a subfolder or subdomain for server-side tagging.
Most blocklists (like EasyPrivacy or Disconnect) still target specific subdomains, URLs, or scripts, not entire first-party domains.
Follow the steps below to use a subfolder for GTM Server Side Tagging (Same Origin Tagging).
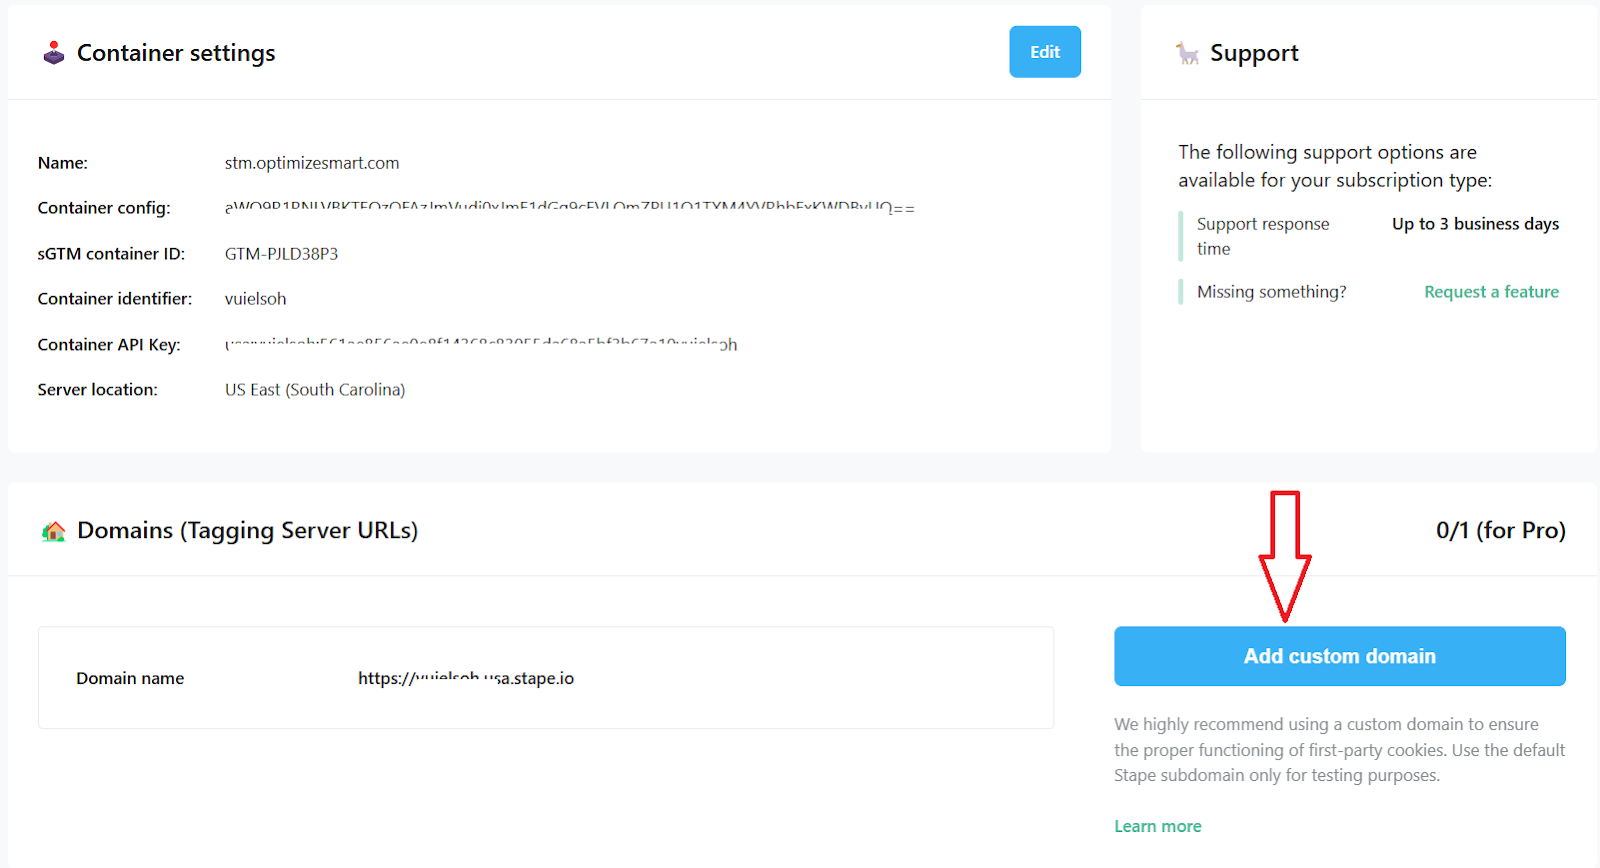
#1 Create a new server container. Name it something like stm.optimizesmart.com
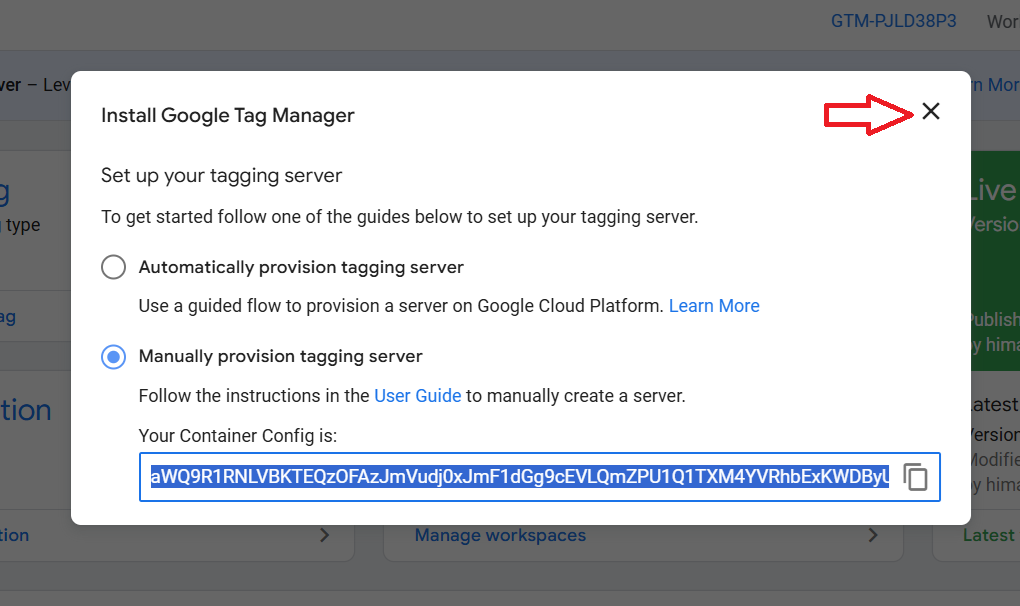
#2 Set up your tagging server by clicking on ‘Manually provision tagging server. ’
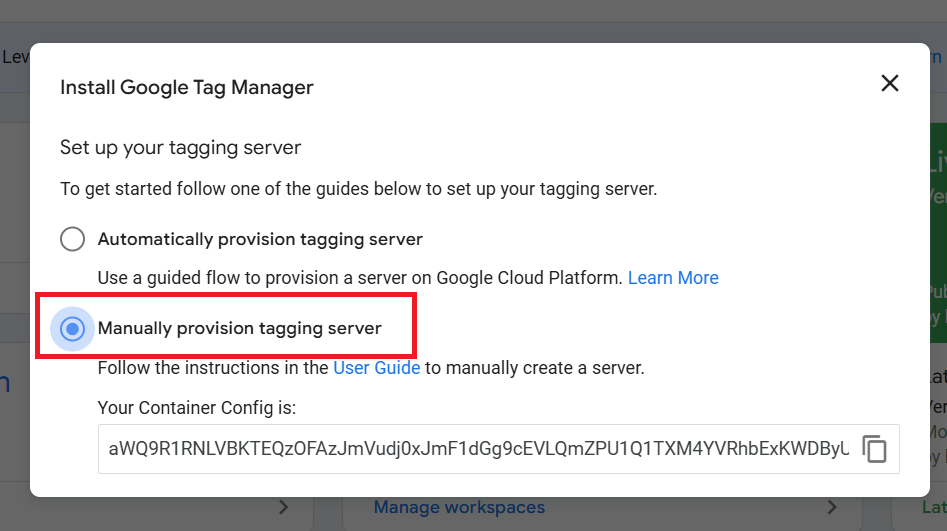
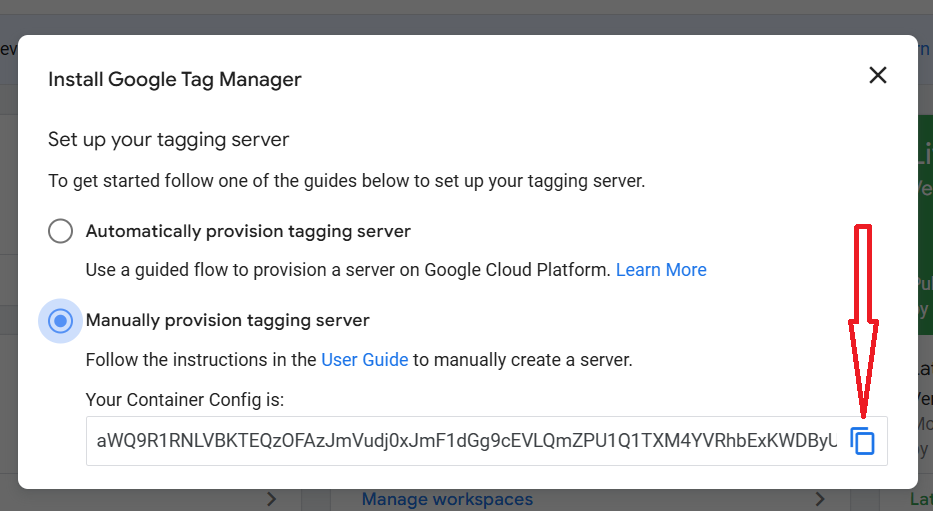
#3 Copy the container configuration:
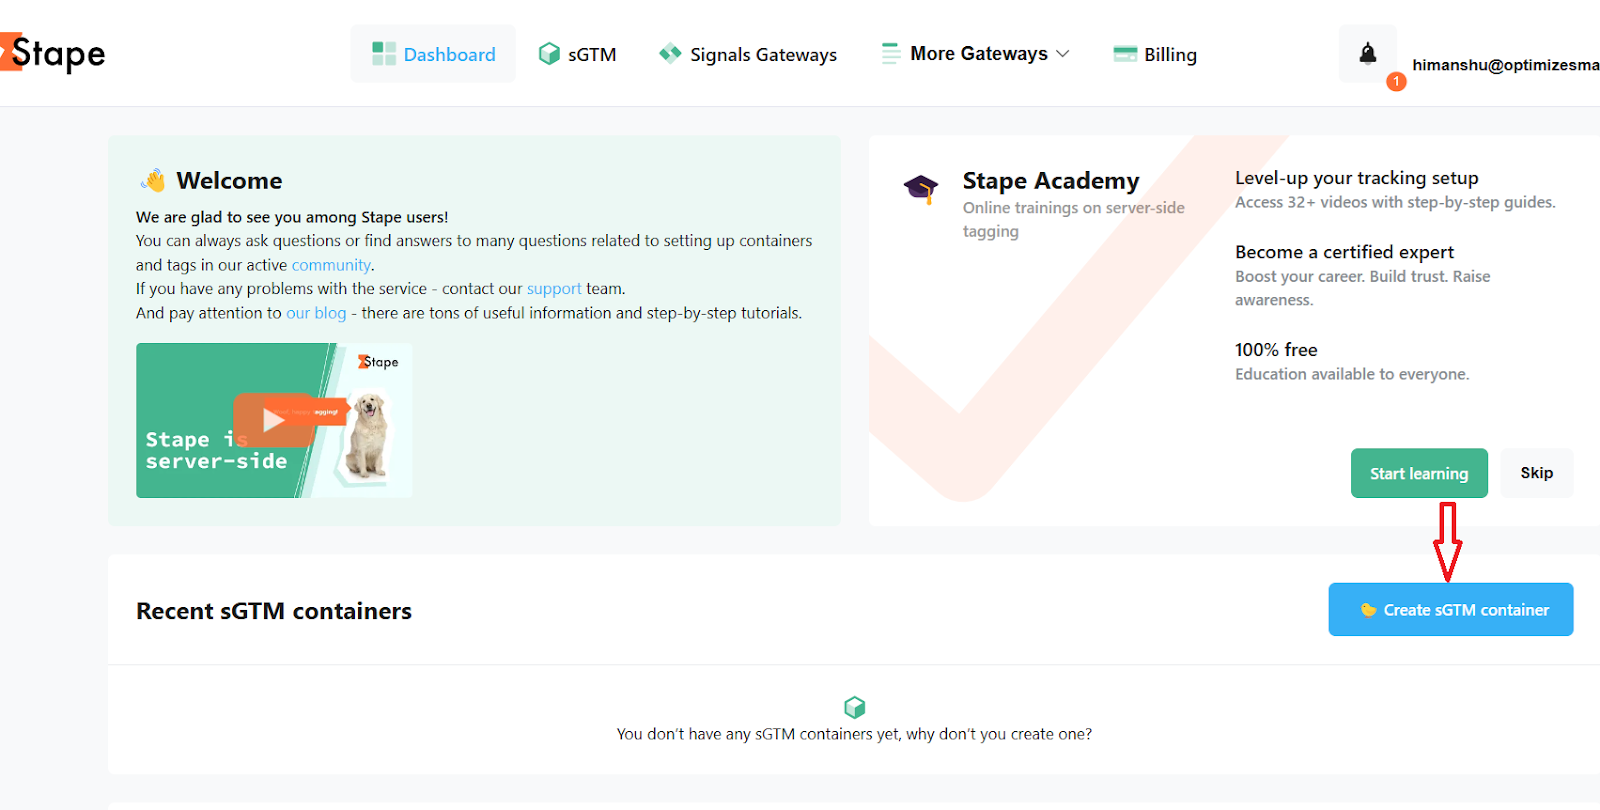
#4 Login to your Stape.io account and click on the button ‘Create sGTM container’:
#5 Add Container name: stm.optimizesmart.com
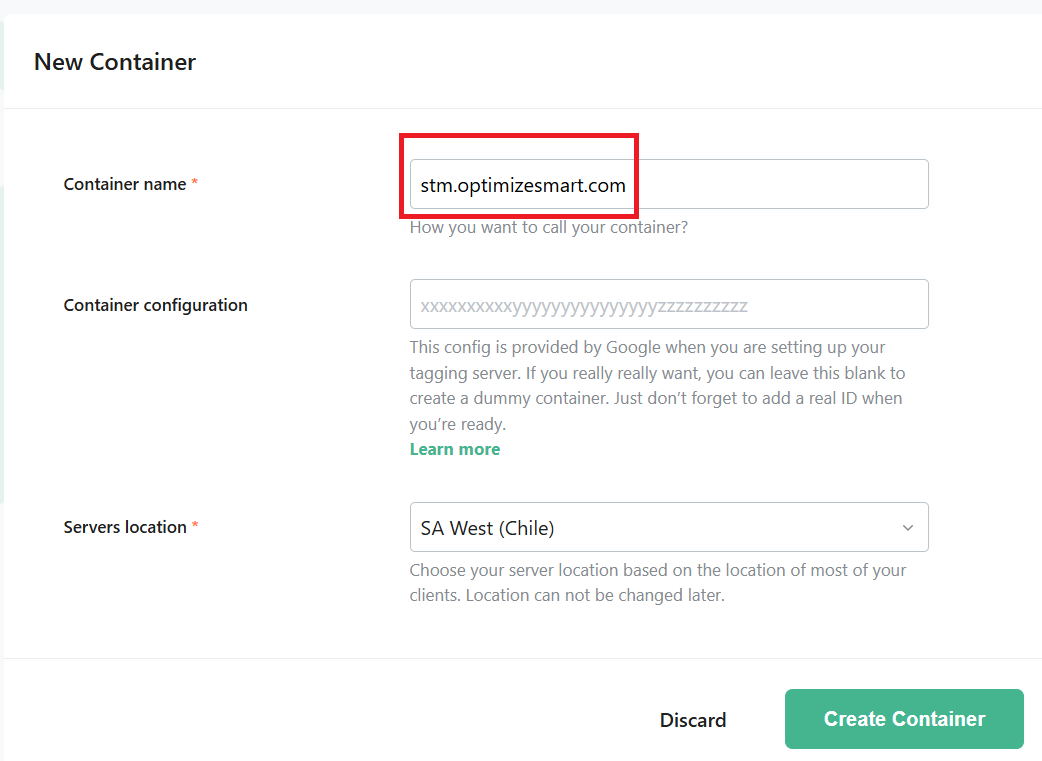
#6 Paste the container configuration you copied earlier:
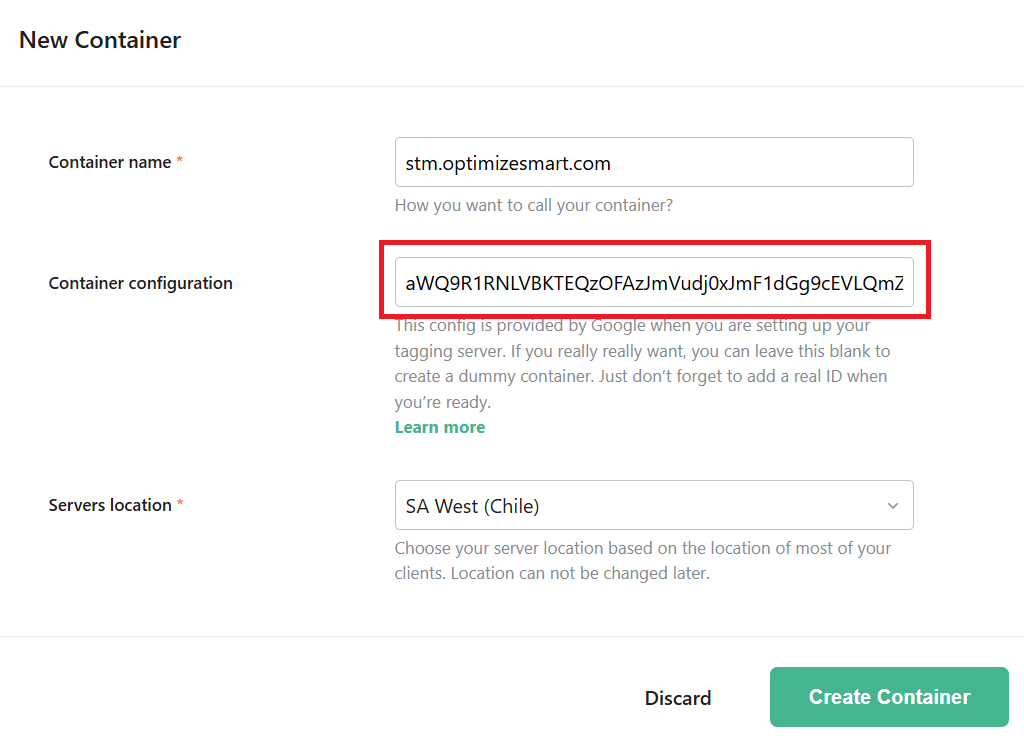
#7 Select a server location based on your legal region (the geographic boundary within which you are allowed or required to collect, store, or process personal data, based on the privacy laws that apply to your business and users).
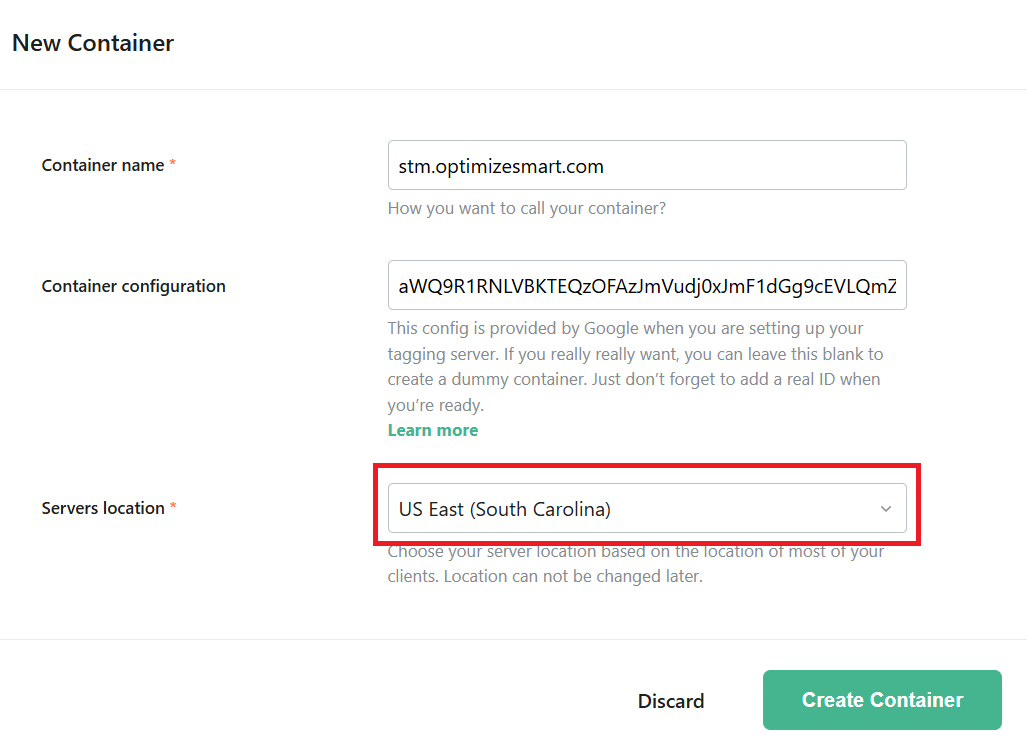
Note: Server location of your tagging server can not be changed later.
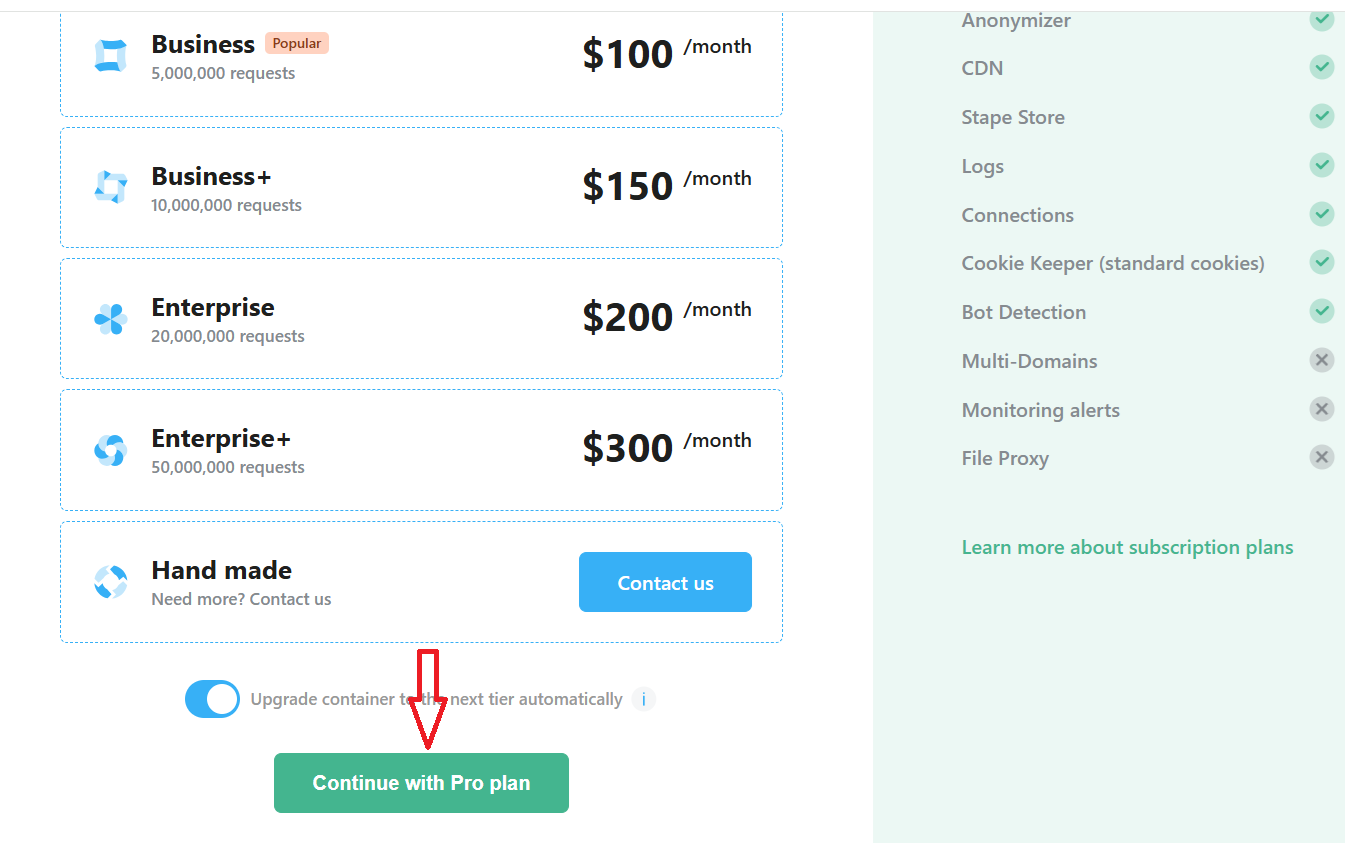
#8 Select a subscription plan for your GTM server container (based on the average number of monthly events recorded by your GA4 property) and then click on the ‘Continue with …’ button:
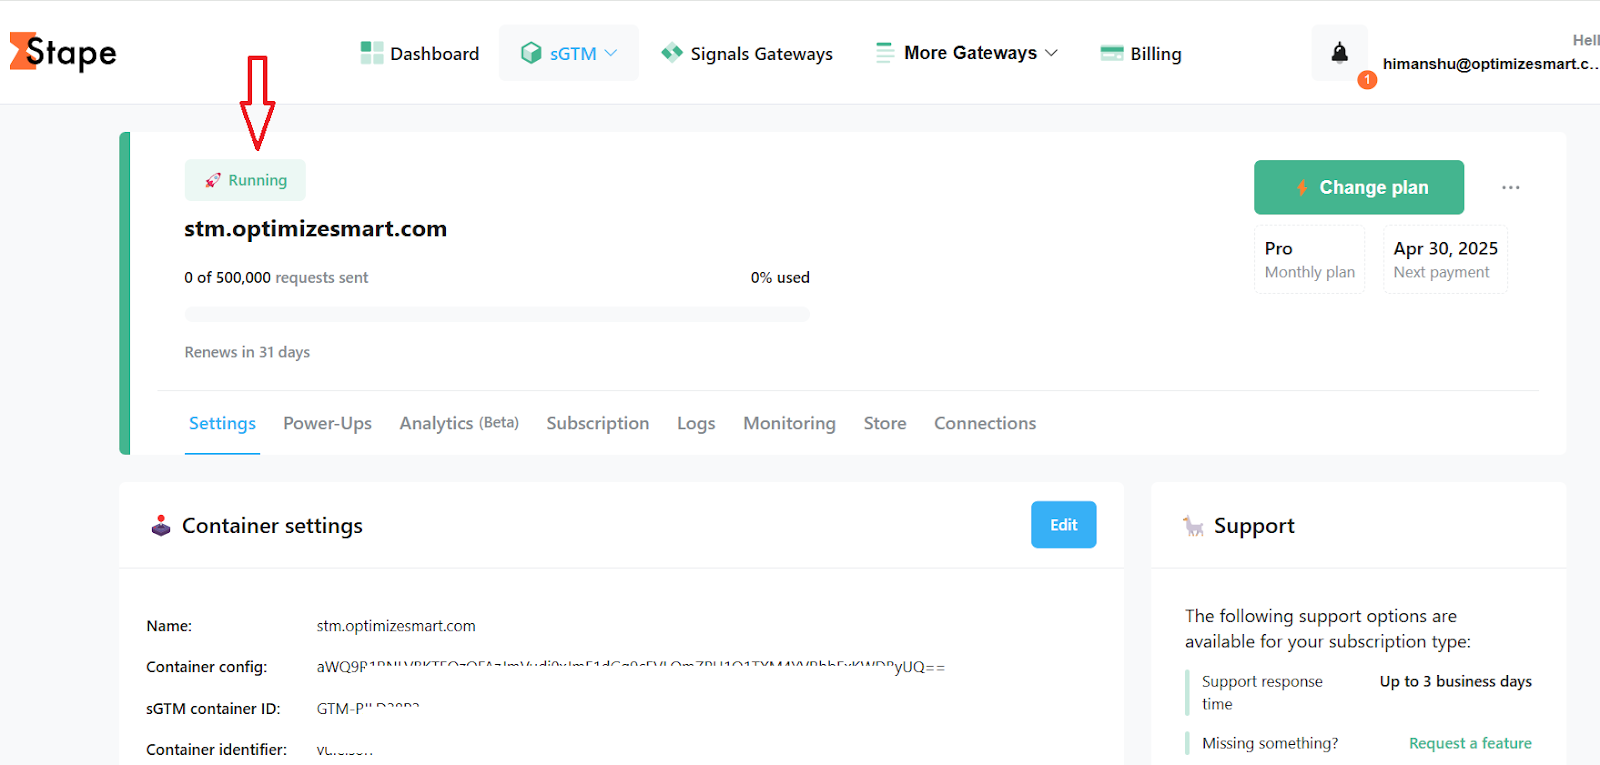
#9 Once you have completed the purchase, you should see a screen like the one below which the current status of your GTM server container (‘Running’):
#10 Map a custom domain for your server GTM container.
- Custom domain allows you to set first-party cookies so you can prolong the cookies' lifetime.
Types of custom domain configuration
#1 Default domain (this is the easiest to setup) - For example: abhddey.us.stape.io
- If you use the default domain, you will lose the ability to set first-party cookies as your sub-domain is hosted on a different domain.
- You can only set JavaScript cookies.
#2 Subdomain - For example: sgtm.example.com
- It gives you the ability to set first-party cookies.
- You will need to configure your CDN or use cookie keeper.
- ITP limits the lifespan of the first-party cookies if the first two octets of the IP address of the subdomain does not match the IP address of the main domain.
#3 Same origin - For example: example.com/stm
- This is the best option to choose.
There are two steps involved:
Step-1: Set up a custom sub-domain within your stape account. Configure the DNS records for the custom subdomain.
Step-2: Use a load balancer or CDN to configure the correct routing.
#11 Click on the button ‘Add Custom Domain’:
Note: Use the default Stape subdomain only for testing purposes. This is the recommendation from Stape.
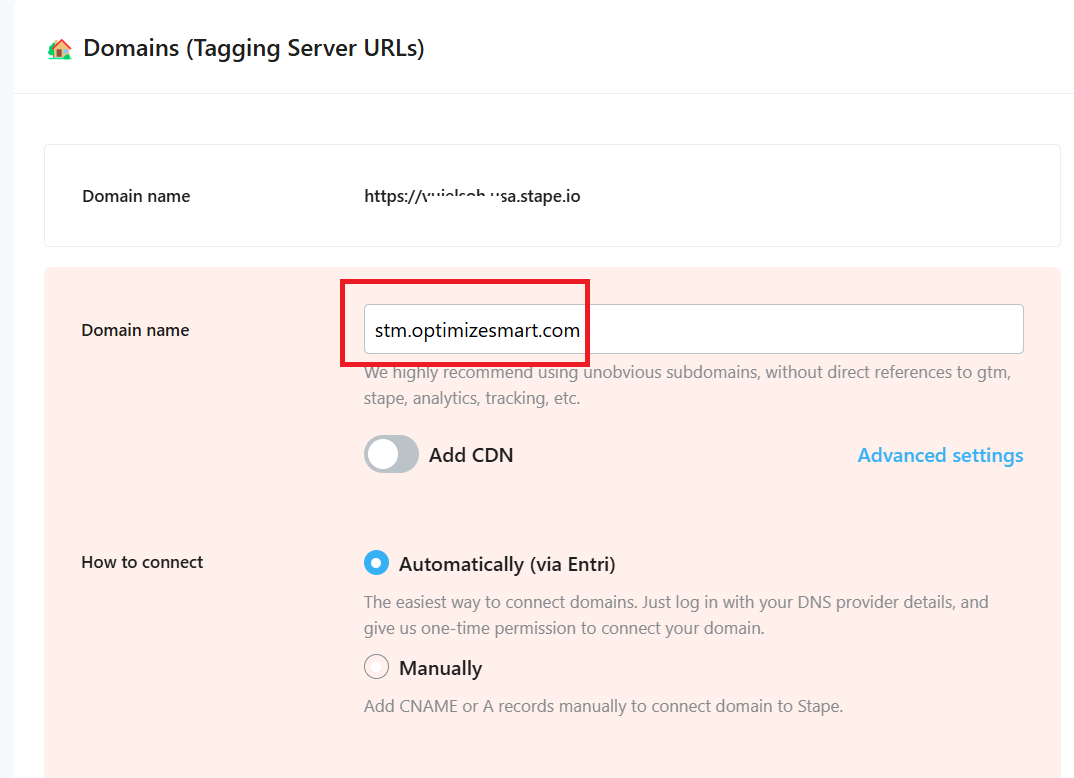
#12 Enter the name of your tagging subdomain:
Note: Avoid naming your subdomain which indicates tracking attempts like collection.example.com, tagging.example.com. sgtm.examples.com, gtm.example.com, analytics.example.com etc.
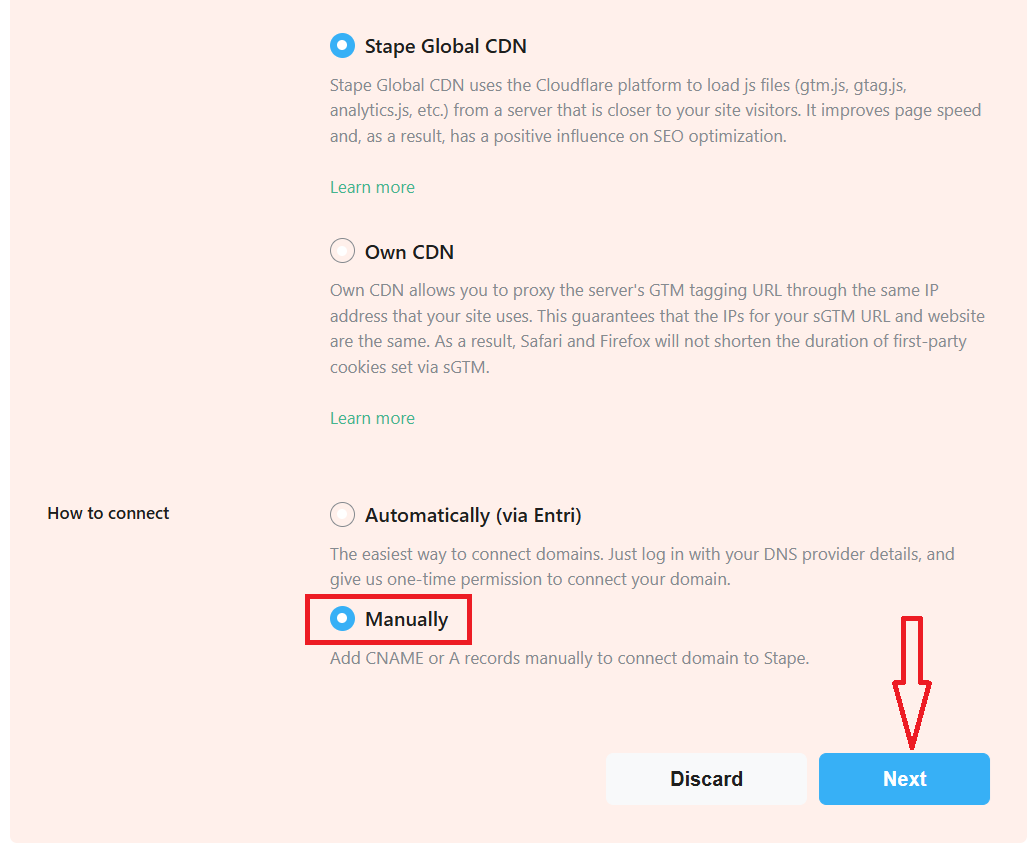
#13 Toggle on the ‘Add CDN’ button. Make sure the ‘Stape Global CDN’ is selected. This is what Stape recommends for same origin configuration.

#14 Select ‘Manually’ under ‘How to connect’ and then click on the ‘Next’ button:
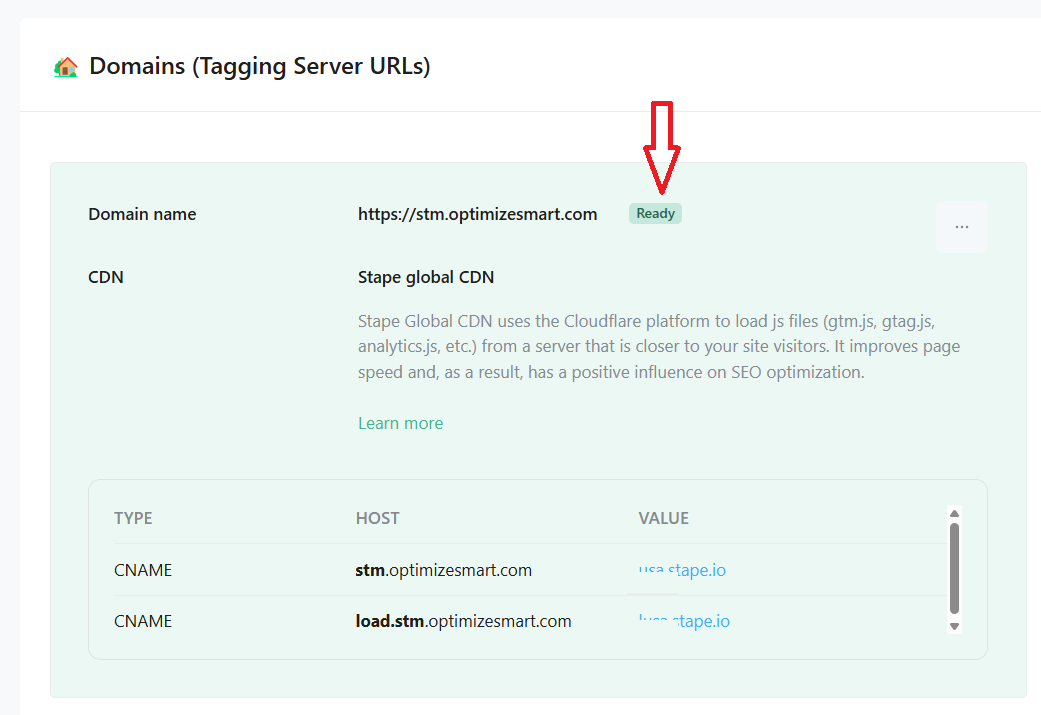
#15 Add the CNAME records you see to your DNS provider (like ‘Cloudflare’) and then click on the ‘Verify’ button:
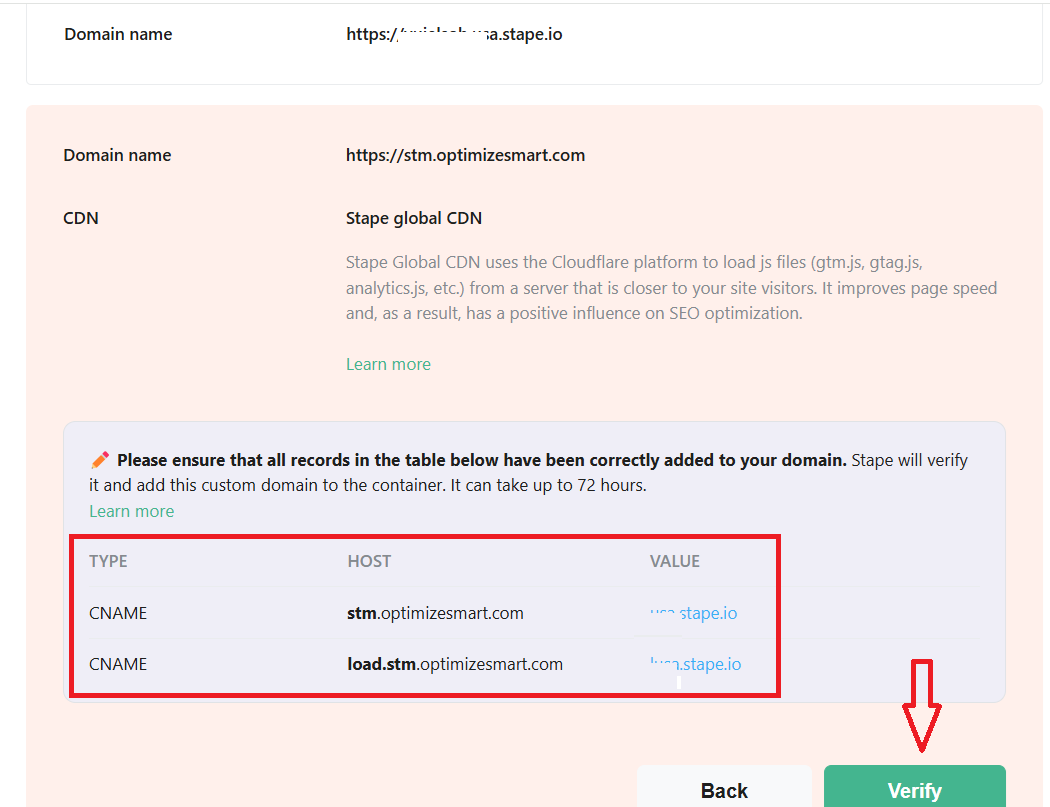
Note: Make sure that the proxy status is not enabled for these two CNAME records.
Once the verification is complete, you should see the ‘Ready’ status next to your tagging server URL:
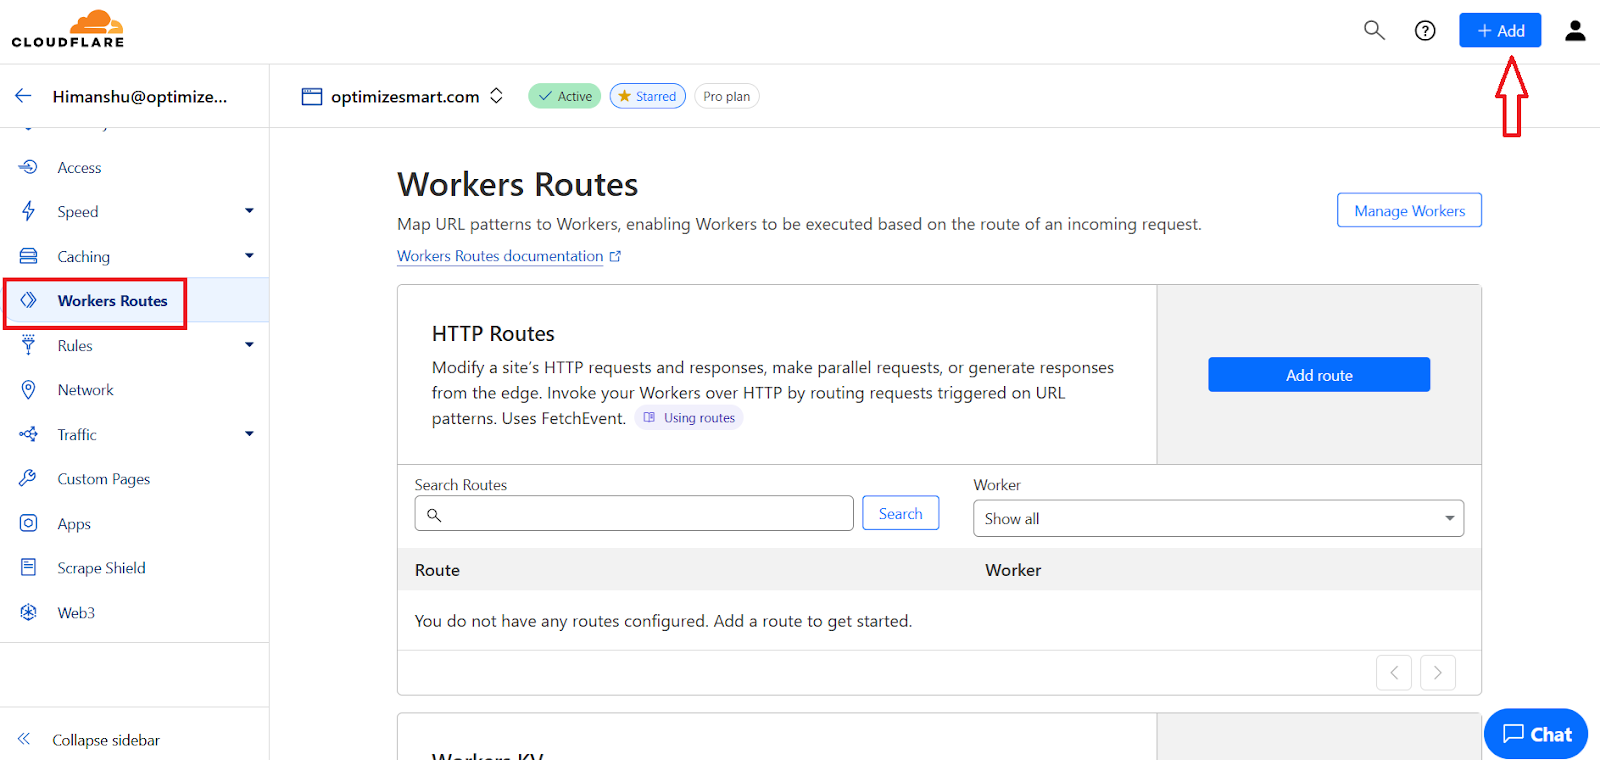
#16 Navigate to your CDN to set up worker. Since I use cloudflare, my steps are relevant to this CDN.
#17 Click on ‘Worker Routes’ from the left-hand menu and then click on the ‘+Add’ drop-down menu:
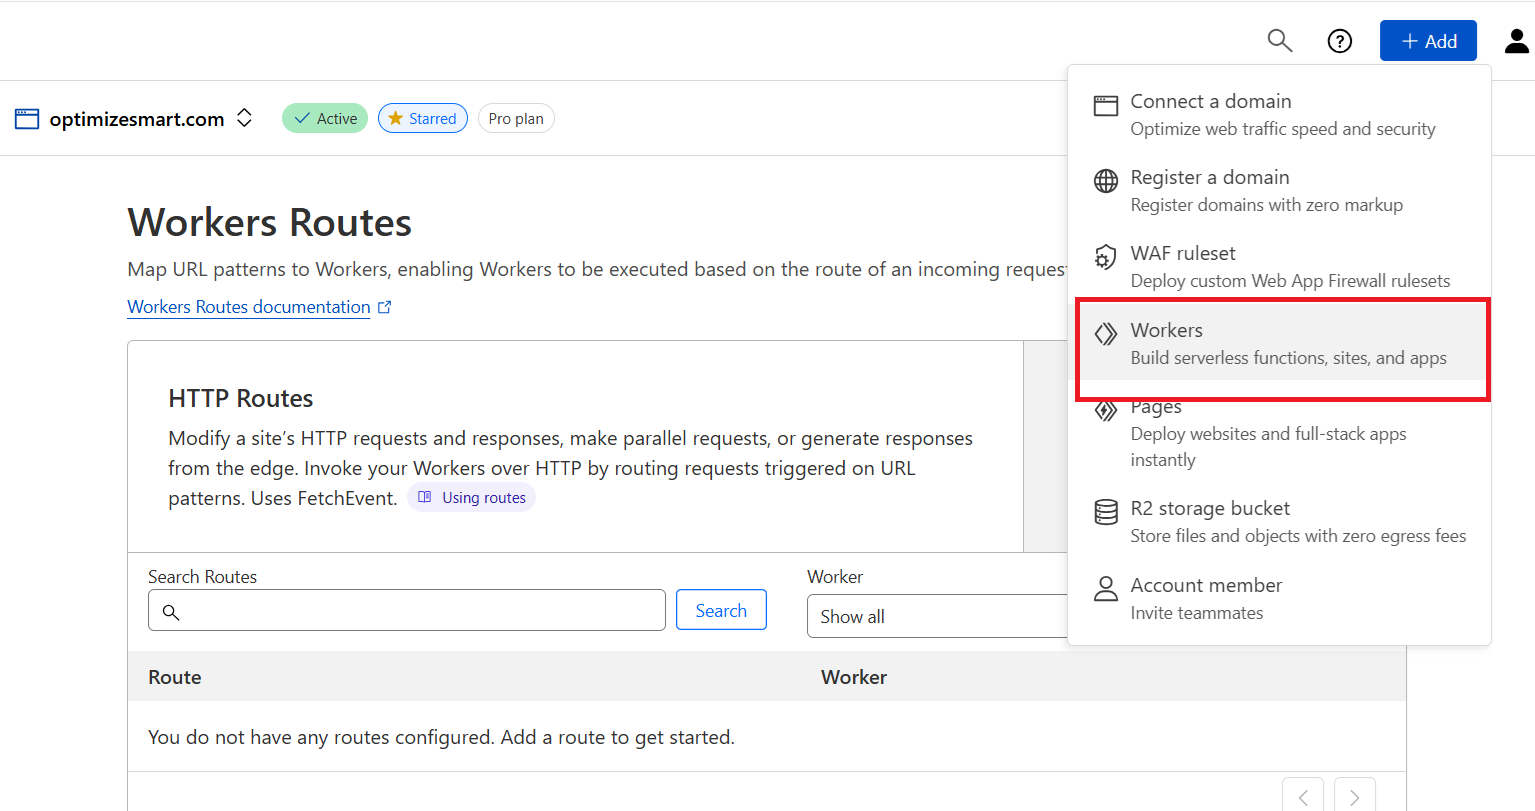
#18 Click on ‘Workers’:
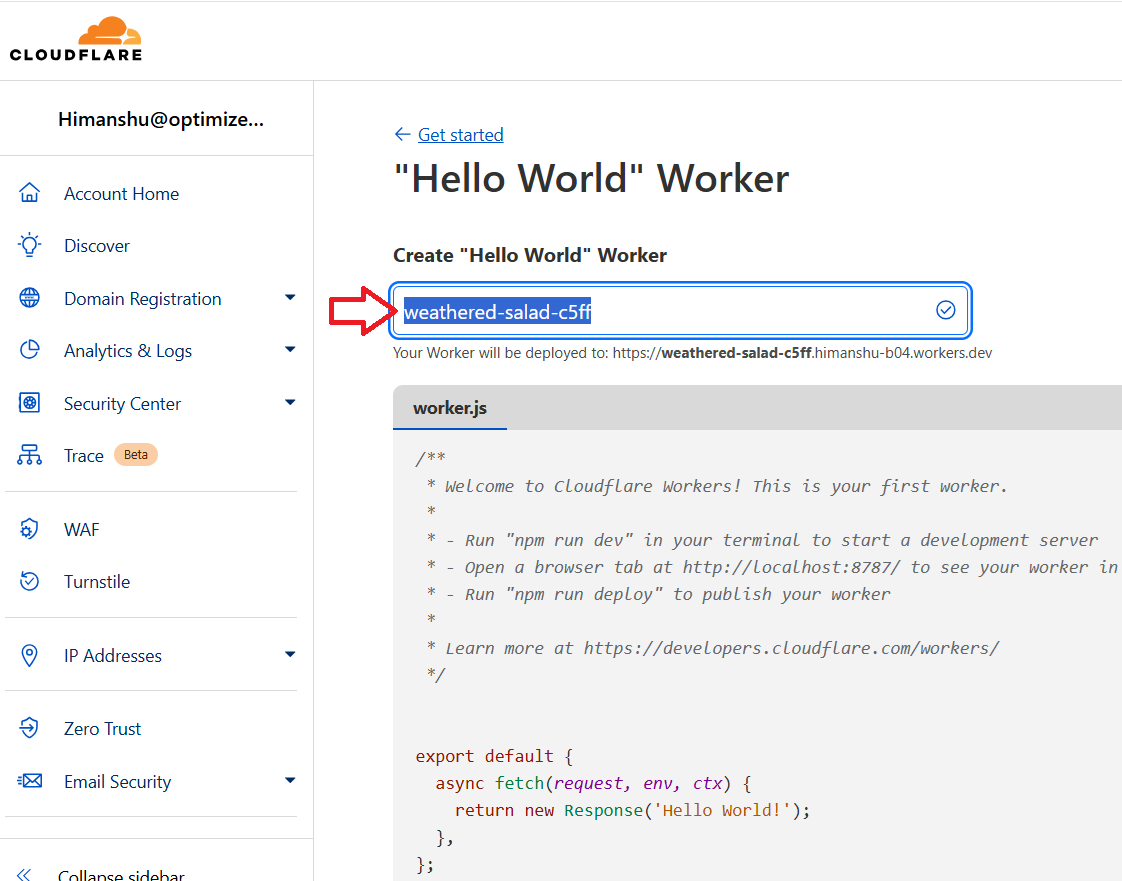
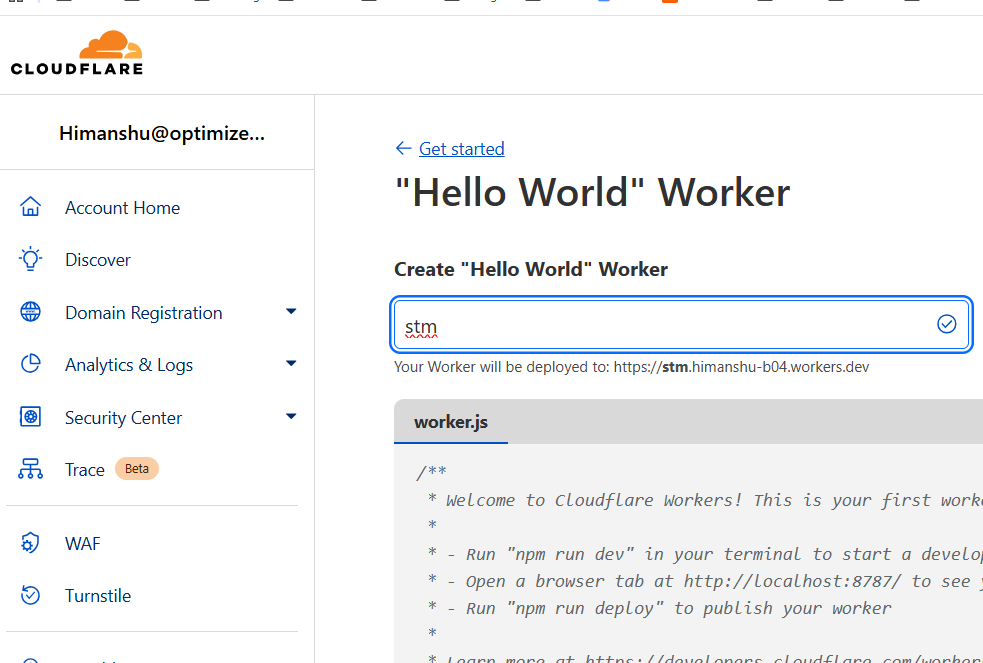
#19 Click on the ‘Hello world’ button:

#20 Rename the worker for easy reference:
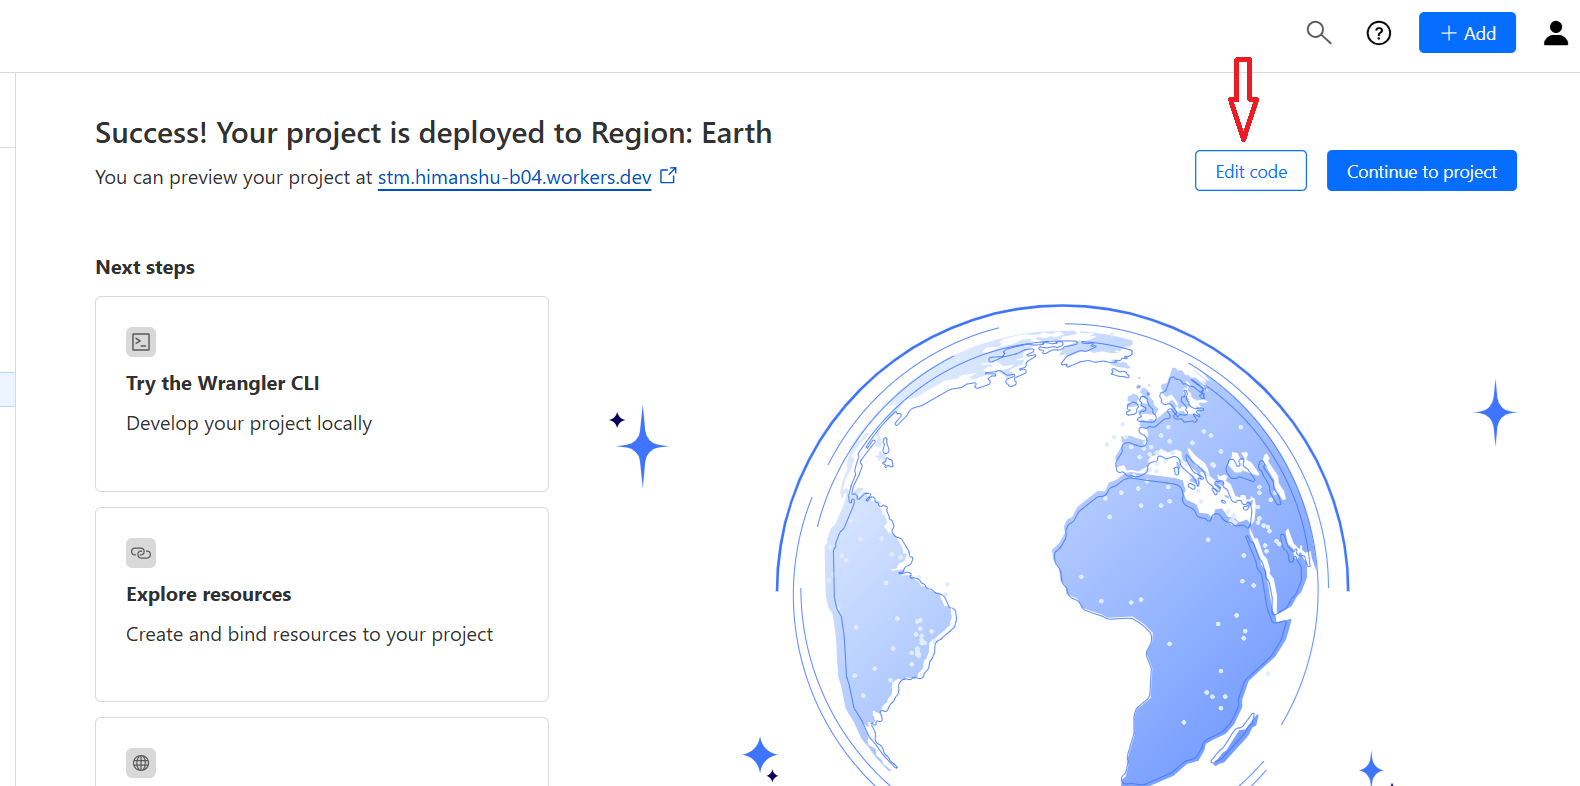
#21 Scroll down the screen and then click on the ‘Deploy’ button:
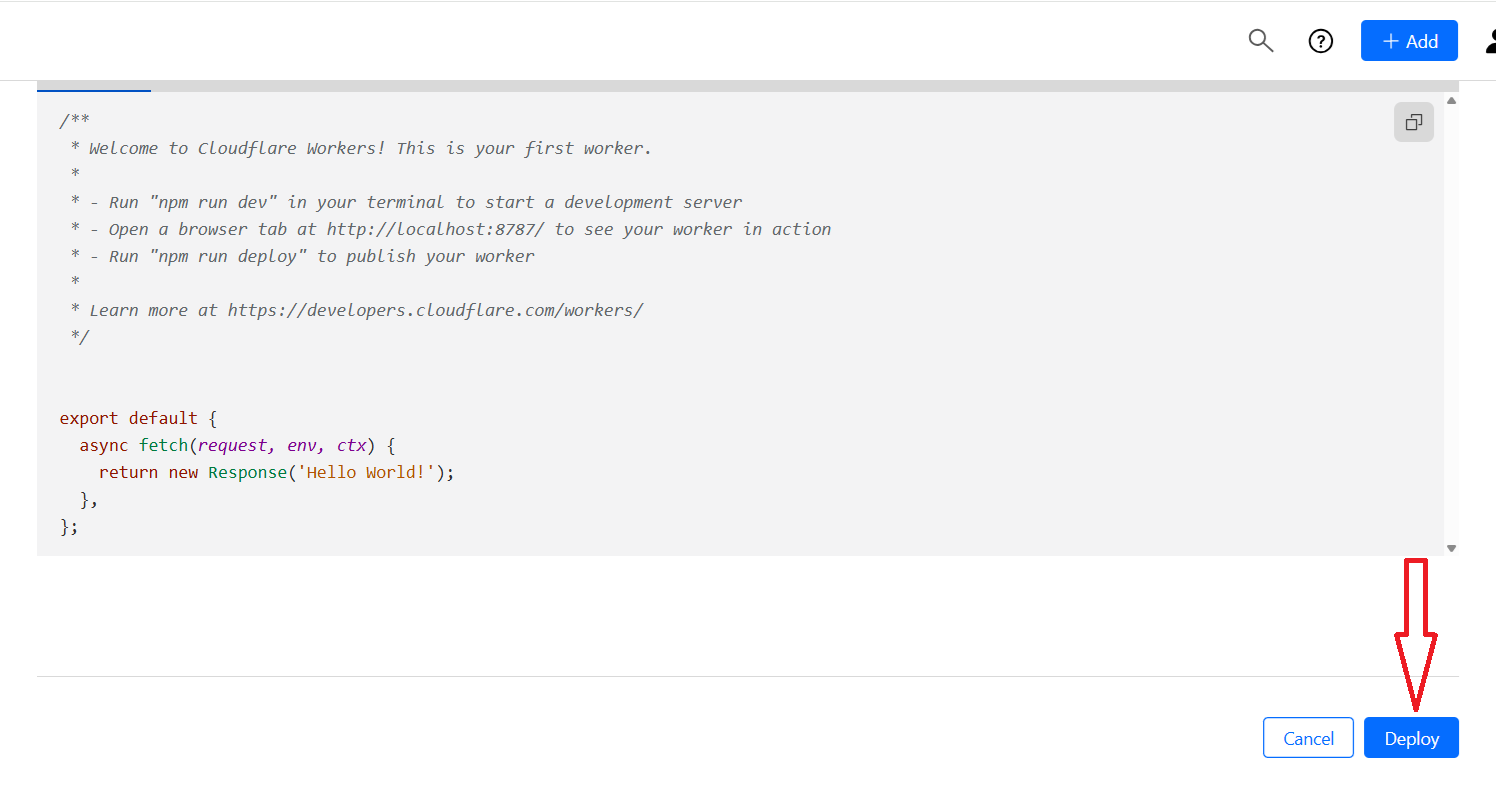
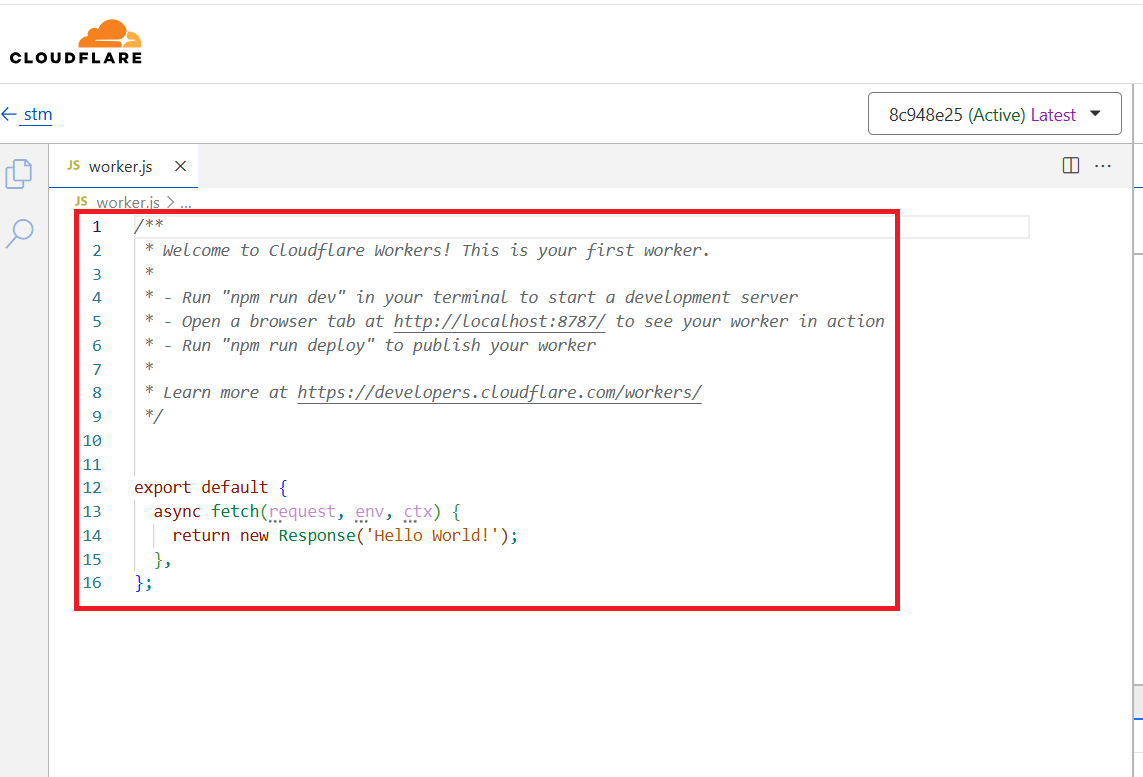
#22 Click on the ‘Edit Code’ button:
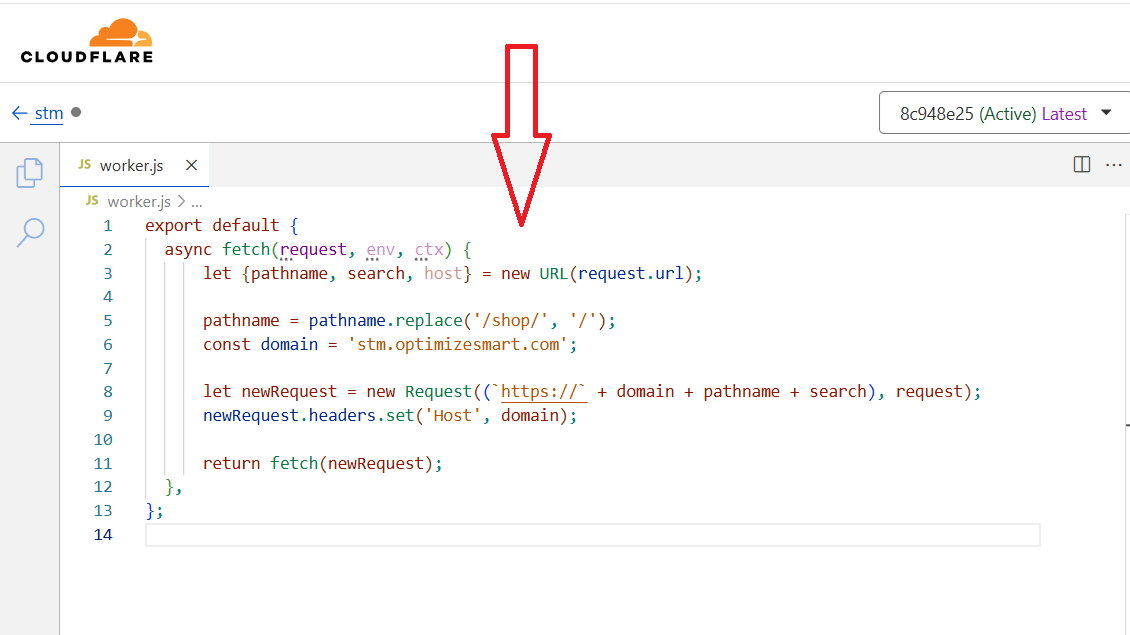
#23 Create JavaScript code similar to the one below, where:
/metrics/ - is a path you choose for your server container.
https://sgtm.stape.video/ - is your tagging server URL. There are two scenarios:
export default {
  async fetch(request, env, ctx) {
      let {pathname, search, host} = new URL(request.url);
      pathname = pathname.replace('/metrics/', '/');
      const domain = 'sgtm.stape.video';
      let newRequest = new Request((`https://` + domain + pathname + search), request);
      newRequest.headers.set('Host', domain);
      return fetch(newRequest);
  },
};
#24 Copy-paste your JavaScript code here and then click on the ‘Deploy’ button:
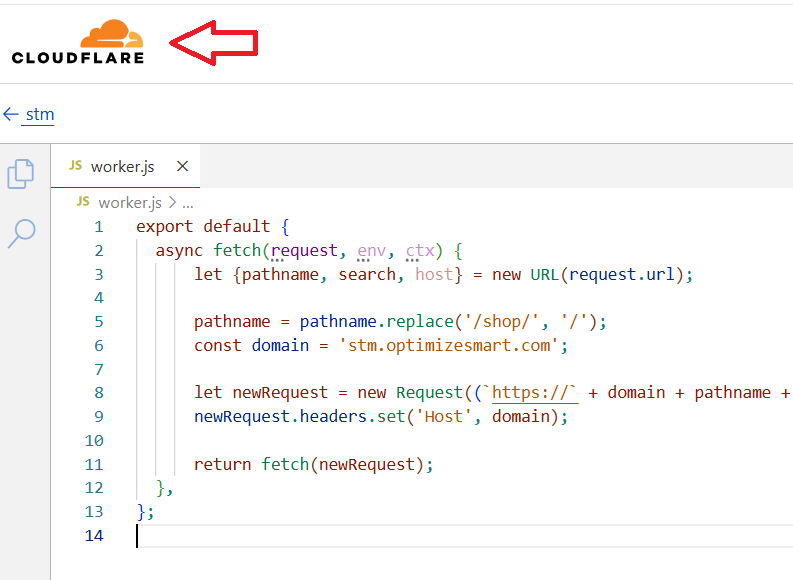
#25 Click on the cloudflare logo and navigate to your main domain:
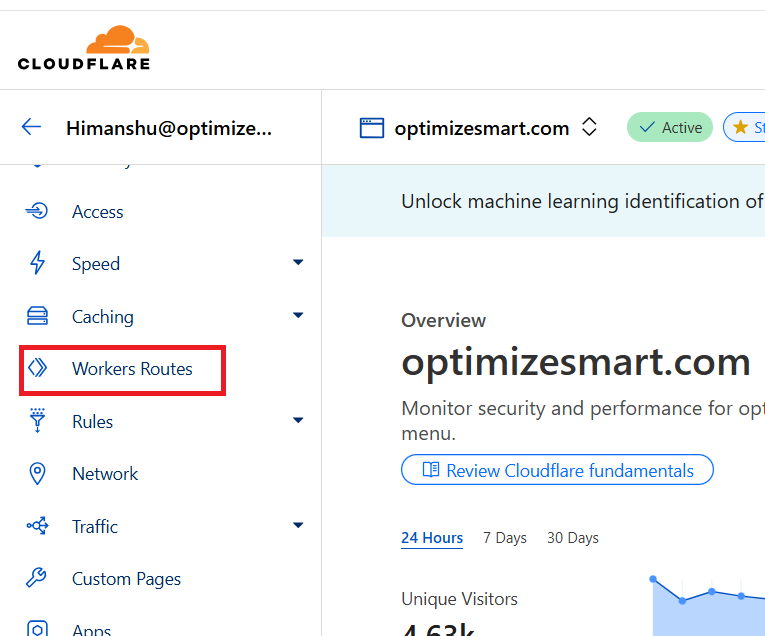
#26 Click on the ‘Workers Roues’ from the left-hand menu:
#27 Click on the ‘Add Route’ button:
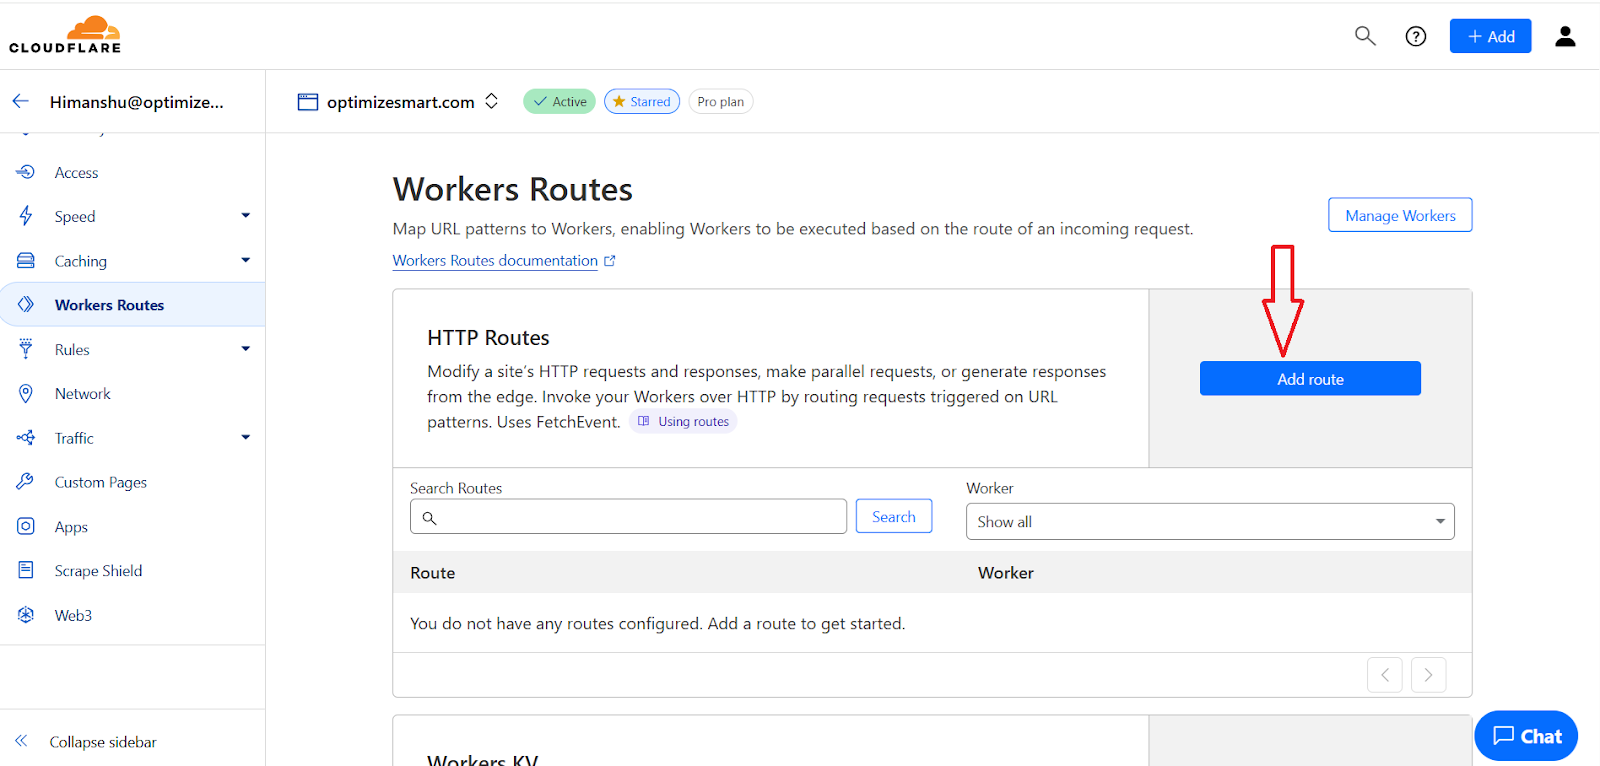
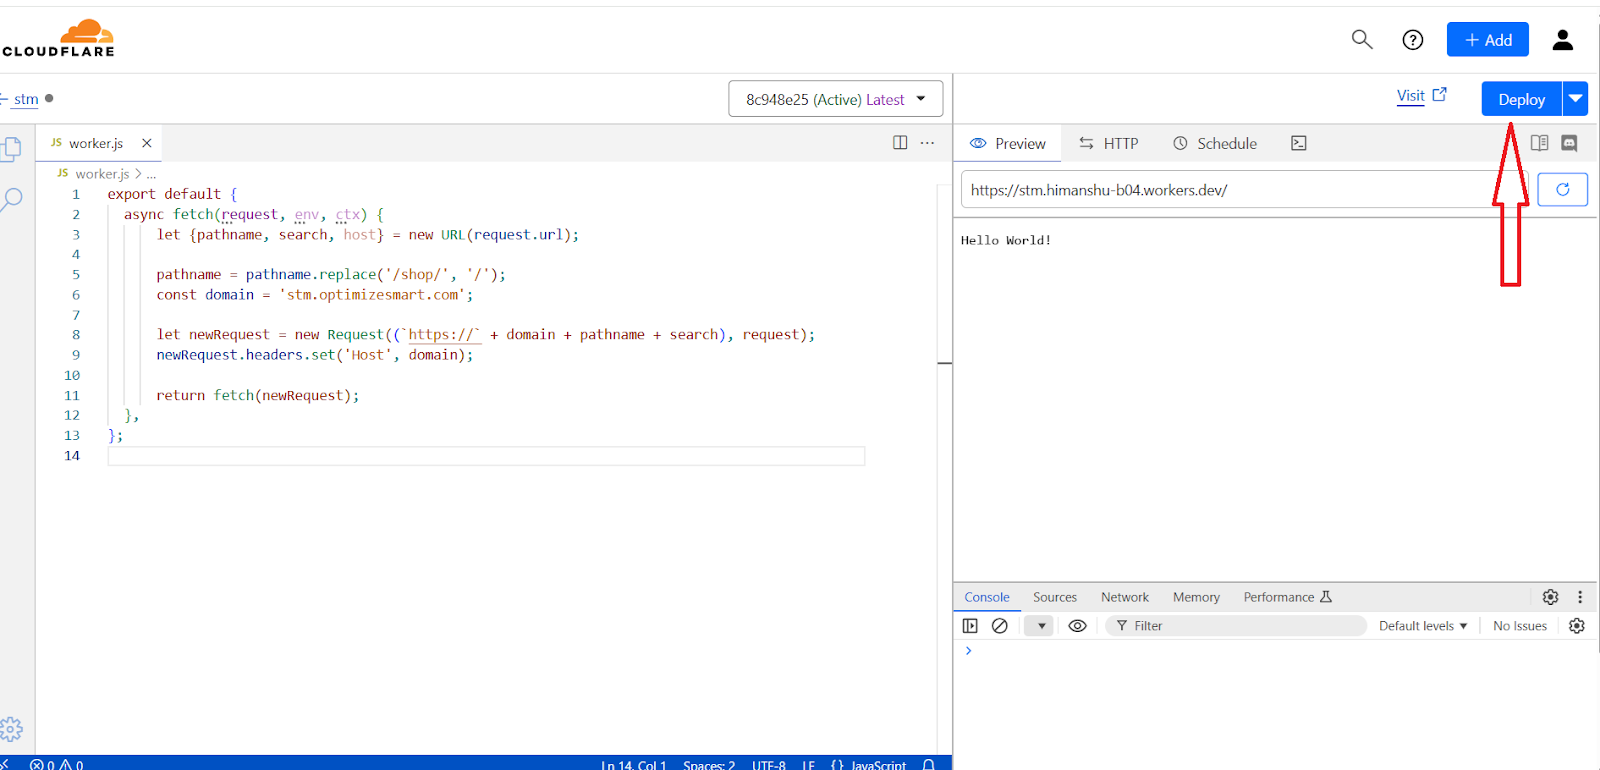
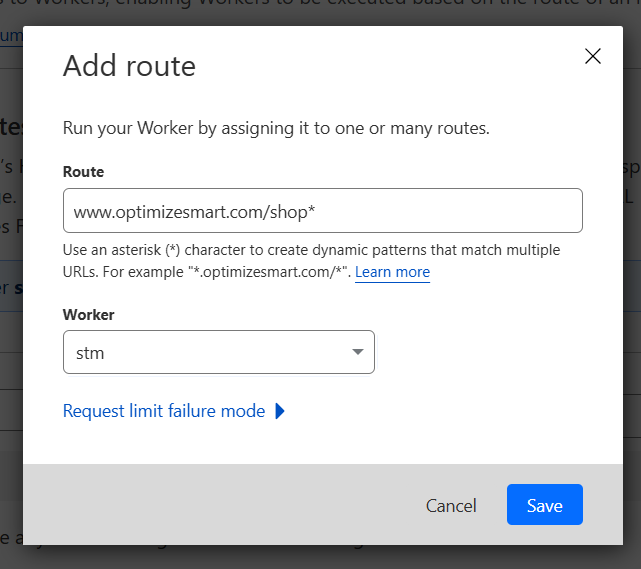
#28 Add the URL you use for server GTM ending with *. In my case, it’s www.optimizesmart.com/shop*, select the worker you’ve created on the previous steps and click on the ‘Save’ button:
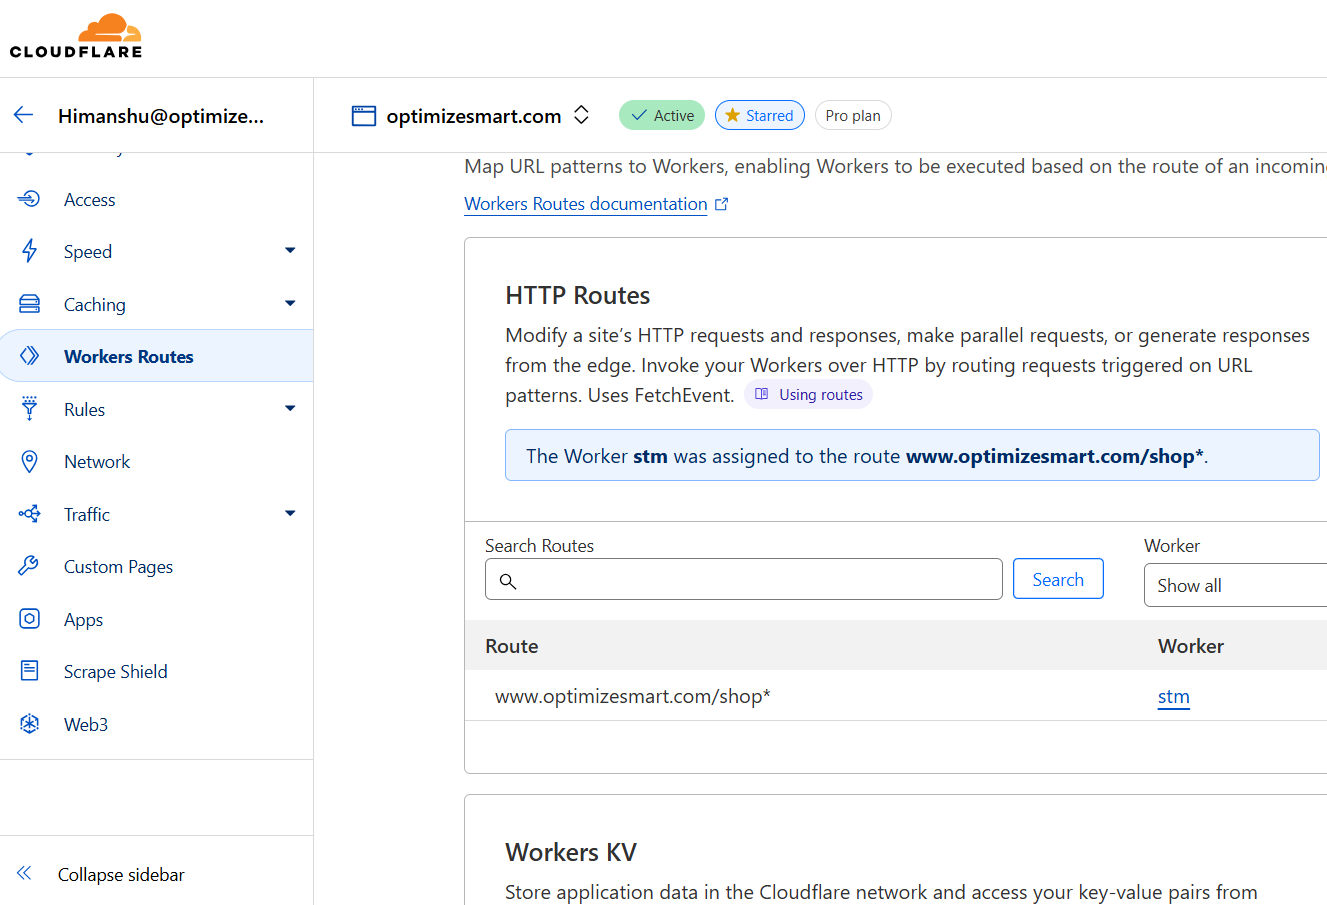
You should now see a screen like the one below:
#29 Test whether your tagging folder works correctly by adding /healthy to your tagging domain URL and then copy-paste the URL in your browser window.
For example: www.optimizesmart.com/shop/healthy
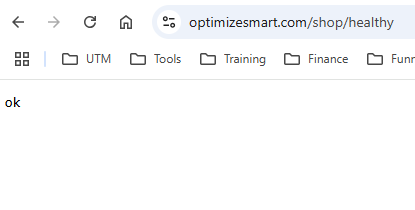
The ‘ok’ message means you have successfully configured your tagging folder.
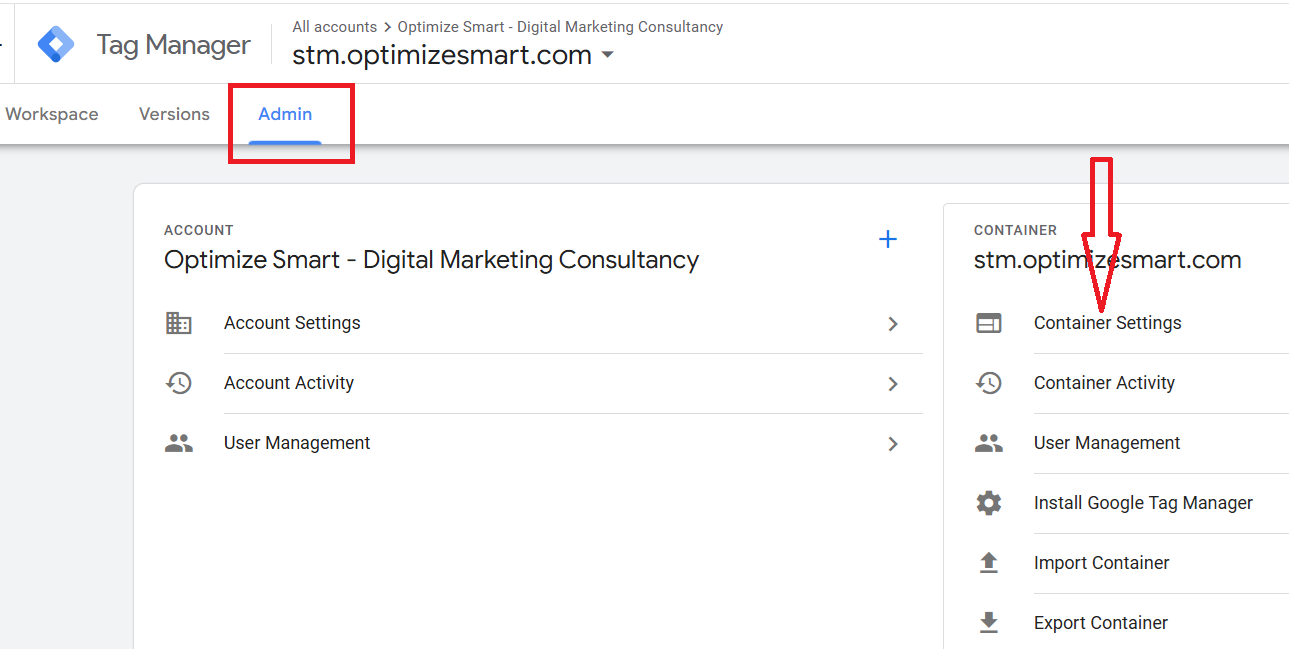
#30 Add this tagging sub-folder to your GTM server container:
30.1 Navigate back to your GTM server container and click on the cross button.
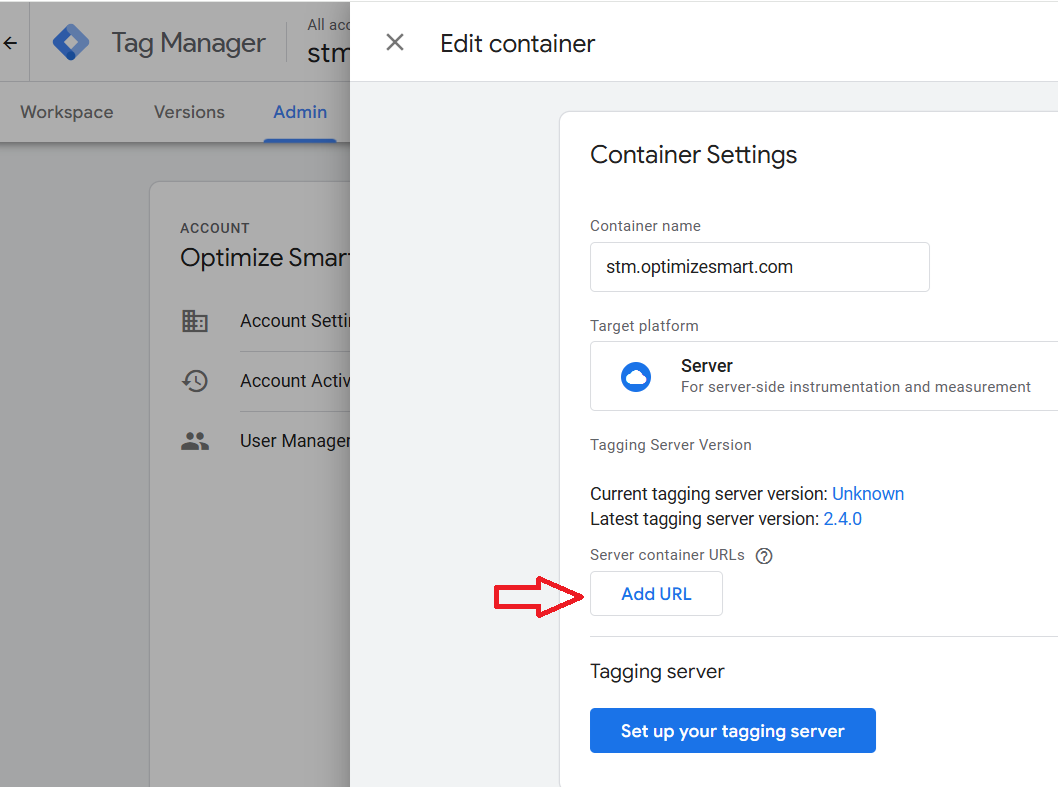
30.2 Navigate to ‘Admin’ > Container Settings:
30.3 Click on the ‘Add URL’ button:
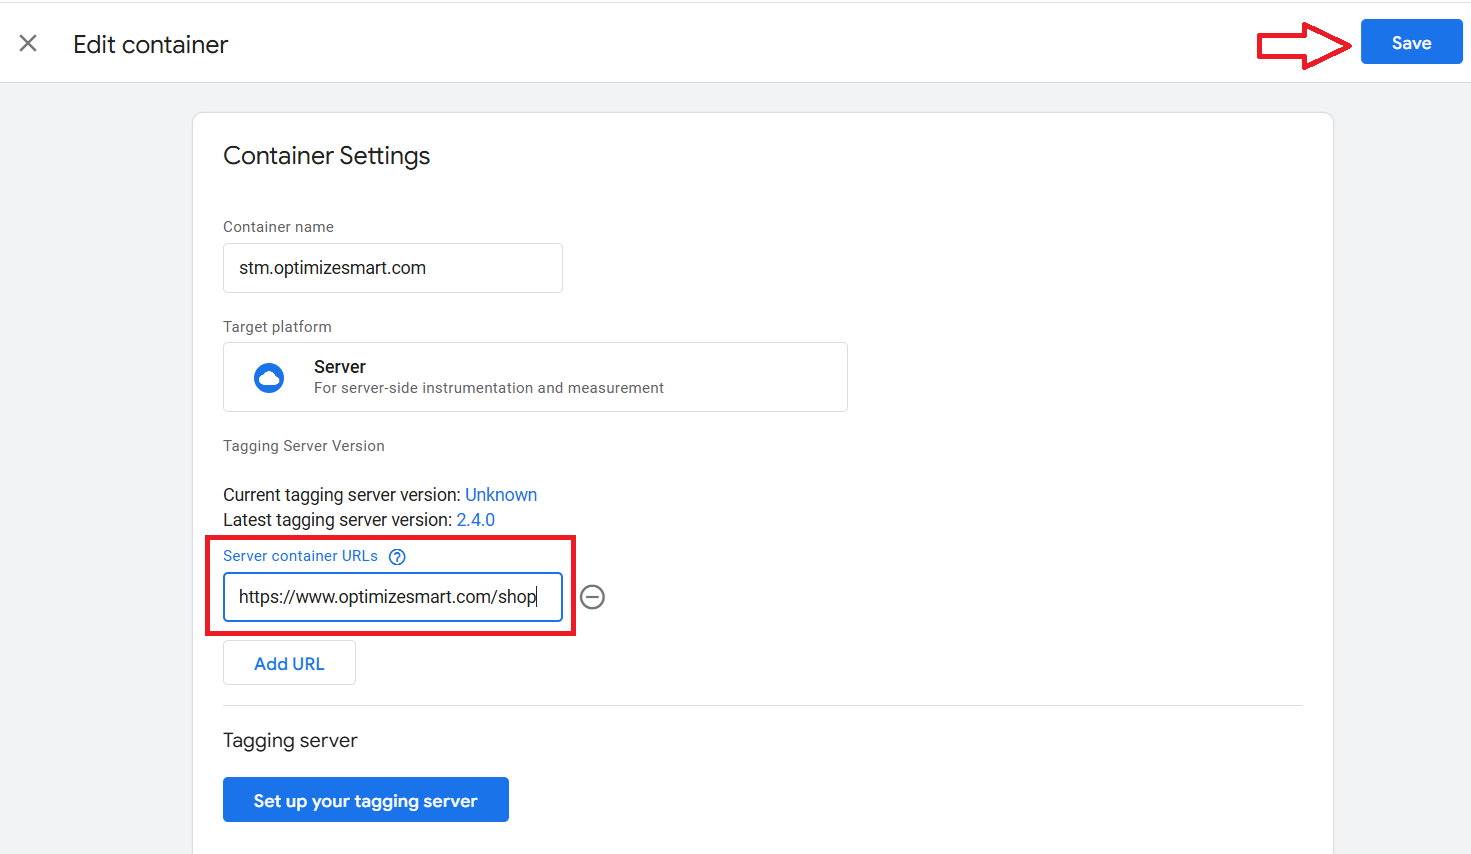
30.4 Add the URL of your tagging subfolder and then click on the ‘Save’ button:
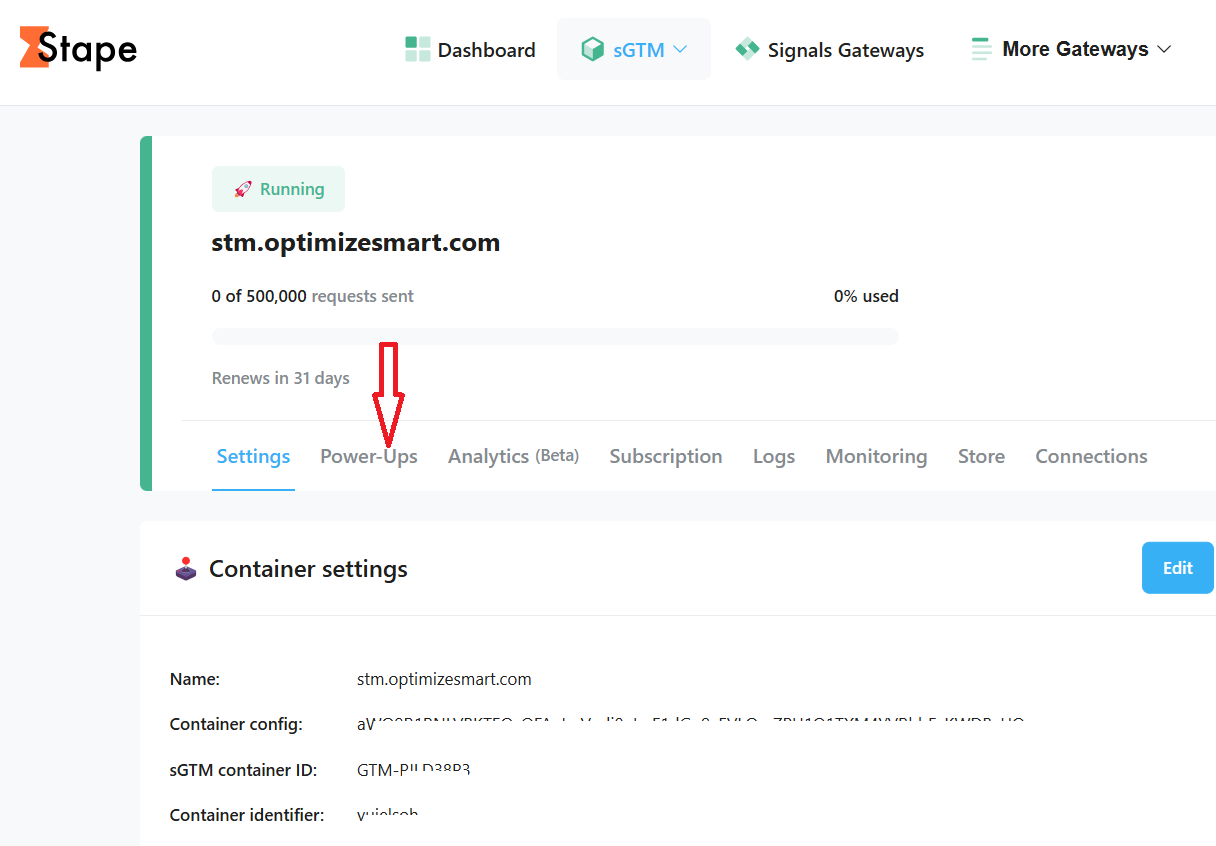
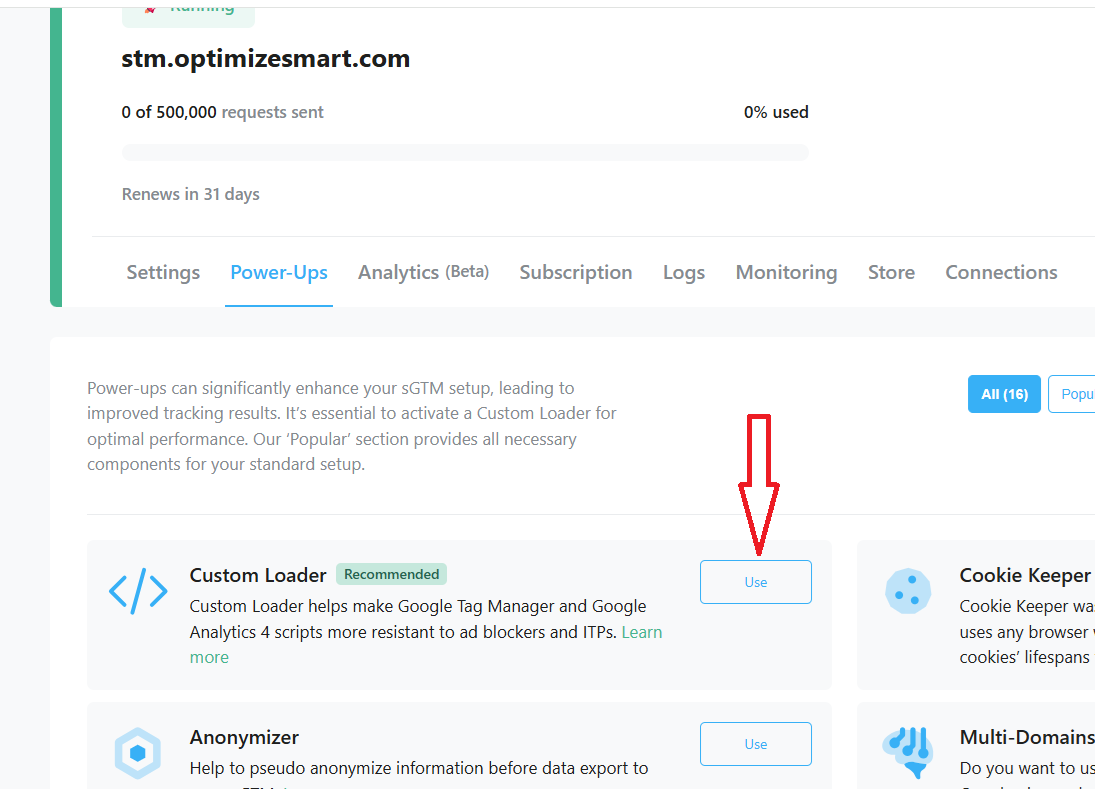
#31 Navigate back to your server container in your stape account and click on ‘Power ups’:
#32 Click on the ‘Use’ button next to the ‘Custom Loader’:
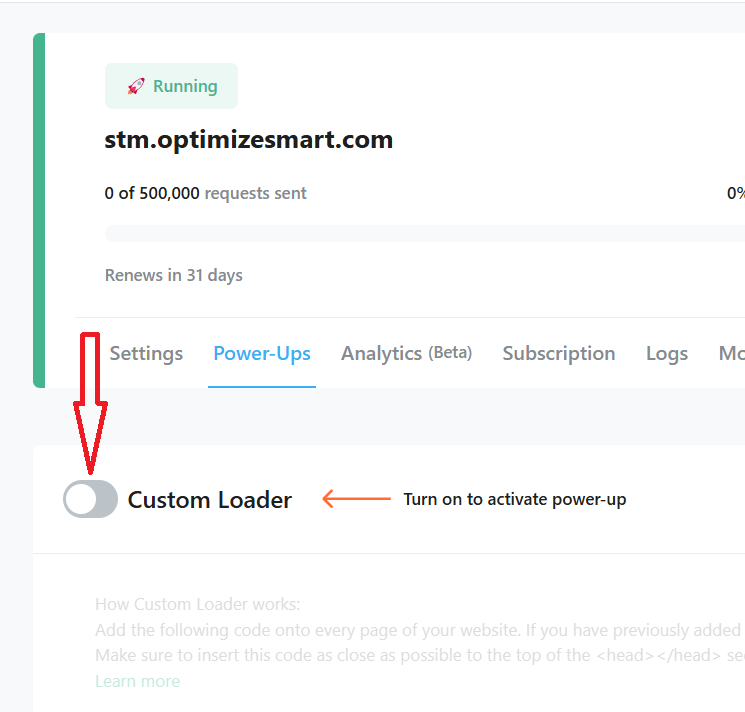
#33 Toggle the ‘Custom Loader’ switch to ON:
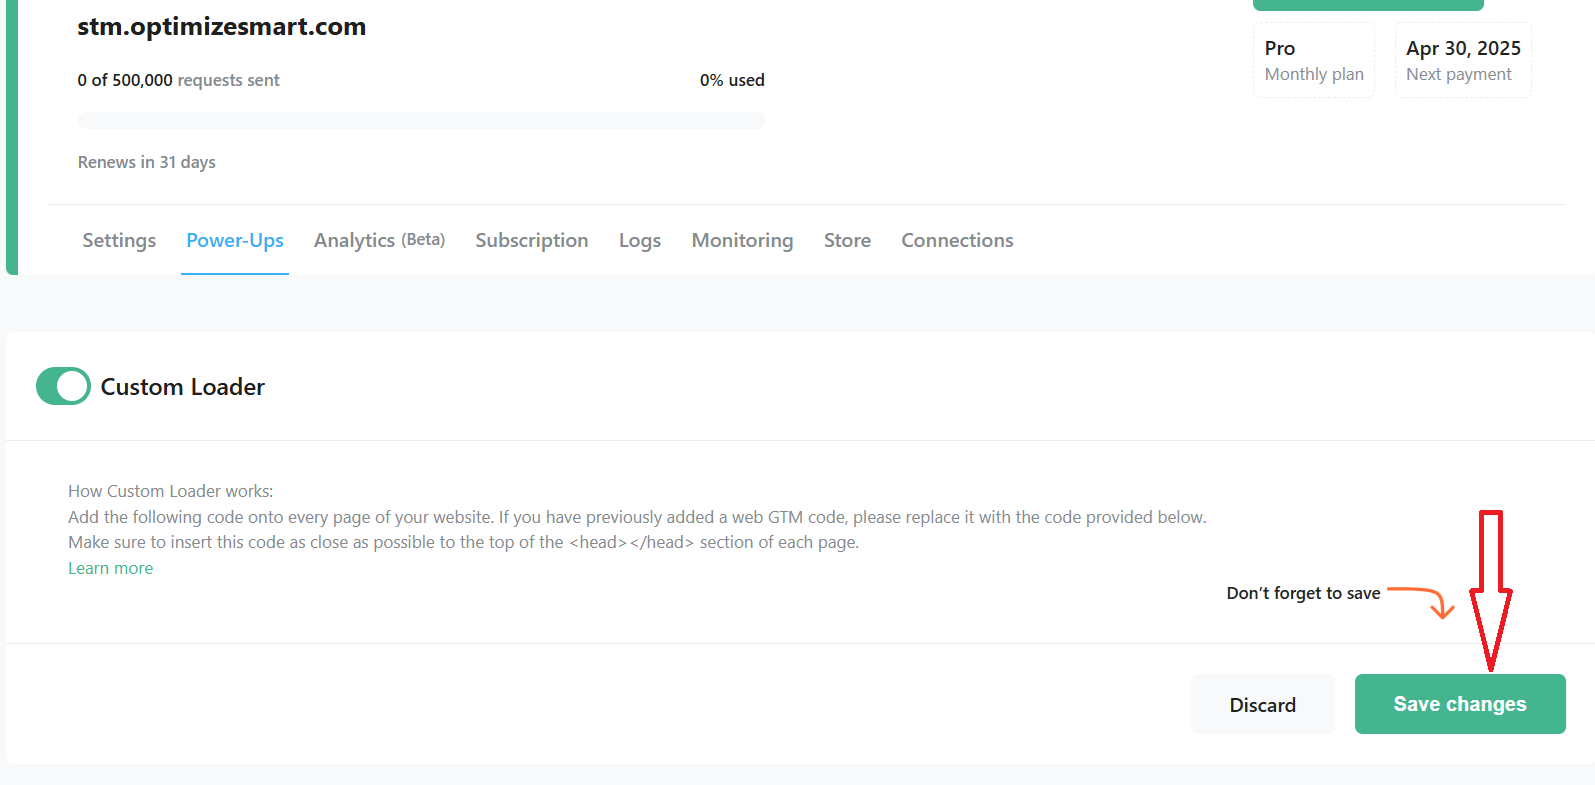
#34 Click on the ‘Save Changes’ button:
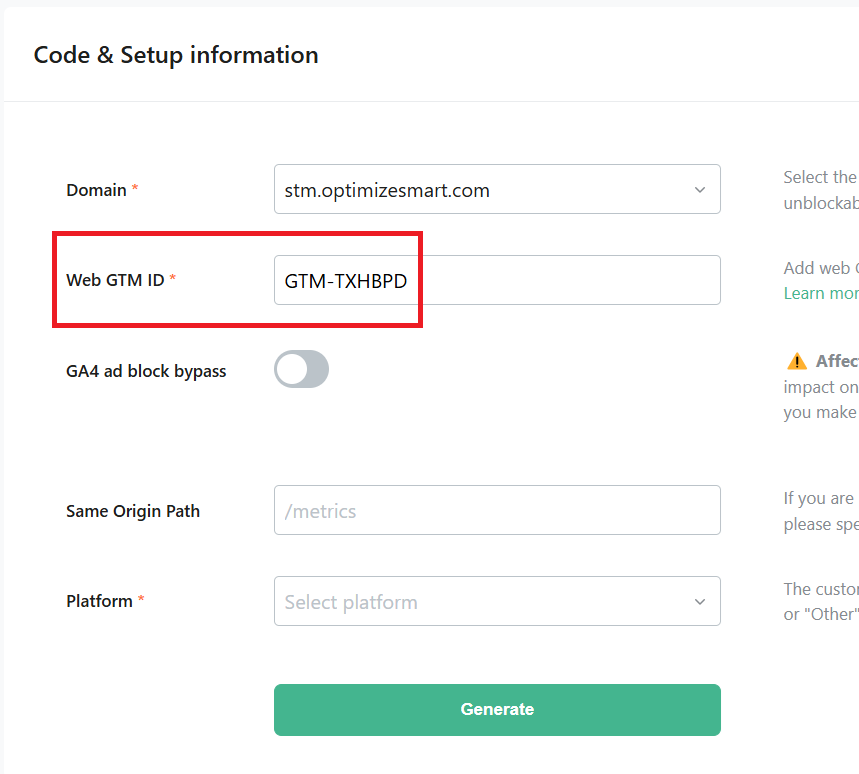
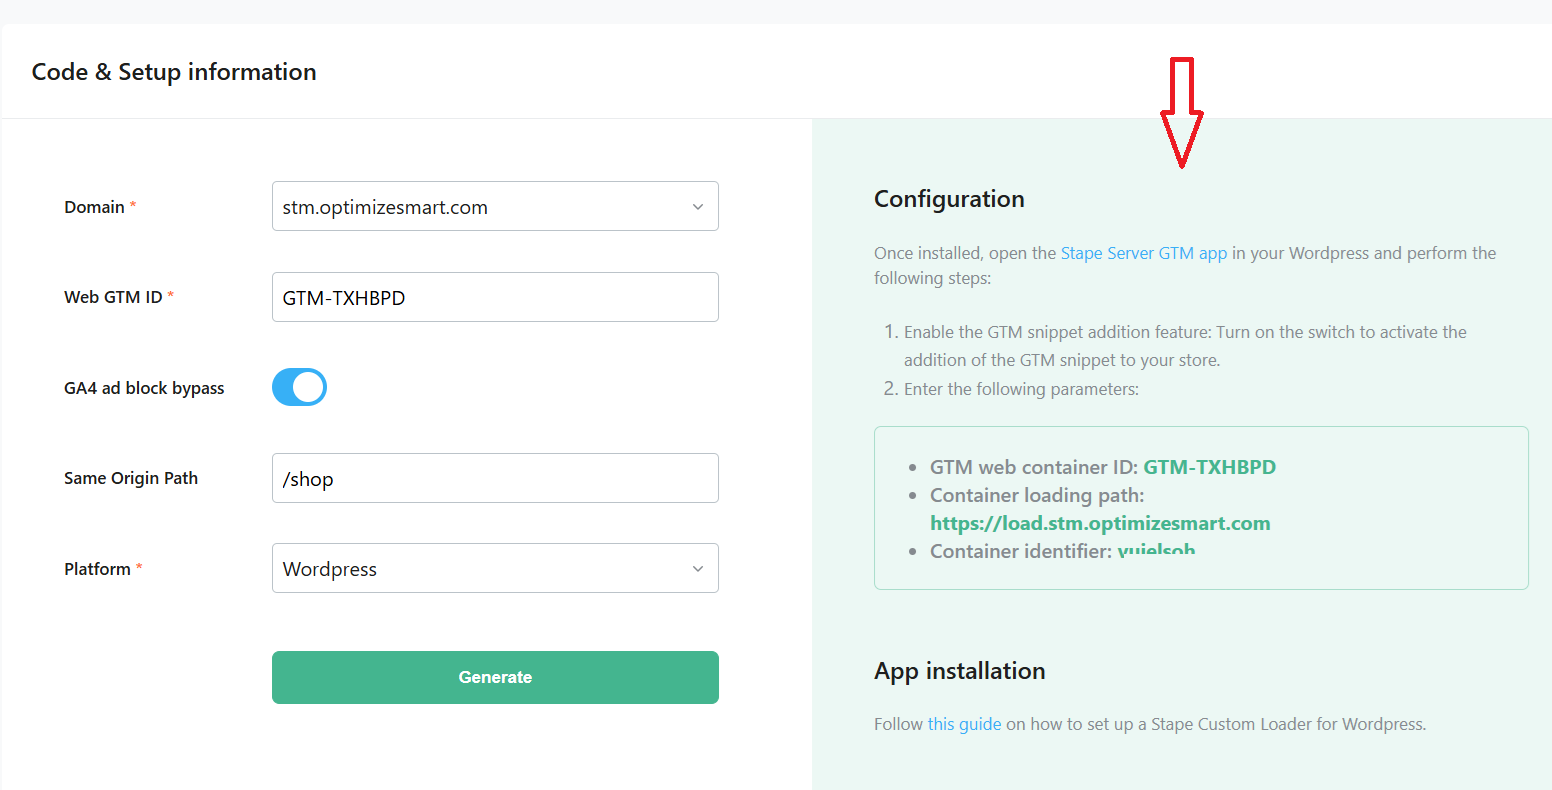
#35 Scroll down and enter your web GTM container ID:
#36 Switch the toggle button ‘GA4 ad block bypass’ to on:
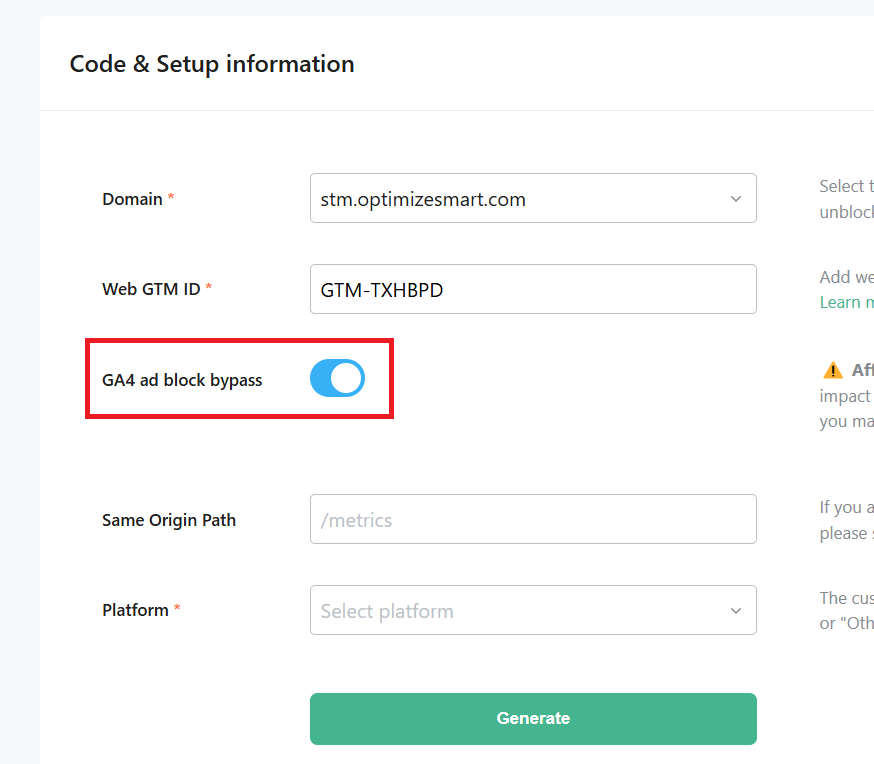
Note: This setting will affect both web and server container domains. After activating this setting, be sure to debug both the web and server GTM containers.
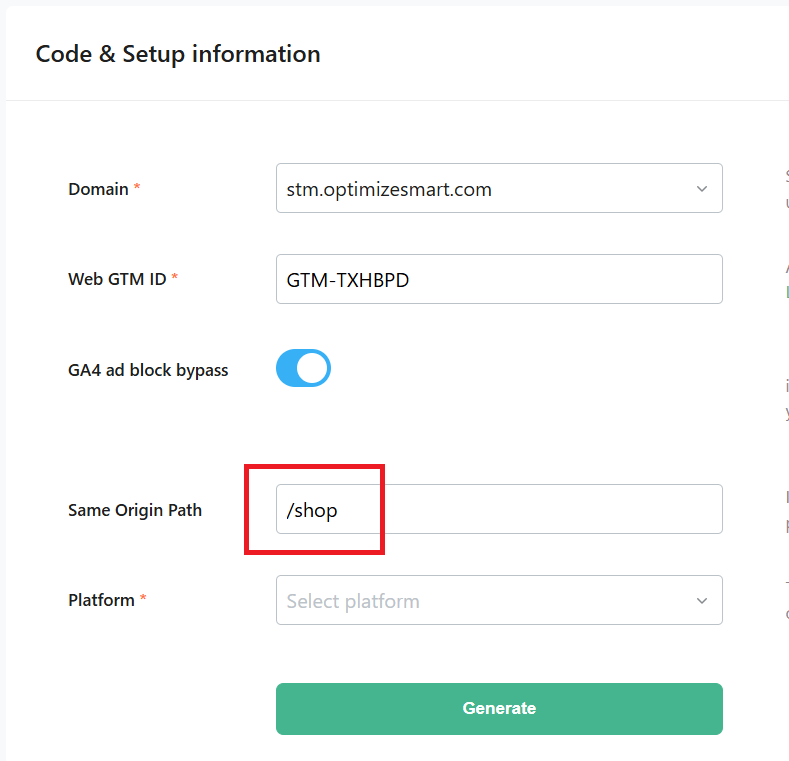
#37 Enter the name of your tagging subfolder next to ‘Same Origin Path’:
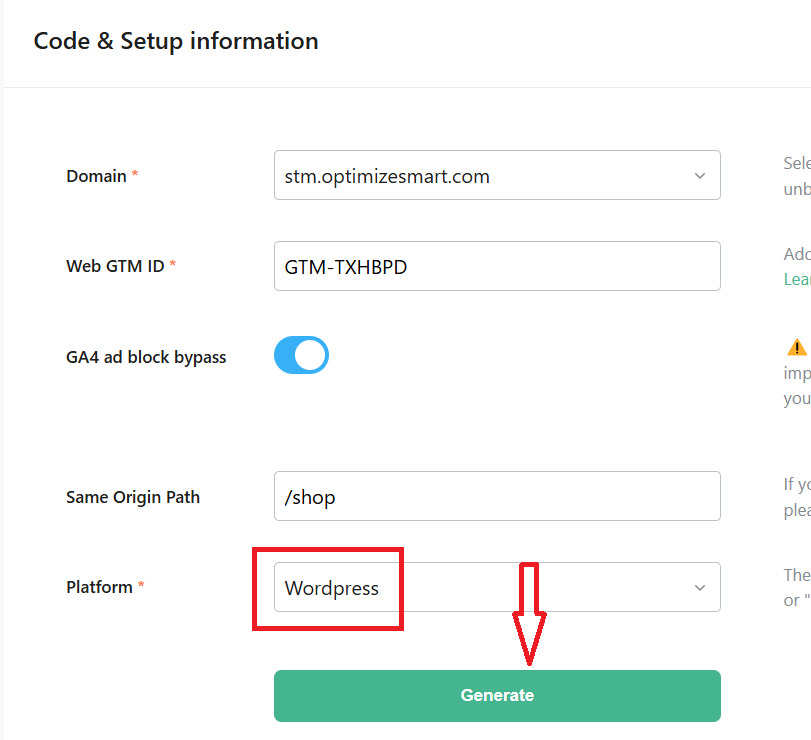
#38 Select your website platform (in my case, it is ‘wordpress’) and then click on the ‘Generate’ button:
You should now see a similar screen which ask you for app installation:
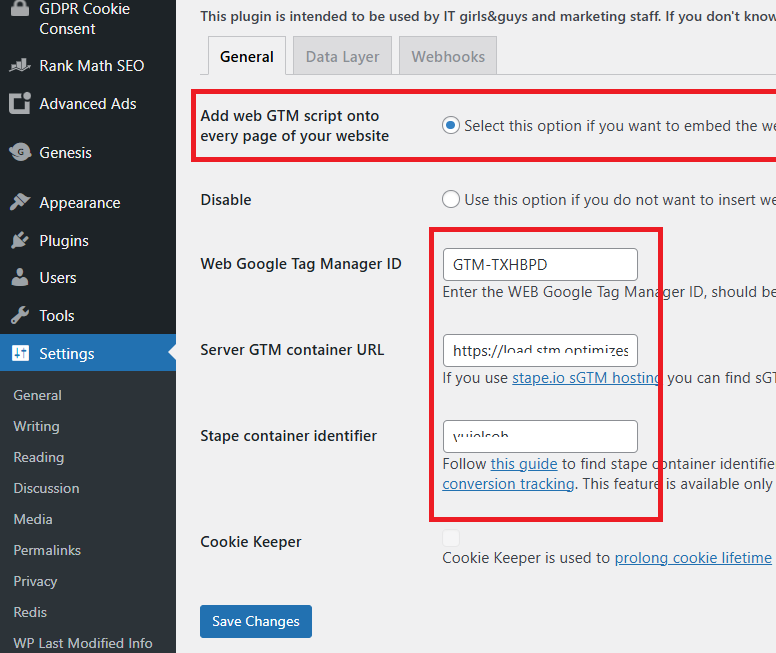
#39 Download the ‘GTM Server Side By Stape’ wordpress plugin, upload it to your website and then activate it.
#40 Edit the setting of the plugin, configure the following settings and click on ‘Save Changes’:
#41 Test whether your custom loader is working correctly by following the steps below:
41.1 Navigate to a page on your website and open developer console.
41.2 Click on the networks tab and reload the web page.
41.3 Search for your tagging subdomain (like stm.optimizesmart.com) and then click on the GTM request URL. Your request URL should start from something like: load.stm.optimizesmart.com
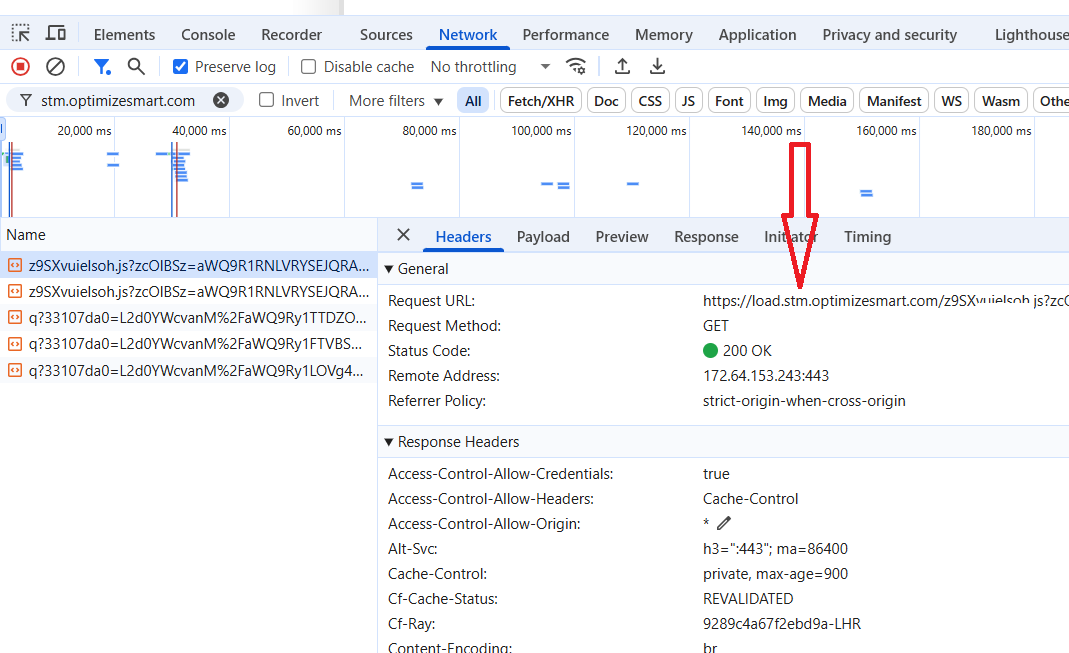
You should see the GTM request URL and status Code 200 OK if your set-up is correct.
Other Articles on GA4.
- Tracking New, Qualified and Converted Leads in GA4.
- Free GA4 training and tutorial with Certification.
- Understanding GA4 Ecommerce Reports (Monetization Reports).
- GA4 Ecommerce Tracking via GTM: Step-by-Step Setup Guide.
- How to see UTM parameters in GA4 (Google Analytics 4).
- GA4 UTM parameters not working? Here is how to fix it.
- How To Use UTM parameters in GA4 (Campaign Tracking).
- How to track AI traffic in GA4.
- Understanding Google Analytics 4 cookies – _ga cookie.
- GA4 (Google Analytics 4) Measurement Protocol Tutorial.
- GA4 Unassigned Traffic: Causes and How to Fix it Fast.
- GA4 Regex (Regular Expressions) Tutorial.
- GA4 Direct Traffic Spike: Common Causes and How to Fix Them.
- gtag.js – Google Tag in Google Analytics 4 and beyond.
- GA4 Scopes – User, Session, Event & Item scopes.
- GA4 Conversion Tracking (Key Events) Tutorial.
- GA4 (not set) - Guide to fixing (not set) issue.
- GA4 Certification Exam: Questions, Answers for Skillshop (GAIQ).
- GA4 User Properties (User Scoped Custom Dimensions) – Tutorial.
- Tracking Organic Traffic in GA4 - Complete Guide.
- Tracking Events in GA4 (Google Analytics 4).
- GTM Server Side Tagging - Setup Guide.
- Using Subfolder for GTM Server Side Tagging (Same Origin Tracking).
- Understanding Event Parameters in Google Analytics 4 (GA4).
- How to Uninstall GTM Server Side Tagging.
- How to remove (other) in GA4 reports and avoid Cardinality.
- Creating GA4 Assistant via Claude for your customers.
- How To Set Up User ID in GA4 - Cross Device Tracking.
- GA4 Mobile App Tracking - Firebase Integration.
- How to use DebugView report in Google Analytics 4 (GA4).
- How to Track Phone Calls in Google Analytics 4.