

What are Custom Metrics in Google Analytics 4
Custom metrics are user-defined metrics.
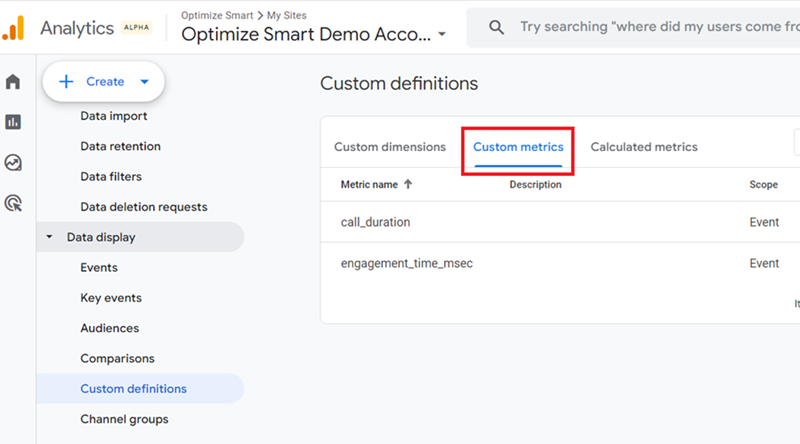
Technically speaking, a custom metric is an event parameter. This parameter can be an automatically collected parameter or a custom parameter.
When to create a Custom Metric in Google Analytics 4
Create and use custom metrics when you want to measure the characteristics of a dimension (whether default or custom dimension) that cannot be measured by any default metric.
Example:
Let us suppose you have defined the users who called your business for the first time by a custom dimension named ‘first_time_caller’ in GA4:
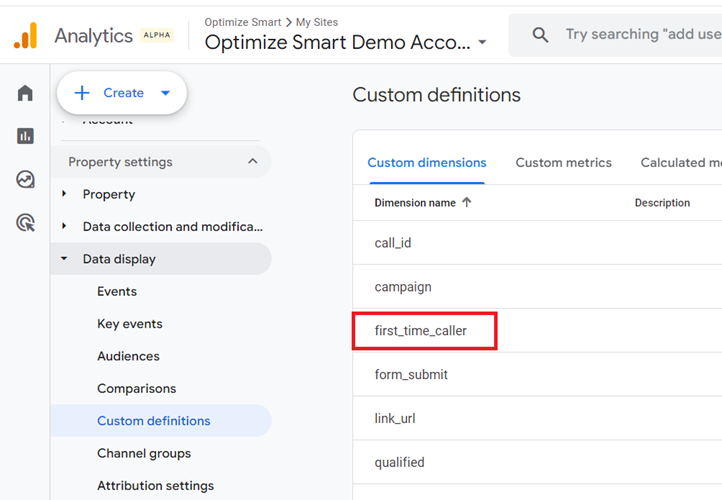
One of the characteristics of the dimension ‘first_time_caller’ could be ‘call duration’.
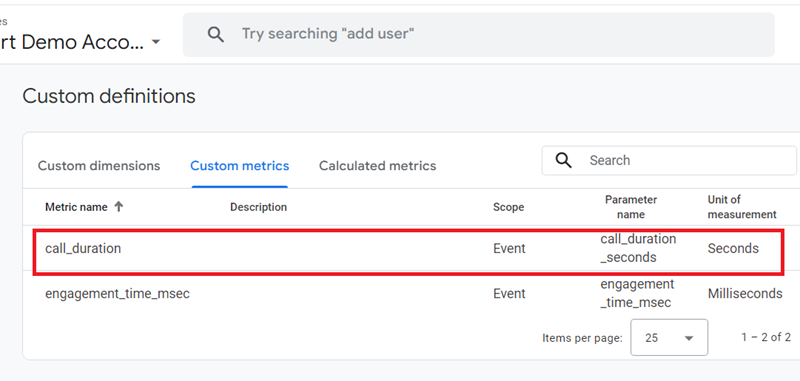
You can measure the call duration by creating and using a custom metric named ‘call_duration’:
Advantages of using Google Analytics 4 custom metrics
The following are the top advantages of creating and using custom metrics in GA4:
#1 You can import custom data into GA4 property.
Through custom metrics, you can import data into your GA4 property that GA4 does not automatically collect, such as product ratings, cost of goods sold, article word count, net promoter score, CRM data (like customer lifetime value), phone call data (like phone call duration), etc.
Note: Do not send personally identifiable information (like phone number, social security number, bank account number, etc) to your GA4 property as the value of a custom metric. This is against the Google Analytics terms of service.
#2 Correlate custom data with GA4 data.
Through custom metrics, you can correlate non-Google Analytics data (such as CRM data, phone call data, imported user data, etc.) with GA4 data.
#3 Enhance GA4 reporting capabilities.
Custom metrics enhance reporting capabilities by allowing you to capture additional data points specific to your unique business needs.
For example, if you want to improve customer support, you can create a custom metric for ‘support ticket resolution time’ to identify areas for improvement.
Every business is unique, and cookie-cutter reports do not always suffice. Custom metrics let you tailor reports to your specific needs.
#4 Enriche existing event reports.
Your event report adds a new data card for every logged event parameter you registered as a custom metric.
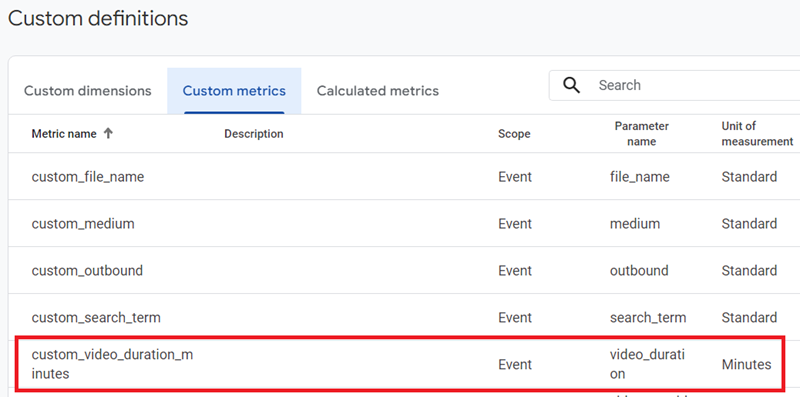
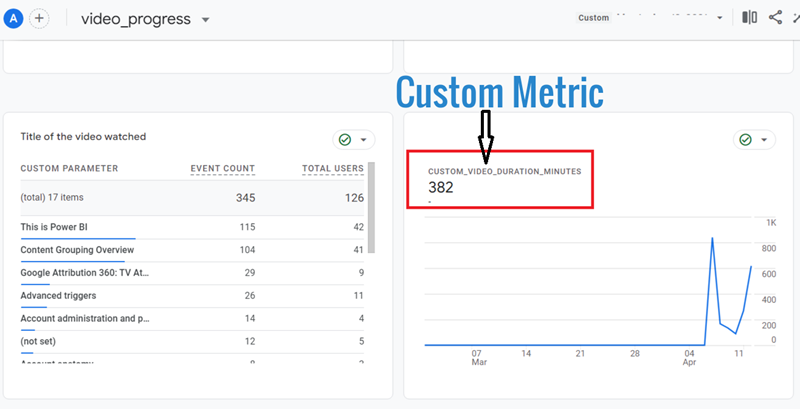
This data card appears in every event report where you (or GA4) are passing the same event parameter along with the event.
Thus, the use of custom metrics enriches your existing event reports.
#5 Report on the same event parameter for as many events as you like.
The key advantage of using a custom metric is that it allows you to report on the same event parameter across multiple events without the need to pass the same parameter repeatedly for each event.
This can streamline your data collection and reporting processes in GA4, making it easier to analyze and compare data points across various events.
Overview of creating a Custom Metric in Google Analytics 4
In GA4, creating a custom metric involves the following two steps:
- Sending an event parameter along with an event.
- Registering the logged event parameter as a custom metric in the GA4 user interface.
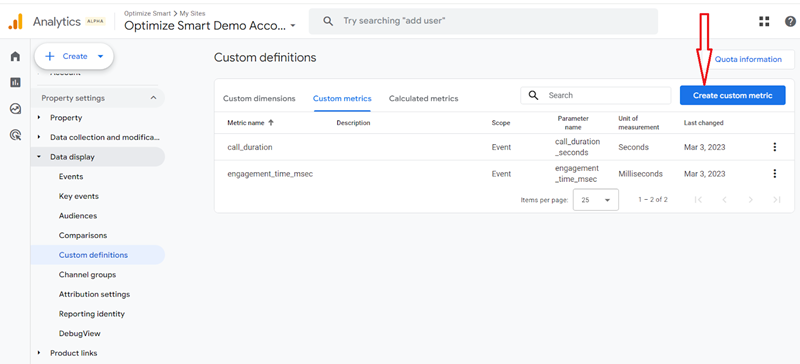
Of course, this is just an overview.
The actual steps depend upon your tracking requirements.
Importance of logged event parameter
In GA4, the values of custom metrics are supplied by logged event parameters.
So, before you create a custom metric, you would need a logged event parameter in your GA4 property.
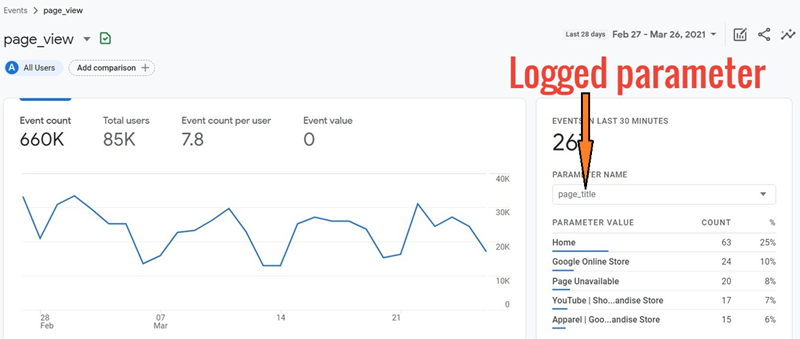
A logged event parameter is one that is already being tracked and reported by your GA4 property.
For example, the ‘page_title’ parameter is a logged parameter:
Note: You can also create a custom metric without a logged event parameter, but this is not considered good practice as it can lead to (not set) issues.
How to edit a custom metric in Google Analytics 4
Follow the steps below to edit a custom metric in your GA4 property:
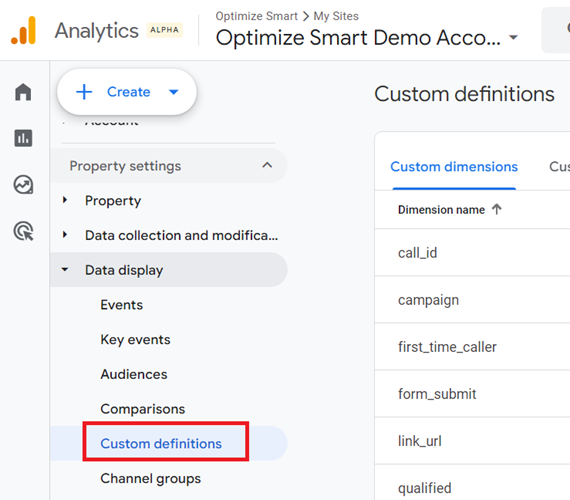
Step-1: Navigate to your GA4 admin area and then click on ‘Custom definitions’ under ‘Data display’:
Step-2: Click on the ‘Custom Metrics’ tab:
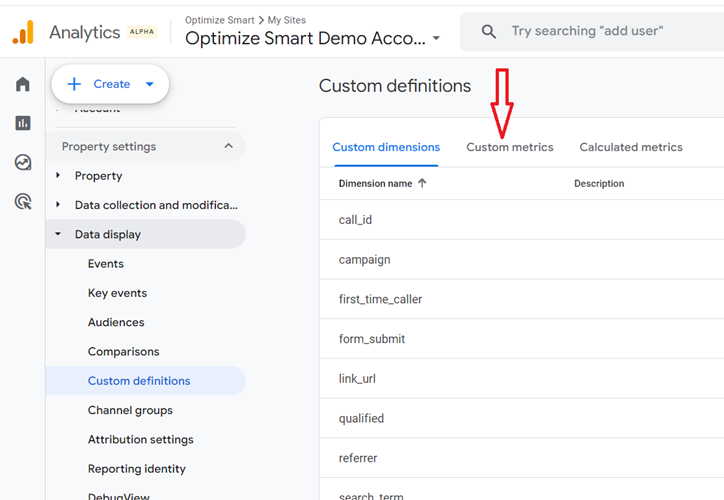
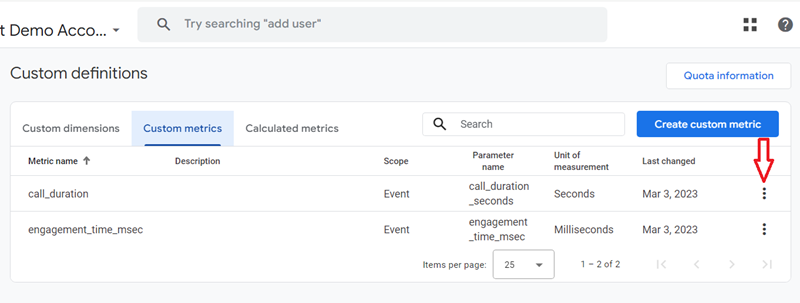
Step-3: Click on the three dots menu next to the custom metric you want to edit:
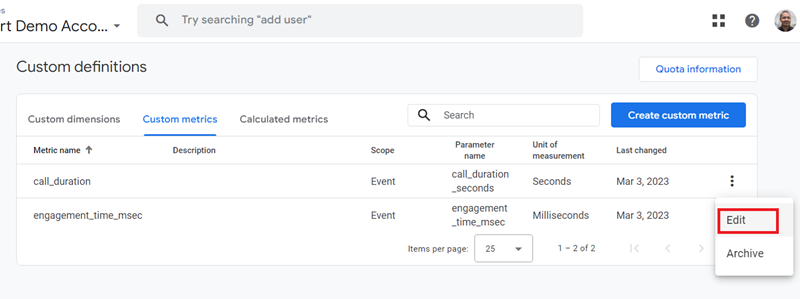
Step-4: Click on the ‘Edit‘ option:
Step-5: Change the name of your custom metric or edit its description and/or its unit of measurement. Then click on the ‘Save’ button:
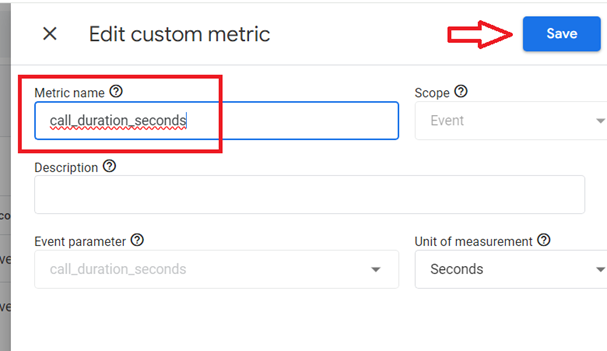
Note: When you edit a custom metric in GA4, you can not change its scope or the event parameter.
Units of measurement for custom metric
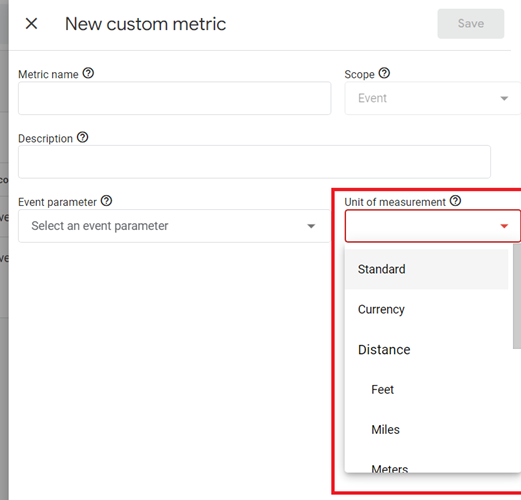
The following are the various units of measurement for a custom metric in GA4:
- Standard
- Currency
- Distance
- Feet
- Miles
- Meters
- Kilometres
- Time
- Milliseconds
- Seconds
- Minutes
- Hours
A custom metric can have only one unit of measurement at a time.
So, for example,
If you create a custom metric from the automatically collected event parameter ‘video_duration’ with ‘seconds’ as a unit of measurement, then you can not create another custom metric from the same event parameter ‘video_duration’ but this time with ‘minutes’ as a unit of measurement.
Quota information for Custom Metrics
In GA4, you can create up to 50 event-scoped custom metrics per property for standard accounts and up to 125 event-scoped custom metrics per property for GA4 360 accounts.
The table below summarises the quota limit for custom metrics:

That’s the custom metrics quota allocated to you.
If you want to know the total number of event-scoped custom metrics you have already created and the number of metrics you are still allowed to create, you can get this information through GA4’s ‘Quota information’ feature.
Follow the steps below to find the quota information:
Step-1: Navigate to your GA4 admin area and then click on ‘Custom definitions’ under ‘Data display’:
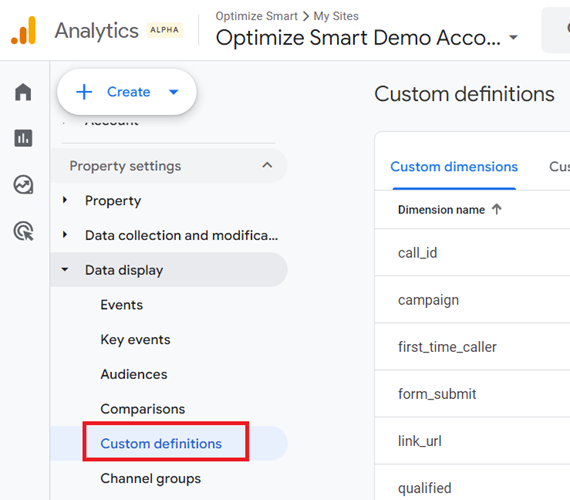
Step-2: Click on the ‘Quota information’ button on the top right-hand side of your screen:
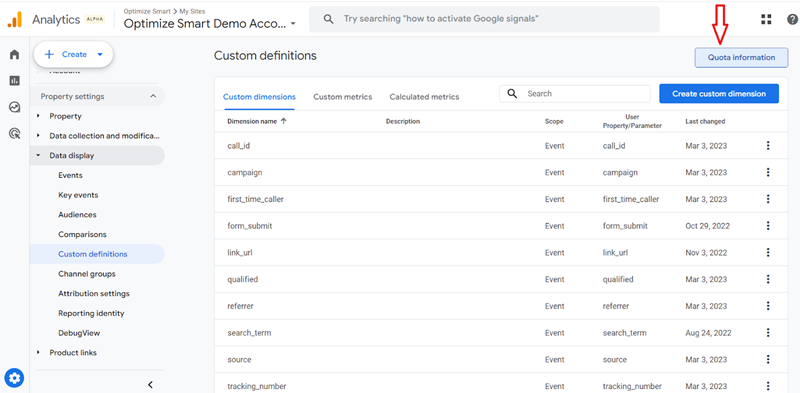
You should now be able to see the total number of event-scoped custom metrics you have already created and the number of metrics you are still allowed to create:
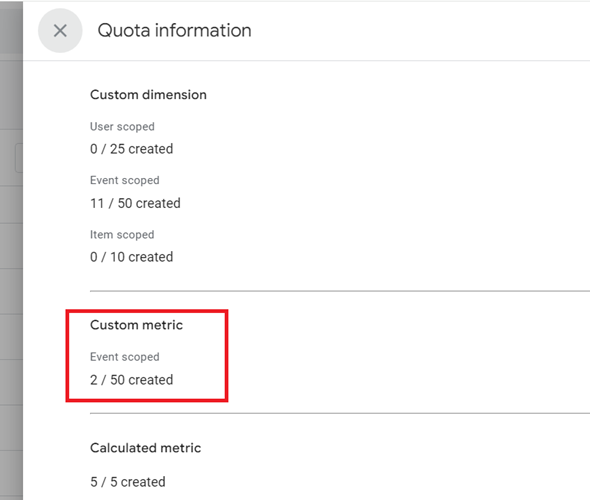
From the screenshot above, we can conclude that we have created two event-scoped custom metrics out of 50.
Therefore, 48 (50 minus 2) event-scoped custom metrics are still available to us.
How to delete a Custom Metric
In GA4, you can create up to 50 event-scoped custom metrics per property.
However, once you have reached your custom metrics quota, you can no longer create any new custom metrics.
In that case, if you still want to create new custom metrics, you would need to delete the ones you are no longer using.
Follow the steps below to delete a custom metric:
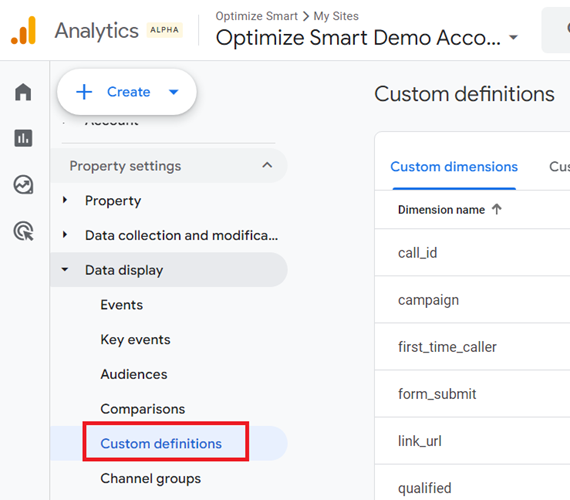
Step-1: Navigate to your GA4 admin area and then click on ‘Custom definitions’ under ‘Data display’:
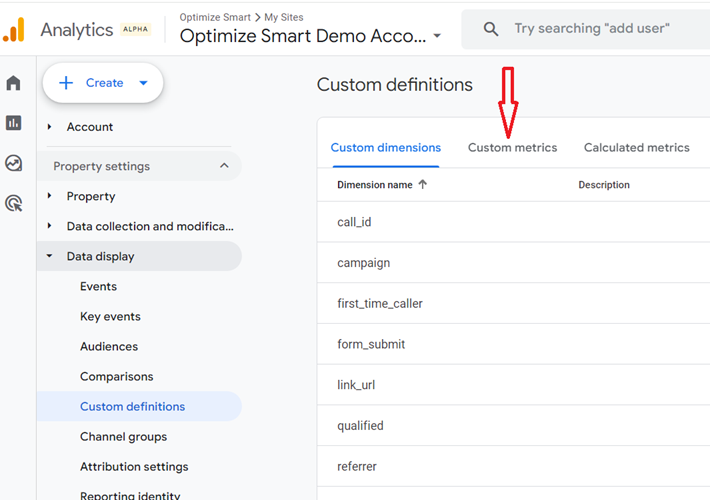
Step-2: Click on the ‘Custom metrics‘ tab:
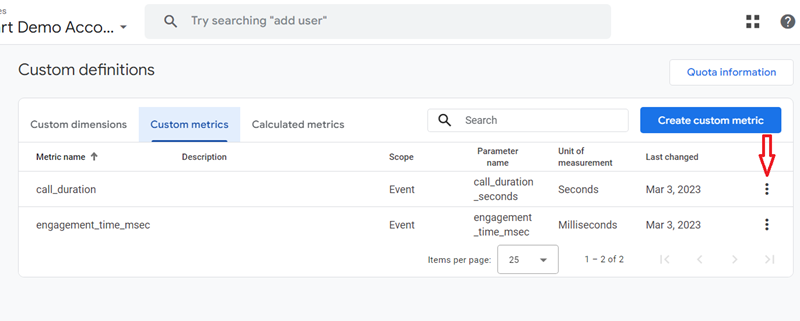
Step-3: Click on the three dots menu next to the custom metric you want to delete:
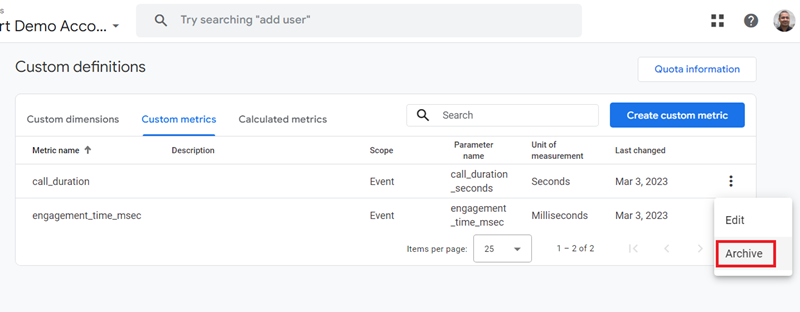
Step-4: Click on the ‘Archive‘ option:
Step-5: Click on the ‘Archive‘ button:
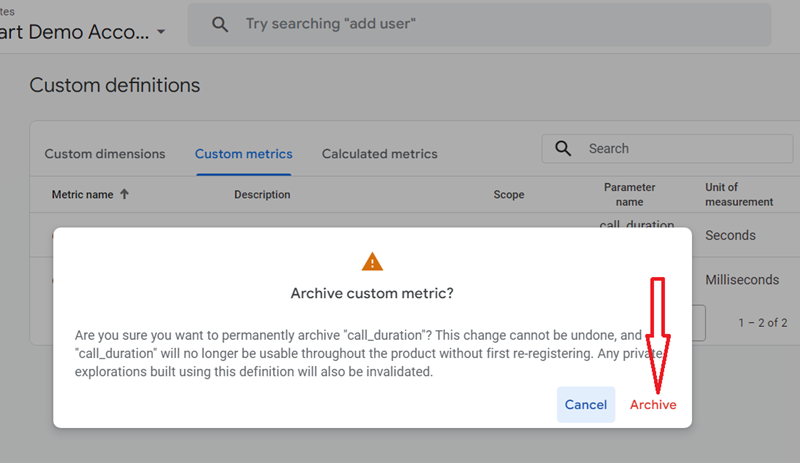
Note: Archiving a custom metric is permanent. It can not be undone, and the corresponding event parameter will no longer be usable without first re-registering. Any explorations built using this custom metric will also be invalidated.
GA4 event-scoped custom metrics
The event-scoped custom metrics are user-defined metrics with an ‘event’ scope. Event-scope means the value of the custom metric is calculated and sent for each event.
Note: In GA4, custom metrics can have only one scope and that is event scope.
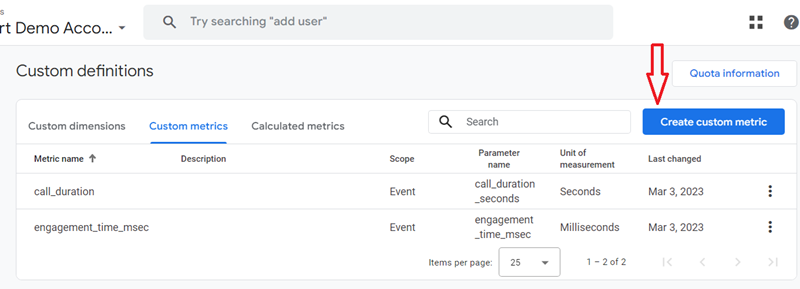
You can create an event-scoped custom metric by registering a parameter with event scope in the GA4 user interface:
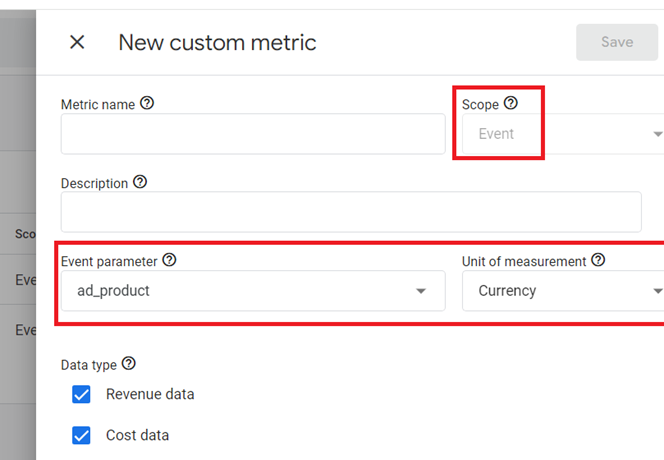
In GA4, the values of custom metrics are supplied by logged event parameters.
So, before you create an event-scoped custom metric, you need a logged event parameter in your GA4 property.
Note: You can also create a custom metric before logging the event parameter, but that is not the best practice for creating custom metrics.
When to create event-scoped custom metrics
If a built-in event-scoped metric does not capture the specific detail relevant to your business, create its corresponding custom event-scoped metric.
Example:
Let’s say you run an e-commerce website and want to track how product ratings influence purchases.
GA4 does not have a built-in event-scoped metric specifically for tracking purchases where a user viewed a product rating beforehand.
Therefore, you need to create an event-scoped custom metric to capture this detail.
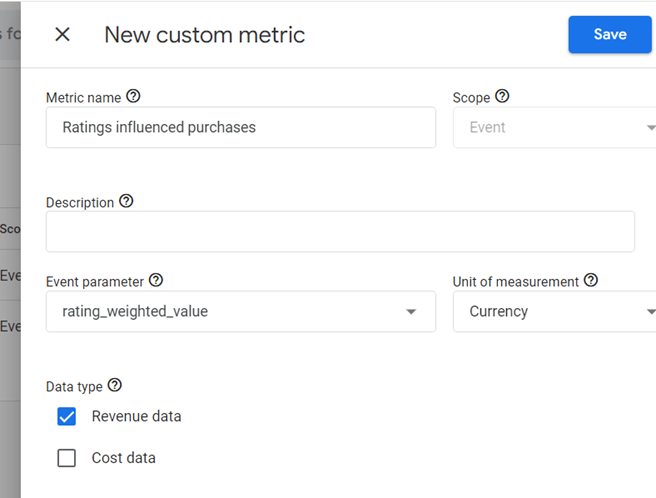
You could create a custom event-scoped metric called “Ratings influenced purchases” to capture this information.
When a purchase occurs, send a ” purchase ” event with a custom parameter “rating_weighted_value”.
rating_weighted_value = purchase_amount * (product_rating / 5)
Here’s an example of how you might implement this:
Then, register the event parameter “rating_weighted_value” as a custom metric:
How to create event-scoped custom metric via automatically tracked parameter
Let us suppose you want to register the automatically collected parameter ‘video_duration’ as an event-scoped custom metric.
To do that, follow the steps below:
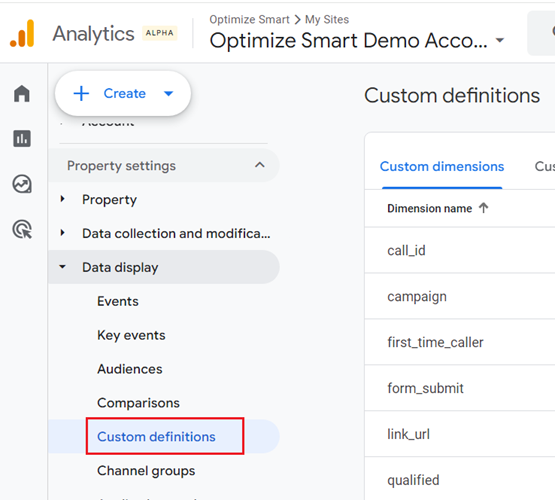
Step-1: Navigate to the admin area of your GA4 property and then click on the ‘Custom Definitions‘ link under ‘Data Display’:
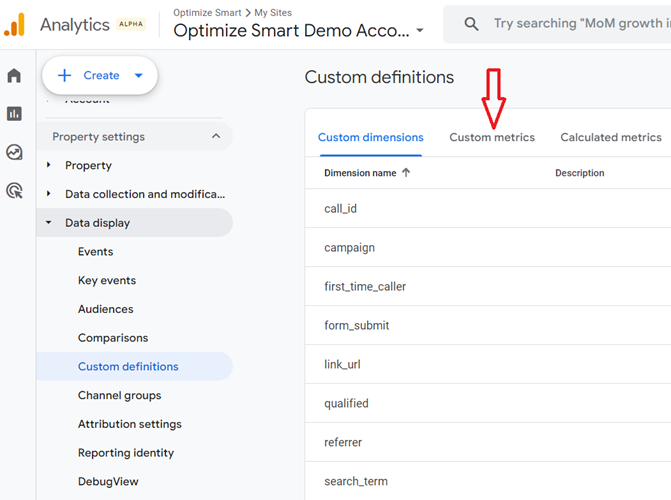
Step-2: Click on the ‘Custom metrics’ tab:
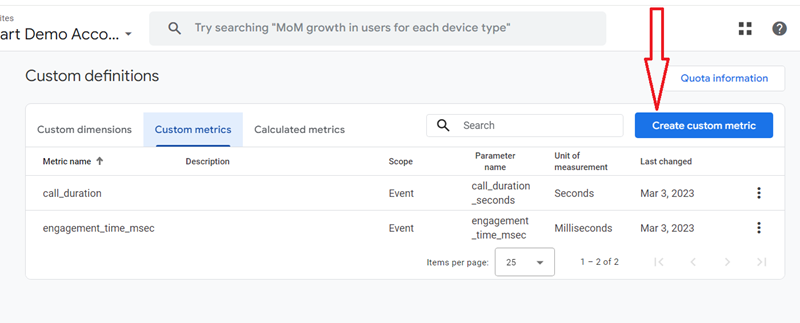
Step-3: Click on the ‘Create custom metric‘ button:
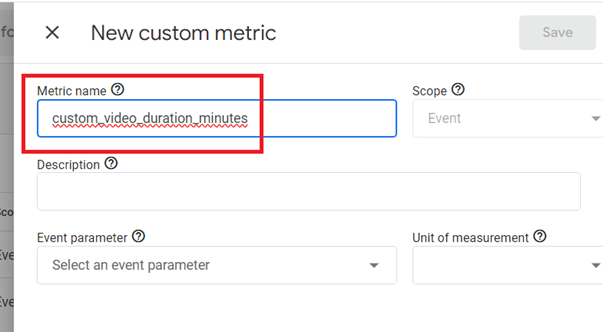
Step-4: Enter a name for your custom metric. This name will appear in your GA4 reports, so use a descriptive name:
Note: You can always change the metric name later if you want.
Step-5: Enter a description for your metric in the ‘Description‘ field (optional):
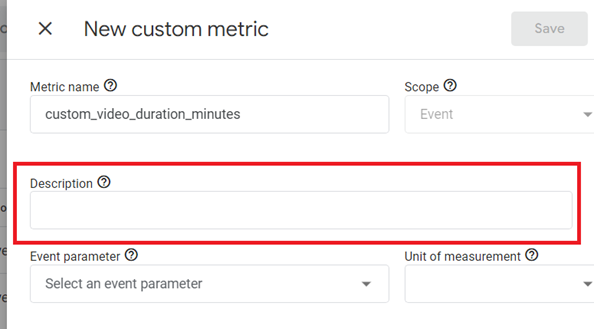
The description could be particularly useful if your metric name is not very descriptive.
Step-6: Select the event parameter ‘video_duration‘ from the drop-down menu:
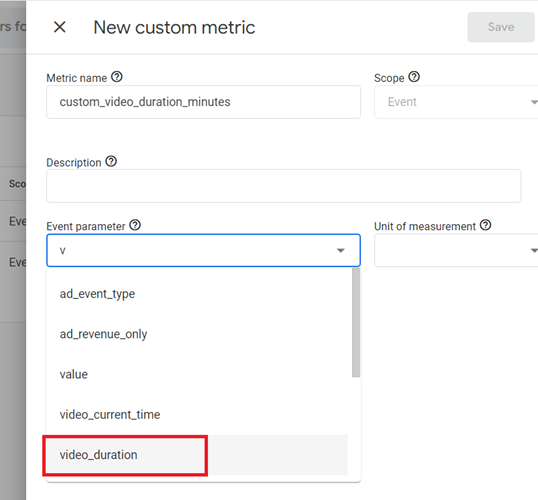
The event parameter ‘video_duration’ supplies the value to your custom metric.
Note: Once you have selected an event parameter, you cannot change it later.
Step-7: Select ‘Minutes’ as the unit of measurement from the drop-down menu and then click on the ‘Save’ button:
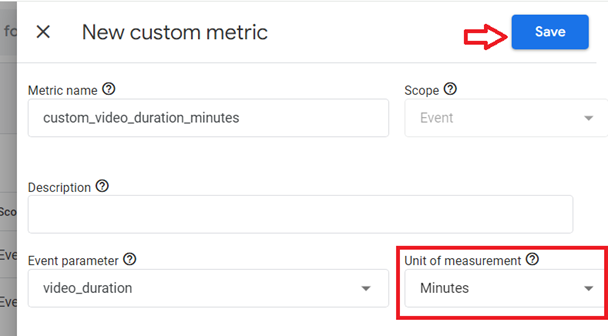
Note: You can always change the unit of measurement later if you want.
You should now see your new custom metric listed under the ‘Custom metrics’ tab:
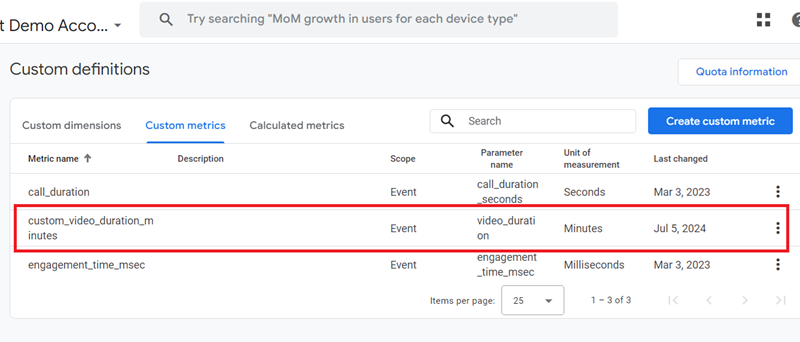
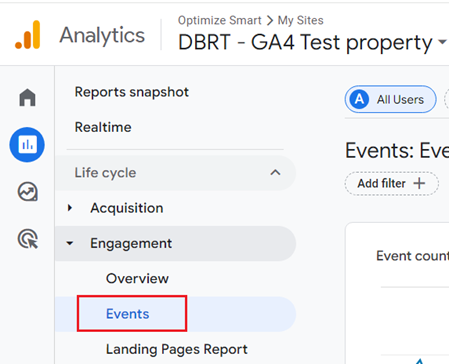
Step-8: Wait for a full 24 hrs and then navigate to the ‘Events‘ report (under ‘Reports’ > ‘Engagement’) in your GA4 property:
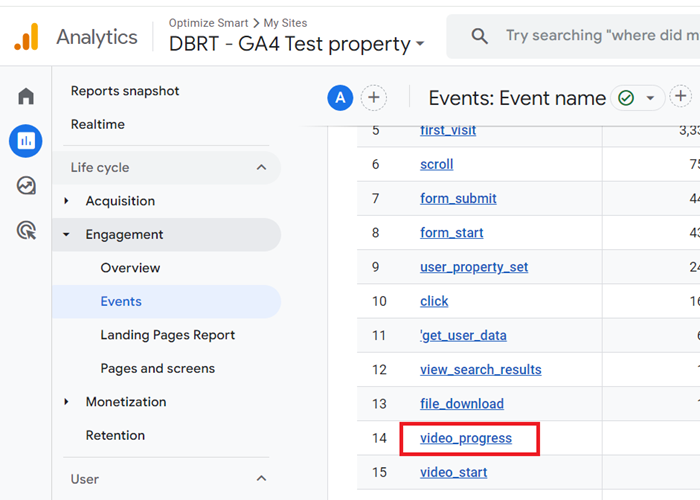
Step-9: Find and click on the ‘video_progress‘ event:
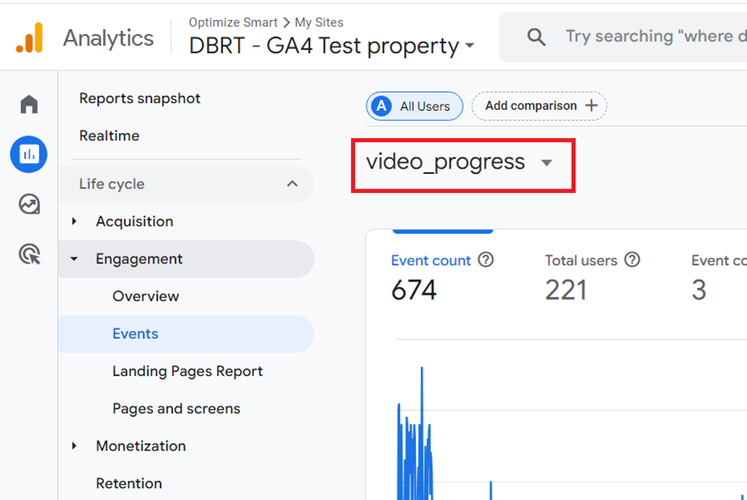
You should now see the report on the ‘video_progress’ event:
Step-10: Scroll down the ‘video_progress‘ event report until you see the data card named ‘CUSTOM_VIDEO_DURATION_MINUTES’:
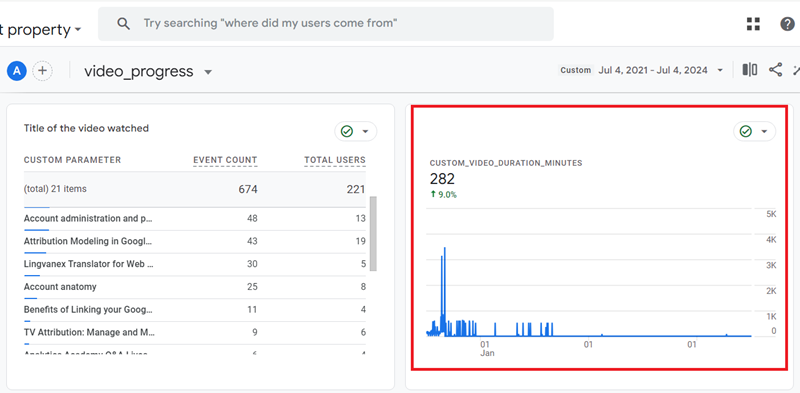
You see this data card in the ‘video_progress’ event report only because you registered the ‘video_duration’ parameter as a custom metric. Otherwise, you won’t see this data card.
This data card will appear in every event report where you (or GA4) are passing the ‘video_duration’ parameter along with the event. This is one advantage of registering a parameter as a custom metric.
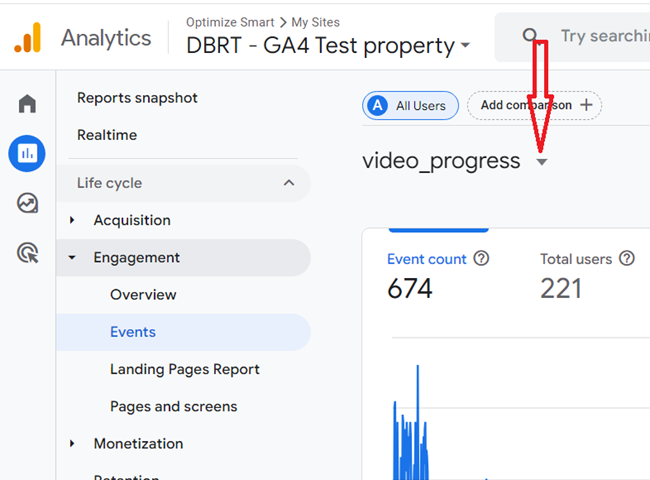
Step-11: Click on the events drop-down menu at the top:
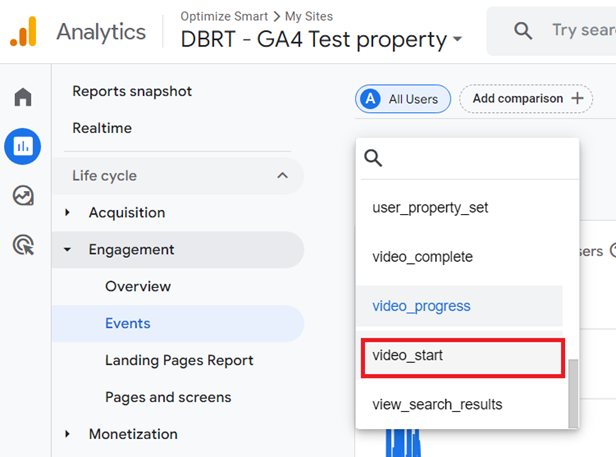
Step-12: Find and click on the ‘video_start‘ event:
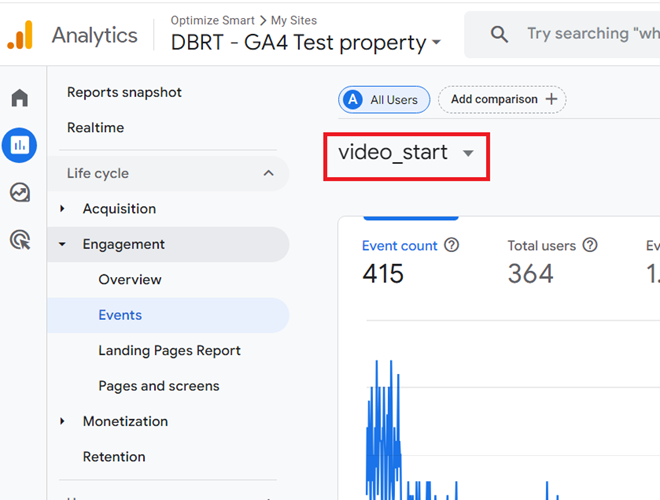
You should now see the report on the ‘video_start’ event:
Step-13:Scroll down the ‘video_start’ event report until you see the data card named ‘CUSTOM_VIDEO_DURATION_MINUTES‘:
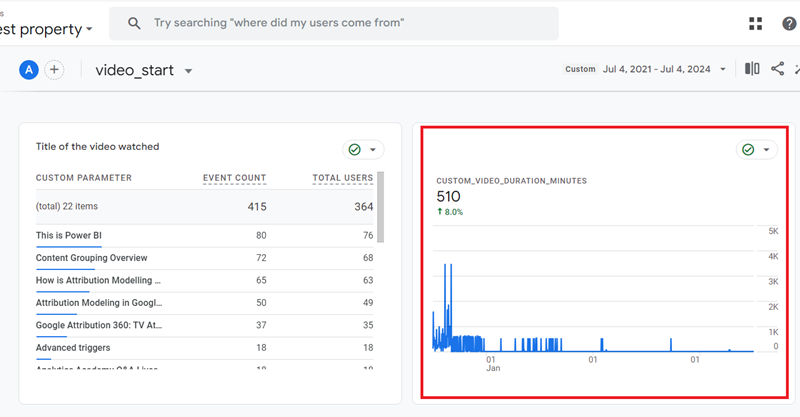
Again, this data card appears in the ‘video_start’ event report only because you registered the ‘video_duration’ parameter as a custom metric. Otherwise, it doesn’t appear.
How to create event-scoped custom metric via custom parameter
The entire process of creating an event-scoped custom metric via a custom parameter is similar to the process of creating an event-scoped custom metric via automatically collected parameters.
Instead of selecting the automatically collected parameter, you select the logged custom parameter from the ‘Event Parameter’ drop-down menu:
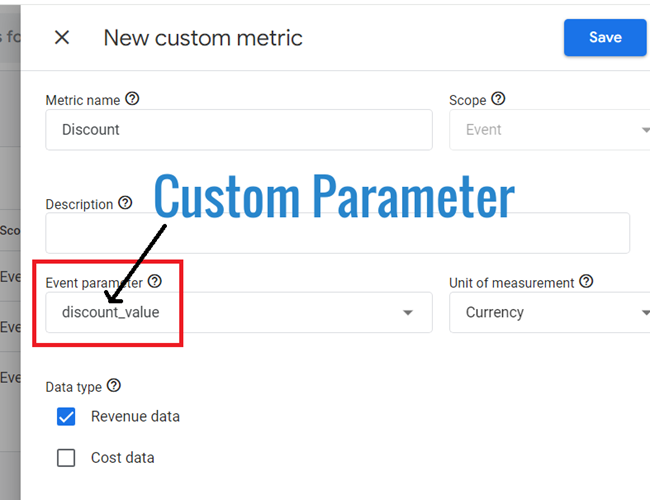
Here, ‘discount_value’ is a logged custom parameter which is sent along with the ‘purchase’ event.
Note(1): A custom parameter registered as a custom metric appears as a data card in every event report where you (or GA4) are passing the custom parameter along with the event.
Note(2): Once you have registered a logged event parameter as an event-scoped custom metric, you can then add the custom metric to an exploration report in GA4.
GA4 treats all values of custom metrics as numbers
In GA4, the values of all custom metrics are stored and processed as numbers, even if the original data you are sending is a number, date, boolean, or any other data type.
Because all values are treated as numbers, this can affect how data is sorted or analyzed in GA4 reports.
Note: There is no direct way to force GA4 to treat numerical values of a custom metric as strings or any other data type.
This can be a limitation when working with custom metrics representing non-numeric data like categories or codes.
When tracking non-numeric data like categories or codes, it is recommended to use custom dimensions instead of custom metrics.
This is because Custom dimensions can handle text and categorical data, allowing for more appropriate analysis and reporting.

Other Articles on GA4.
- How to export GA4 data to Google Sheets for free.
- Top Google Analytics 4 Tools, add-ons and resources.
- Google Analytics 4 Audiences Tutorial.
- Understanding Automated Insights in Google Analytics 4 (GA4).
- How to build Comparisons in Google Analytics 4 (GA4).
- How to create a remarketing audience in Google Analytics 4 (GA4).
- Advanced Google Analytics Tracking – HTML DOM – Tutorial.
- Google Analytics 4 Migration Checklist - Upgrade to GA4.
- How to Install Google Analytics 4 on Shopify.
- How to link Google Analytics 4 with AdSense.
- Google Analytics 4 Subproperties Tutorial.
- How to connect Google Analytics 4 with Google Data Studio.
- Advertising Snapshot in Google Analytics 4 (GA4).
- Manage automatic event detection in Google Analytics 4.
- How to use Google Analytics 4 Event Builder.
- Is Safari Undermining Your GTM Server-Side Tagging?
- Guide to Google First Party Mode.
- You Can’t Really Trust Google Analytics 4 Engagement Metrics.
- Google Analytics 4 Metrics Tutorial.
- Google Analytics 4 Custom Metrics Tutorial.